Search This Blog

Wednesday 26 July 2017

Crochet Heroes- Edie Eckman

I've already mentioned this lady, and I've already told you to rush out and get a copy of The Crochet Answers Book! You can also find her on her web site edieeckman.com which is well worth doing.

Edie is a born teacher, not in a ruler on the knuckles type way, and she never talks down to you, but you just can't help learning from her. She has online classes and you'll find her on Craftsy. She's written plenty of books which you can find more about here. Yes I've got a few well thumbed copies of them! But you'll learn plenty on her web site too.

Every now and again she does a mini CAL or challenge. Here's my attempt at her Xmas stocking CAL. 
 
 
 And here is my stack of experiments from her Motif Challenge.Who knew I was that good at experimenting! Take a simple motif and experiment with it. 


My favourite two are the painted crochet version and the overlay crochet version.

Crochet Tips: Needle Join and Weave in Ends.

Needle Joining

Tatsianna Kupryianchyk (LillaBjorn) taught me to Needle Join and I have to own up, it was only in the last pattern I made that I truly understood what I was doing! 

 A Needle join is used when working in rounds. These instructions apply to rounds which have begun with chain stitches. This illustration uses treble stitches and I have begun the round with 3 chain stitches to stand for the first Treble. Obviously the technique applies to other size stitches as well!

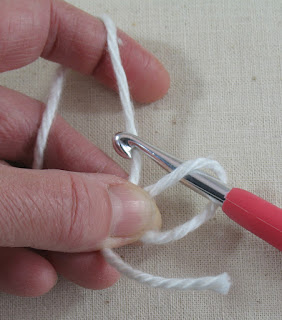
In the first image we are have got to the end of the round and still have the working loop on the hook. 
Cut the yarn leaving yourself a generous 10cm / 4" tail. Pull the yarn end up out of the top of the last stitch made.
Although this is called a Needle Join there is no need to use a needle! You can if you wish, after all you've got to weave in the end at some point! Insert your hook (or needle!) under the loops of the first Treble Stitch, catch the yarn and pull through. It doesn't matter whether you go front to back or vice versa.
Catch the yarn and pull through. Now put the hook up through the top of the last stitch made, from the back, and out over the front loop, catch the yarn and pull back through.
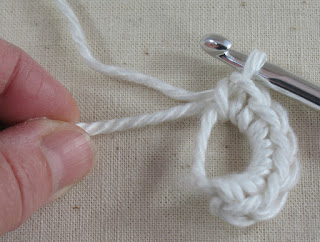
 You can see from our final image how the needle join has made the chain stitches look more like a proper stitch. The chain stitches have become the post of the stitch and the join has become the loop. Joining rounds in this way is much neater than a slip stitch join and there is no danger of our adding an extra stitch on the next round.
In a future post I will be talking about Standing stitches. If you have started with a Standing stitch rather than Chain stitches, if you join into the top of the first Stitch you will be creating an extra stitch.
Instead join into the second stitch so that the loop forms over the top of the first stitch.
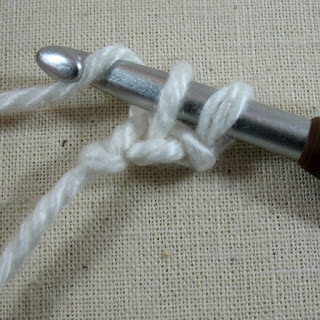
 Join into the second stitch,
 over the top of the initial stitch.

Weaving in Ends

I just wanted to add a note about weaving in ends. It's one of those things that is taken for granted that you understand but no one explains. No one that is except Edie Eckman! It wasn't until I read her 'Crochet Answers' book that I realised I'd been doing it wrong. I used to merely crochet over my yarn ends at the start, and thread them back through behind the stitches at the end. But this meant that there was a danger of them popping out when the cloth was stretched. There is no one way to weave in ends as it depends on the project, lacy work requires a little more ingenuity! But the important thing is that the yarn should go in more than one direction, diagonally if possible. I find it helpful to give the cloth a little tug before clipping my end to give it some slack.

Crochet Tips: Magic Ring

Here's a photo tutorial about Magic Rings, sometimes referred to as Slip Rings or Sliding Loops or adjustable rings.
When working in the round, it's always hard to get the correct number of chain stitches so that the circle isn't too loose. Sometimes the first round is begone by making two chain stitches and then continuing by working in the first chain made. Instead of beginning with chain stitches you can use this technique. 


Make a loop as shown and hold in the left hand.
 Insert the hook into the ring, catch the working yarn and pull up a loop.
Make a chain stitch, (for double crochet, or 3 chain for treble crochet) the chain stitches usually count as the first stitch.
Now make the required no of stitches in the ring.
 To tighten the ring, take hold of the tail and pull gently.
 To join the ring slip stitch to the first chain stitch or needle join to the first double crochet. We will talk about Needle joining in the next post.

There is another technique sometimes referred to as a Sliding Loop or Double Ring, where the tail is wrapped twice around the finger before the first chain stitch is made. I have not mastered this technique, every time I try I end up very frustrated and I can't see why it is an improvement on the first method! If you know different please shout up!

To be honest the thing I hate about blogging is the one way conversation. So if you are popping by please shout up and say Hello!
Bye for now! Rach

Crochet Tips: Foundation Treble Crochet.

Continuing the photo tutorial of foundation stitches let us now look at Treble foundation stitches.

With a slip stitch on the hook, chain 4.
Yarn over the hook, insert hook in the stitch furthest from the hook.
Yarn over and pull up a loop.
Yarn over and pull through first loop only. (Chain St made)
Yarn over and pull through first two loops only, (Once)
Yarn over and pull through last two loops, (Twice) First Treble Made.
*Yarn over and insert hook as indicated.
 Yarn over and pull up a loop. (Loop)
Yarn over and pull through first loop only. (Chain made)
Yarn over and pull through first two loops only. (Once)
Yarn over and pull through last two loops.** (Treble made)
Repeat from * to ** for each Treble required.
Ta Dah!
All those yarn overs and pull throughs can become quite hypnotic so if like me you get confused about how far you've got try chant something like "Loop, Chain, Once, Treble".
I hope you find this as freeing as I do, it helps me to get a much more even tension on my first row.
In the next post we'll look at magic rings, so that we can almost get rid of those pesky chain stitches altogether!
Rach


Tuesday 25 July 2017

Crochet tips: Foundation Stitches

Crochet tips: Foundation Stitches.

How do you get on with those chains stitches at the start of everything you make? Do you never seem to have the right number, no matter how many times you count? Do you crochet them too loosely or too tightly? And do you really, really hate crocheting into those stitches?
Well you're not on your own! I first heard about foundation stitches from Tamara Kelly on Moogly. Since then I've found them to be invaluable. 

There are two ways to go about it. So have a go at both of these and go with the one you like best!


Foundation Double Crochet Version 1

   With a slip stitch on your hook,
 chain 2


Double crochet into the chain furthest from the hook.


* Placing the hook under the side loop of the double crochet you've just made, as shown...
 
... pull up a loop...
 

... and make your second double crochet.**
 
Repeat from* to** for each double crochet required.
 
Ta Dah!
You'll notice that this method leaves you with a single loop under each double crochet stitch just as if you had worked into a row of chain stitches.


Foundation Double Crochet Version 2

 With a slip stitch on your hook, chain2,
 

place the hook into the chain furthest from the hook and pull up a loop.


Yarn over and pull through the first loop only.
 
You have just made the first chain stitch.
 
Yarn over again and pull through both loops.
 You have just made the first double crochet.
 * Place the hook into the chain stitch you've just made...
 
 ...yarn over and pull up a loop... (Loop)


...yarn over and pull through first loop only... (Chain)

...yarn over and pull through both loops.** (DC)


 Repeat from* to ** for each double crochet required.
 Ta Dah!


(I like to chant LOOP, CHAIN, DOUBLE CROCHET, with each yarn over and pull through as I am a bear of very little brain and get easily confused!!)
You'll notice that this method leaves you with a pair of loops under each double crochet stitch. This gives a firm foundation to the row especially if you are going to work back into the stitches.

I will demonstrate Foundation Treble crochet in the next post.
Rach.