

Adding beads to Hairpin Lace is so transformative that I felt it deserved it's own special post. I'll begin by showing you how to add beads to any design and then give you step by step instructions to make this challenging but beautiful Berry Braid.
[Abbreviations used in this post:
Chain- Ch
Double Crochet- Dc (Sc-USA)
Right-Hand- RH
Back Left-hand Loop- BLL]
Beaded Asymmetric Braid

Last month I showed you a way of making an Asymmetric Braid which is perfect for adding a fringed edging. By loading your working yarn with beads before you begin to make the lace, you can create a beaded fringe. Simply pull up one bead as you turn the frame to form the long loops.


In this manner beading can be added to any of the braids we have made so far in this series.
Berry Braid
This
doesn't immediately look like Hairpin Lace. I found it challenging to
say the least. It introduces the idea that the Hairpin is simply a tool.
We don't have to be restricted by the very basic Hairpin Lace instructions that we are
normally offered.

This braid is best made on a closed quad frame. It's quite fiddly in the beginning and liable to fall off an open frame!
Pre load your yarn with beads. You can use any number or size of bead, but you will need an odd number per loop. There are three loops per berry. I've used 7 beads per loop.

Begin with a Slip-knot on your hook and Slip-stitch around the RH pin, Ch3, keep the working yarn to the back.

*Pull up 7 beads, placing 3 to the back and 4 to the front,
Turn the frame, catching the working yarn between pins and Ch1.

(Turn the frame, Dc in the BLL...

...Pull up 7 beads as you did before and turn the frame, Dc in the BLL)... ...repeat all between the brackets once more.


Place the hook between the chain stitches and the 2 left Loops, work 3 Dc around the 2 loops.
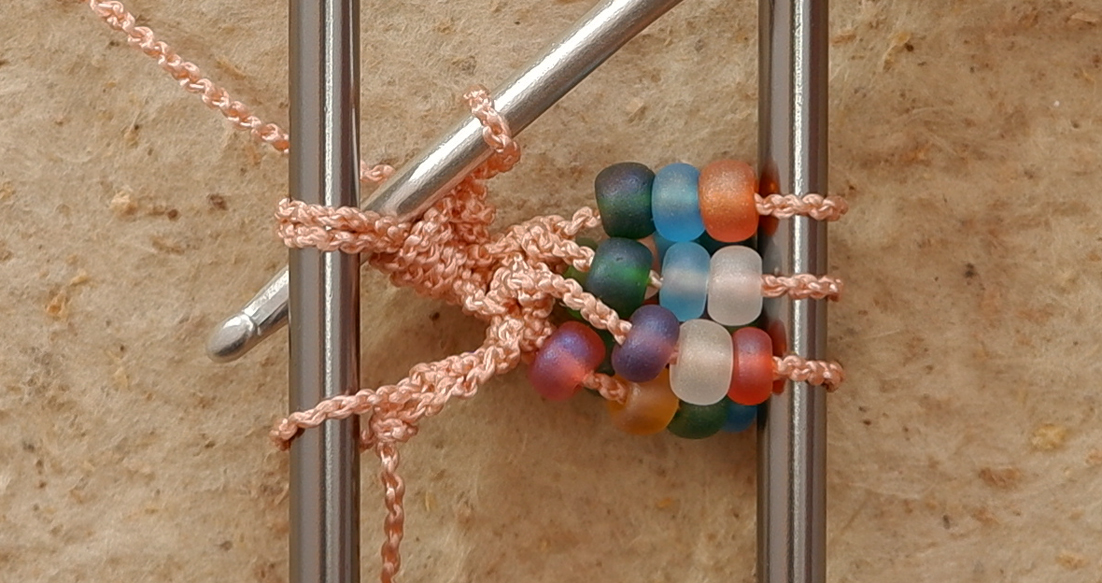
Now place the hook down between the Front and Back loops... ...and work a final Dc around the 2 back loops only.

Turn the frame, catch the yarn between the pins and Ch3.
Repeat from * to the required length.

The braid has 3 loops between each pair of berries. To finish and add an edge, catch the 3 loops together into a single Dc and 5 chain stitches in between the 3-loop groups.
Next month we'll look at ways to edge, join and use Hairpin Lace Braid. I hope you'll join me.
fastening off...
