Search This Blog

Showing posts with label Amigurumi. Show all posts

Wednesday, 12 April 2023

Adventures with Bees, Bugs and Butterflies.

This review of Vanessa Mooncie's book, Bees, bugs and Buttterflies is rather late. It's six months late in fact, thanks to the tardy service of a major British bookseller. But, let's brush off my outrage and get on with the job at hand!
    The trouble I always think with choosing crochet books is never knowing if they will be truly useful. If you are buying on line you don't get to flick through and see the contents. Let's start there.
    We are told that the book offers us ten projects, this is a little white lie. This is the good kind of little white lie because all in all there are instructions for eighteen different critters if you include all the variations on a theme.
    And is this book really useful? The only way to find out is to give it a go. As an ardent Vanessa Mooncie fan I was all ready for all her complex short rows and weird changes of direction. There are always masses of photos for every conceivable angle. Along with the stitch diagrams they help to unlock any difficulties you may encounter.
    All of the projects in this book use thread crochet of one kind or another. I decided from the outset that I would not rush out and buy any new yarns but instead work from my stash, even if I had to make a few odd choices. As you will see this decision didn't last long!
   
    I dove straight into the Praying Mantis. What truly weird creatures these are! The thought of making fiddly little stitches with a tiny1.25mm hook struck me immediately as absurd. Instead I had some Schachenmayr Catania cotton which is a 4ply yarn, along with a 2.25mm hook I had something more manageable.
And who doesn't love giant insects?! Making the parts was easy, the problems now arose from the fact I have scaled it up, what size wire do I use? Once again I just went with what I had and used the photos as a reference.
   For the next project I went with the Ladybird, because it looks fairly simple and I actually had all the ingredients for this project. Vanessa kindly allows us to use a 1.75mm hook for this project, which I thought I could manage. Note to self: do not try to crochet black thread crochet at night while watching the telly! A strong overhead daylight lamp and one of those tiny metal stitch markers is fairly essential if you do.
   Having made the tiny ladybird I decided to make a giant one with some DMC Natura yarn. The difference in scale is quite surprising, don't you think? There is a lot of colour and spot variation in the Ladybird world. So should you wish you could create an entire rainbow army of these little greenfly-eating bugs. The spots and markings are embroidered on at the end which makes this a fairly quick project.
   Feeling really confident after my successes so far, I thought to try the Christmas beetle which comes in three variants. The designs are supposed to be made In DMC Coton Perle and a Diamant Metallic thread held together. I had none of these, but began with some odds and ends that I already had. The result was unsatisfactory, I gave up and for once in my life did as instructed, I ordered the yarn! I'm so glad I did the Coton Perle is a soft and, as the name suggests, pearly thread.
    The body is made in one piece, the wings made separately and then attached afterwards.
    I don't think we have these beetles in Britain, so I thought, as it worked out well, I would have a go at creating a Sorrel beetle. Not being a big beetle fan, I find these delightful, they can be seen chomping away on dock plants here in May.   
    The bellies of the female beetles become so swollen that they can be seen beneath the wings. In order to make the abdomen larger I used two strands of the Coton Perle together. To give you an idea of the size, the eyes are just 3mm.
   The Swallowtail butterfly comes in three variants. Foolishly I chose the Zebra Swallowtail despite the fact I absolutely hate tapestry crochet. This is made in No10 crochet thread and that dastardly 1.25mm hook. I decided to give a 1.5mm hook a go instead. Now, there is gauge information for each of these projects, but this is the one time I will not make a gauge swatch. Does the author really expect me to make 10cm gauge swatches in thread crochet? I'm sure she doesn't.
    I found this challenging, to say the least. However having achieved this result I think he may end up in a box frame. I could have gone easy on myself and made the more simple blue Pinevine variation, or I could have made my own variation in solid colours. I think I may have found a mistake in the pattern, or I may just have confused myself! There are written instructions along with charts and in numerable photographs. So if like me you end up in a muddle you can easily make reference to the other details.
     While I was ordering the Cotton Perle I also bought some little balls of Kid-silk so that I could make the White tailed Bumble Bee. Although Vanessa again gives us three bee species to choose from, this one is visually my favourite even if apiarists wouldn't agree with me! This also calls for the 1.25mm hook.
I should probably, at this point, explain my problem with these smaller hooks.
It may be that a different brand of hook would work better for me but neither of the two I have work well, they both tend to split the yarn. However I thought I would give it a go with this yarn and it worked fine. Although it must be added that crocheting anything in black is done more by touch than sight! I would recommend a strong light source and if you get into problems a magnifying glass helps! The wings are supposed to be made in a stranded embroidery thread which I didn't have. I messed about with various threads but just got in a terrible muddle. In the end I went with a No10 thread so my wings are bigger and chunkier than they should be.
   Would you want to crochet a moth? They are so ugly aren't they? Not in this book. I was hard pressed to choose from the three variations but after my struggles with the tapestry crochet I went with the Ermine Moth. His black markings are embroidered on at the end.
I had more or less the right yarns except for the alpaca needed for the head, instead I used the Kid-silk again. I held it doubled and trebled to get the fat head and brushed it when completed to get the ermine effect.
   Having gained confidence with all these projects I decided to go back and have another go at the Praying Mantis. I think I made a mistake in making this project first. This time I went with a No12 crochet thread.
Crocheting him is the easy part, putting him together requires you to have  faith in Vanessa. I forgot to wire his wings, so rather than make them again, this time I starched them. I am more than thrilled with the way he has turned out.
     My favourite of all insects is the dragon fly. I'm not enamoured with the version in the book but when I compared it to the real thing I found it was very accurate. I rather suspect it is impossible for any human to truly recreate the majesty of this creature. So I left it alone. The other projects I haven't attempted are the spider, Cicada and Stag beetle. Of course my partner liked the Stag beetle best, if he learns to crochet he can make one for himself!

     Should you wish to know more information about what I made, I have recorded the information for each project on my Raverly page. I hope that I have given you an idea that these designs are fun, adaptable and as challenging as you want to make them. I will be waiting for someone to make an enormous Praying Mantis! Super-chunky perhaps?

Fastening off...


P.S.
The blog has gone out a few days early this month as thePulledStitch is moving house this month. I will endeavour to back with you again in May, but should I be late you will know why!
     

Tuesday, 17 November 2020

Crocheted Birds

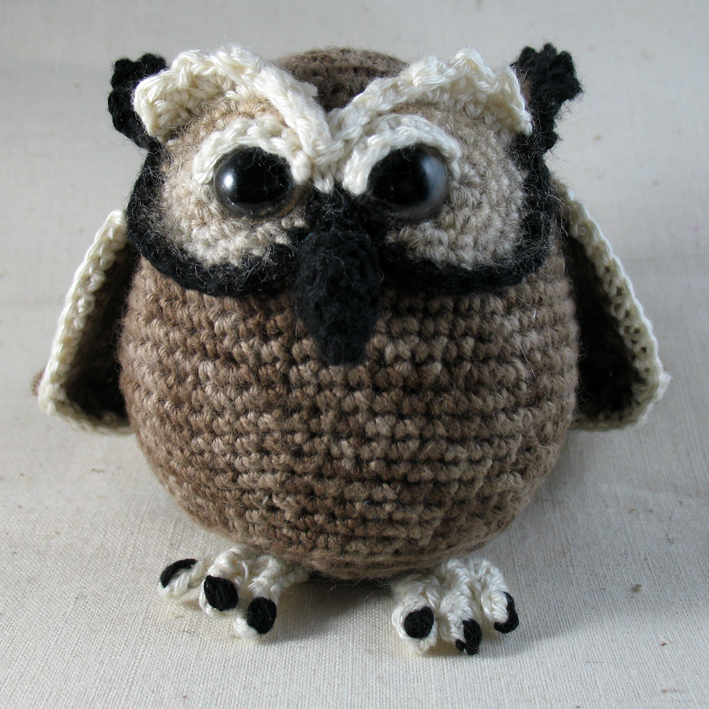
I was surprised to discover I have a thing about birds. I'd always thought they were rather dull creatures, but since we have been feeding our garden visitors they've been worming their way into my affection. Our selection of birds are rather plain. We host mainly sparrows and their even duller Dunnock cousins. We watch them through the year from nest building, to fledgling training, to fully functioning squabbling and bathing adults. Even so, it would never have occurred to me to actually crochet a bird. It all started with Owl's.
There are a number of Owl lovers in my family so Jessica Boyer's Great Horned Owl was my first make. He's basically a ball with added features. It's one of the curious and magical things about Amigurumi makes that, until you put all the separate elements together it looks like nothing in particular.
I wouldn't really claim to be an amigurumi maker but I am always drawn to texture and three dimensions. What does fascinate me is when Amigurumi moves beyond circles and sausages to complex shapes. The geometry created by increases, decreases, stitch sizes and the ability to crochet in seemingly any direction, now that amazes me. It is beyond my own skill level to create anything so complex from scratch. When I follow a pattern and discover how the designer has been able to solve these conundrums, then I am in awe.
My next bird, a Cockatoo form PawPaw's Studio, was also made as a gift and I still hadn't realised that I had a bird fetish. This make was then quickly followed by a brace of chickens. The somewhat comic and googly eyed Danish chickens came from a Danish book by Josefine Bjorn Knudsen. I had to translate the patterns into English in order to make them. Having no facility with language I award myself a merit!
At this point I admitted that I had an ornithological leaning and invested in Vanessa Mooncie's Crocheted Birds book. If you've read my Crochet Sea Creatures blog post or made any of Vanessa's patterns then you'll know that she has a true understanding of three dimensional shapes.
The structure is created mainly using arcs which intersect to produce very organic shapes. Sometimes I was working in the round and sometimes in rows. Not only does this help to create the form but also to suggest feathers.
I should probably also mention that I have an inability to work any pattern exactly as it is written and in the same yarn, or even the same weight of yarn! I'm making the Barn Owl as a Christmas gift. He's meant to be made in a DK weight yarn, but I'm using a mixture of 4ply, fingering weight yarns plus another yarn of unknown origin! I thought that would work quite well to express the flecked feathering. You of course get to judge the results.
Having made all the body parts, this is the point at which the legs are added and the bird begins to take shape. There are very exact instructions for shaping the feet and legs to the right proportions. Ah! I am of course making my bird in a non standard size so I have to 'wing it' here! To be honest I think my wire bending and wrapping skills need more practise.
The final element is the embroidery. Once again my crochet skills are far in advance of my sewing ability. I don't think it is unusual for a knitter or crochet to baulk at this moment. As I wasn't exactly following the instructions to the letter, I did quite a lot of experimenting and procrastinating at this point!
I found that after all that procrastinating the wings were looking a little battered. As a finishing touch I used some spray starch on the wings which was allowed to dry before I attached them.
I hope you will approve of the final result. And I hope the recipient will too.

There are plenty more birds to make from this book, but I am also adding to my bird wish list a Dodo and a Toucan. I have always had a weakness for Toucans but have no idea why! 
I hope your seasonal makes are going well.
 
Fastening off...


P.S. I was hoping to finish this Blue Tit in time to post but instead you get it as an update! Certainly practise makes perfect, my wire bending skills have improved. The wings did not need starching as they are finished around a strip of wire, as is the tail. Xx