This month you find me playing with folded crochet techniques. It's a great way to add texture or cables to a project, but the instructions can often look a little scary. Let's see if I can't tempt you to give it a try!
I couldn't find many variations on this theme so I've thrown in a few examples that use some of the same ideas. (Pseudo folded crochet perhaps?)
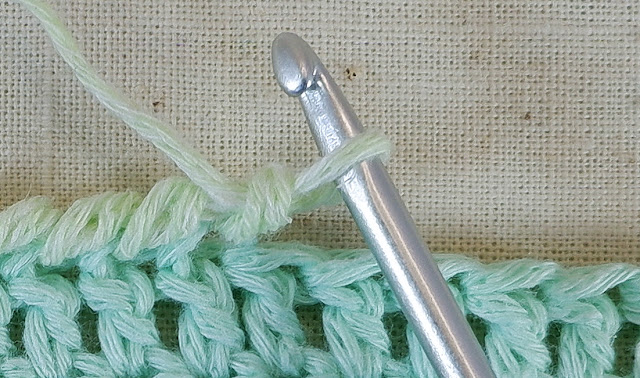
But let's start with the standard stitch. Folded crochet is basically a row of long stitches made into the front loop only. The next row folds those long stitches in half by being made into two rows at the same time. It's much easier than it sounds. Just to remind you, I'm using UK terminology (US in brackets!). I'm also turning at the end of each row, unless I say otherwise.
But let's start with the standard stitch. Folded crochet is basically a row of long stitches made into the front loop only. The next row folds those long stitches in half by being made into two rows at the same time. It's much easier than it sounds. Just to remind you, I'm using UK terminology (US in brackets!). I'm also turning at the end of each row, unless I say otherwise.
Row1. (Green) We start with our base row of stitches, any number, they could be any stitch but I've used Treble Crochet (Dc-USA).
Row2. (Pink) The next row is the stitches that we are going to fold. I'm using Double-Treble Crochet (Tr-USA), they are made into the front loop only of Row1 stitches.
Row3. (Green) Now we fold the long stitches, so I am making Double Crochet (Sc-USA) into the remaining back loop of Row1 stitches and at the same time the corresponding loop of Row2 stitches. (Leaving the front loop Row2 empty.)
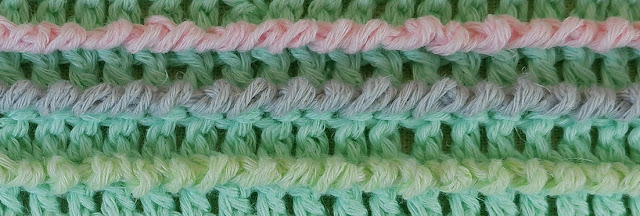
You can alter the size of the fold merely by working into both loops from Row2. Here you can compare the results.
(Pale Green) Here I've chosen to work Treble stitches (Dc-USA) and I've chosen to work into both loops of the Treble.
(Pink) This time I'm using Half-Treble (HDc-USA) and only working into the back loop of the Half-Treble.
Taking this idea to the extreme I've worked a row of Slip stitches into the front loop only. (grey) This is a Pseudo folded stitch!
A variant on the standard folded crochet technique is to fold several rows of short stitches instead of one row of tall stitches. So in this version I am folding 6 rows of Double Crochet (Sc-USA).
Row1. Into a base row of stitches (Green), I've added a row of Double Crochet (Sc-USA) into Front Loop only (Grey).
Row2-6. I've added 5 more rows of Double Crochet (Sc-USA) through both loops of the previous rows. The number of rows could be any number depending on what you want to achieve. I also used two colours just because I felt like it!
Row8. Now we fold the previous 6 rows, so Double Crochet (Sc-USA) into both loops of the last row and the remaining back loop of the base row stitches at the same time.
So far we've been folding a whole row of stitches. But of course it's possible to fold individual stitches. I spent hours messing about with this idea trying out all the possible variations. At the end of the day I picked just this one example to give you a starting point! I'm calling it On/Off Folded Crochet.
Row1. (Pink) I've had to begin and end this design with two folding stitches, so my base row had to be a multiple of 4 stitches plus 2. So as you can see I have made Front Loop Double Treble x2 followed by 2 chain, finishing with 2 FLDtr. (FLTreble-USA).
Now I am adding the missing stitches behind the chain stitches. I am not turning but working in the same direction as Row1.
Row2. (Green) So I am working into the base green row, starting with a Back loop Double crochet (BLSc-USA) behind each DTr and a normal Double crochet (Sc-USA) behind each chain stitch.
Row3. (Green) This is the folding row so I have turned and am working on the reverse. I am working Treble stitches (Dc-USA). I have gone through both loops the pink Row1 Dtr and Row2 Dc at the same time. When I get to the chain stitches I make the Trebles behind them into the green stitches as you can see. This makes the chain stitches move to the back of the work and disappear.
Beaded Folded Crochet. I found this version written as an edging, but I thought it would be fun to include it as a fabric. It's worked exactly the same way as normally except for the beads. I've also discovered that making the beaded row from the reverse makes the beads fall in the right place. So to start with I preloaded my thread with beads. A 'big eye' needle is a really easy way to do this.
You can add the beads at any point during the making of your stitch. I am working Double Treble stitches here (Tr-USA), so I decided to add the beads in the middle of my stitch. When you're ready to make a yarn over and pull through, pull the bead up next to the stitch and simply make the stitch as usual.
Candy Cane Cable. This is another edging stitch you may be familiar with. It's not really folded crochet, but I just had to find a way to make it look like folded crochet.
The technique is quite simple but annoyingly fiddly. I'm using two colours. We begin with a Front Loop Double crochet in the first stitch (Sc-USA), then Chain3. Then start the second colour in the next stitch, (FLDc, Chain3). From there onwards the first colour is taken to the back and the second colour brought forward. (Dc, Chain3) in the next stitch.
This process is repeated for each stitch, with the back colour coming forward and the front colour going backwards.An alternative way of working is to make all the stitches in the first colour (Pink) and then work the second colour (Grey), feeding the loop and working yarn through as you go. When you get to the end and fasten off, the remaining yarn is simply pulled back out. Both methods are time consuming but the results are satisfying.As we have done before the next row of stitches is simply made into the remaining back loop, making the candy cane cable stand proud.
This process is repeated for each stitch, with the back colour coming forward and the front colour going backwards.An alternative way of working is to make all the stitches in the first colour (Pink) and then work the second colour (Grey), feeding the loop and working yarn through as you go. When you get to the end and fasten off, the remaining yarn is simply pulled back out. Both methods are time consuming but the results are satisfying.As we have done before the next row of stitches is simply made into the remaining back loop, making the candy cane cable stand proud.
Crab Stitch Cable. Here's another cheat that you will recognise as an edging stitch.
Crab stitch is worked backwards, from the left to right. Left handers work from right to left. The hook is moved to the next stitch to the right, once again we're using the front loop only, yarn Under and pull through the stitch.Now we can finish the stitch like a normal Double crochet (Sc-USA), yarn over and pull through.Making the next row of stitches into the remaining back loop turns this edging stitch into a cable.
My intention was to finish with a little motif that you could use as a sampler. Sadly time has escaped me so I promise to bring you that next month. When I start 'experimenting' I never know when to stop!


