Search This Blog

Tuesday 15 December 2020

Tatted Picots and Half-Hitches.

Crochet is by and large a very lonely occupation, but isn't it wonderful how universal our community is? I never forget that I only get to do this because of all the hook-wielders before me!
    Back in June when I was writing about picots, I came across a reference to Tatted Picot in an old crochet book. Frustratingly I could not make head nor tail of the instructions. So when I read a recent blog post by Vashti Braha about Limpet Stitches a light bulb went off in my head. She in turn refers us to some video instructions by Sue Perez / Mrs Micawber. TaDah! all becomes clear to me.
    So what is a Tatted Picot? It's a sort of crocodile stitch formed from half-hitches. It may come to us directly from Tatting or through Irish Crochet.
    Here's how it's made. 
1. We start with a double crochet (single crochet-USA) made into the base row.
 2. Then we create an even number of half hitch pairs. This is where we needed Mrs Micawber. This is what a single pair of half hitches looks like.
3. To make the right-hand loop;
Place the yarn over your forefinger from front to back.
4. Place the hook through the loop from the front, letting it fall onto the hook.
5. To make the left-hand loop; 
Place the yarn over your forefinger from back to front.
6. Place the hook through the loop from the back, letting it fall onto the hook.
7. That is the first pair of half-hitches made. 
8. Make 7 more pairs.
9. Grab the yarn leaving plenty of working thread to pull through the picot.
10. Pull through all the loops on the hook. Adjust the picot to remove any slack.
11. Now work one chain stitch to join your tatted picot...
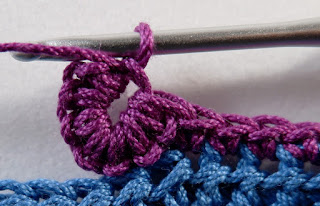
12. Skip 2 base stitches and work another double crochet (Sc-USA) into the base fabric.
13. On your next row place a stitch into the chain at the centre of the picot. And another stitch into the left hand side of the picot.

Until Vashti illuminated these instructions for me I had never seen any other reference to these type of stitches. I was wondering when I would ever find the need for such a strange picot, but then 'The guy with the hook', published his stylish Ottomania pattern. 
While Mark has cleverly used a sort of inside out bobble, I can now imagine tatted picots used in a similar.
 If you would like to try the swatch sample I have produced, these are my instructions (UK terminology). 
The pattern needs to be worked over multiples of 4 stitches, plus an extra stitch at each end. I started with 30 stitches.

Row1. Make 30 Foundation Double Crochet (Sc-USA). Turn.
Row2. Chain2 (doesn't count as stitch), Treble Crochet (Dc-USA) in each stitch across. Turn.
Row3. Chain1 (doesn't count as stitch), Dc in each of next 5 stitches, *Dc in next stitch, 1 Tatted picot as described above [No.3to11], skip2 stitches, Dc in next stitch. Dc in next 4 stitches**. Repeat from *to** finishing with a Dc in last stitch. Turn.
Row4. Chain2, *Tr in next 6 dc, Tr in chain-space of picot, Tr in left hand side of picot. Repeat from* across row. Turn.
Row5. Chain1, Dc in first st,
*Dc in next stitch, 1 Tatted picot, skip2 stitches, Dc in next stitch. Dc in next 4 stitches**. 
Repeat from *to** finishing with Dc in next stitch, 1 Tatted picot, skip2 stitches, Dc in next stitch and a Dc in last stitch. Turn.
Row6. Chain2, Tr in next 2 dc, *Tr in chain-space of picot, Tr in left hand side of picot, Tr in next 6 dc. Repeat from* across row.Turn.
Now repeat the pattern [Row3to6] as set to your desired height.
 By altering the number of half hitch pairs in the picot, the number of stitches skipped and how tightly they are closed I think that there is plenty here to experiment with!

It only seems fitting at this time of year, the winter equinox here in the UK, that we should celebrate all our fellow hook wielders who help to shine a light on our craft! Seasons Greetings to one and all.
Fastening off...


P.S. This year I have been blogging every fourth Tuesday, and while that makes sense for me, I've finally realised it makes no sense for you at all. So from now on I will be blogging every 15th of the month. That way you'll know when there is new content. Of course you can always sign up for the email notification!

Tuesday 17 November 2020

Crocheted Birds

I was surprised to discover I have a thing about birds. I'd always thought they were rather dull creatures, but since we have been feeding our garden visitors they've been worming their way into my affection. Our selection of birds are rather plain. We host mainly sparrows and their even duller Dunnock cousins. We watch them through the year from nest building, to fledgling training, to fully functioning squabbling and bathing adults. Even so, it would never have occurred to me to actually crochet a bird. It all started with Owl's.
There are a number of Owl lovers in my family so Jessica Boyer's Great Horned Owl was my first make. He's basically a ball with added features. It's one of the curious and magical things about Amigurumi makes that, until you put all the separate elements together it looks like nothing in particular.
I wouldn't really claim to be an amigurumi maker but I am always drawn to texture and three dimensions. What does fascinate me is when Amigurumi moves beyond circles and sausages to complex shapes. The geometry created by increases, decreases, stitch sizes and the ability to crochet in seemingly any direction, now that amazes me. It is beyond my own skill level to create anything so complex from scratch. When I follow a pattern and discover how the designer has been able to solve these conundrums, then I am in awe.
My next bird, a Cockatoo form PawPaw's Studio, was also made as a gift and I still hadn't realised that I had a bird fetish. This make was then quickly followed by a brace of chickens. The somewhat comic and googly eyed Danish chickens came from a Danish book by Josefine Bjorn Knudsen. I had to translate the patterns into English in order to make them. Having no facility with language I award myself a merit!
At this point I admitted that I had an ornithological leaning and invested in Vanessa Mooncie's Crocheted Birds book. If you've read my Crochet Sea Creatures blog post or made any of Vanessa's patterns then you'll know that she has a true understanding of three dimensional shapes.
The structure is created mainly using arcs which intersect to produce very organic shapes. Sometimes I was working in the round and sometimes in rows. Not only does this help to create the form but also to suggest feathers.
I should probably also mention that I have an inability to work any pattern exactly as it is written and in the same yarn, or even the same weight of yarn! I'm making the Barn Owl as a Christmas gift. He's meant to be made in a DK weight yarn, but I'm using a mixture of 4ply, fingering weight yarns plus another yarn of unknown origin! I thought that would work quite well to express the flecked feathering. You of course get to judge the results.
Having made all the body parts, this is the point at which the legs are added and the bird begins to take shape. There are very exact instructions for shaping the feet and legs to the right proportions. Ah! I am of course making my bird in a non standard size so I have to 'wing it' here! To be honest I think my wire bending and wrapping skills need more practise.
The final element is the embroidery. Once again my crochet skills are far in advance of my sewing ability. I don't think it is unusual for a knitter or crochet to baulk at this moment. As I wasn't exactly following the instructions to the letter, I did quite a lot of experimenting and procrastinating at this point!
I found that after all that procrastinating the wings were looking a little battered. As a finishing touch I used some spray starch on the wings which was allowed to dry before I attached them.
I hope you will approve of the final result. And I hope the recipient will too.

There are plenty more birds to make from this book, but I am also adding to my bird wish list a Dodo and a Toucan. I have always had a weakness for Toucans but have no idea why! 
I hope your seasonal makes are going well.
 
Fastening off...


P.S. I was hoping to finish this Blue Tit in time to post but instead you get it as an update! Certainly practise makes perfect, my wire bending skills have improved. The wings did not need starching as they are finished around a strip of wire, as is the tail. Xx


Tuesday 20 October 2020

How to make Flat X and Y Crochet Stitches

 We all have a comfort zone, a safe place were there are no unexpected challenges and no frustration. Stepping outside that place is a little scary, it means taking a risk, but brings unexpected rewards. Finally I have challenged myself with the X and Y stitch and been happily surprised by the result!

Whenever I've looked at the instructions for an X or Y stitch, all I've seen is YarnOverYarnOverYarnOver and immediately a little voice inside my head starts screaming! Finally I have fought my way through those seemingly undulating instructions. I've figured out exactly where that hook should go. Let me try to demystify it for you and serve it up in a slightly more palatable fashion.

[In all these examples I've chosen to place a Chain1 between the crossed stitches for visual clarity.]

Let's start by looking at the sort of crossed stitches that we're all familiar with. Shall we call them 'unconnected X stitches'? You know, where the diagonals can travel in front or behind each other and are completely independent of each other. They can be made using any number of diagonals crossing each other.

If the foremost stitch slants down to the left, then the second stitch needs to be made behind the first. This is the easiest type to make, we merely fold the 1st stitch forward to make the 2nd stitch behind.

If the foremost stitch slants down to the right, then the second stitch needs to be made in front of the first. This is a little bit more fiddly. 

The next type we could call 'connected X stitches'.

That's when the second diagonal encloses the first like a spike stitch. This is usually made with a Treble (Dc-USA). In this case the working yarn should be held behind and the stitch made in front, encapsulating that first diagonal.

There is a second way of making this with a taller stitch. Let's call it a 'parallel X stitch'.

This time make a Double-Treble (Tr-USA) in the first stitch. Chain1. 
Yarn over the hook once only, pull up a loop in the next stitch, YO and pull through 2 loops on hook;
now loop the hook around and behind the 1st stitch, [marked by needle in image3] grab the yarn and bring it in front,
(YO and pull through 2 loops on hook) x2.

It's possible to use this same wrapping technique to make a 'Y' stitch.

So, make a Double-Treble (Tr-USA) in the first stitch. Chain1. 
Yarn over the hook once, loop the hook around and behind the 1st stitch, grab the yarn and bring it to the front,
(YO and pull through 2 loops on hook) x2.

Now we come to 'flat stitches'. I think the best way to approach the X is by first looking at the Y!
If we wrote the flat Y stitch in a chart it might look like this:
 
It's a long diagonal with a shorter stitch anchored to it's middle. Quite simply it's a Double-Treble (Tr-USA) with a Treble (Dc) anchored to it's middle.
Here's how it's made.
Double-Treble in indicated stitch, Chain1;
Yarn over hook, place hook behind the lowest diagonal bar and left leg of stitch, pull up a loop,  [marked by needle in image2]
(YO and pull through 2 loops on hook) x2

We need to consider the 'upside down Y stitch' as well. It might look like this in a chart:
It's a cluster stitch with a short stitch on top.
Here's how it's made.

Yarn over hook twice; 
Pull up a loop in 1st stitch, YO and pull through 2 loops on hook- 1st leg made.
YO hook, pull up a loop in 2nd stitch, YO and pull through 2 loops on hook- 2nd leg made. 
(YO and pull through 2 loops on hook) x3- 3rd leg made.   

So to make a 'flat X stitch' we start with an upside down Y and add that short diagonal to it's middle. In a chart it looks something like this:
Make the upside down Y stitch, as above, then;

Chain1, YO hook, place hook behind diagonal bar and left leg at centre of stitch,
(YO and pull through 2 loops on hook) x3- 4th leg made.


Wouldn't it be great, just for once, to say it was all that simple? Sadly this is ThePulledStitch universe where nothing can EVER be quite that simple!
So before I leave you I have to offer you one more flat X stitch version.

In a chart it would probably look like this:

And is made as follows:

Yarn over hook three times, [Trebletreble-UK, Dtr-USA]
Pull up a loop in 1st stitch, YO and pull through 2 loops on hook- 1st leg made.
YO hook, pull up a loop in 2nd stitch, YO and pull through 2 loops on hook- 2nd leg made.
YO and pull through 3 loops on hook- 2 legs joined.
(YO and pull through 2 loops on hook) x2- 3rd leg made.
Chain1,
YO hook, place hook behind the two diagonal bars at centre of stitch,
(YO and pull through 2 loops on hook) x3- 4th leg made.

I can't decide which of these two flat X stitches I prefer. I shall leave you to decide! The truth is always 'there is no right or wrong in crochet'. You will find that there are as many ways to make these stitches as there are grains of sand on a beach. You will find fat X's and thin X's, tall Y's and short Y's.

Hopefully neither of us will ever be scared of tackling one again and if you don't like the way it looks, you'll understand how to change it to one you do like.

Fastening Off...


Tuesday 22 September 2020

Birds Nest Table Mat

I have a pattern and tutorial for you this month which came about by accident. It is derived from one of those old family patterns that has been passed down, but never written down. So you may well recognise the technique. It reminds us that no matter how clever or innovative we think we are, we are merely riding the shoulders of giants. 

I found the original on the 'Miss Abigail's Hope Chest' blog where it had been artfully translated for us. I thoroughly recommend the blog and urge you to raise your hook in salute of the author, Kathleen Mower and her amazing Hope-Chest achievement.

As often happens when something lights a fire in our creativity, I was thinking about something else entirely, but I was so fascinated by Kathleen's pattern for a Hot Pad that I just had to try it. The amazing thing about the technique is that it creates a double thickness fabric. Here is my attempt in Double Crochet (Sc-USA).


I was so delighted with the result that I just couldn't help wondering if I could work the same thing using Half-Trebles (Hdc-USA).

So what about Trebles? (Dc-USA)

Well one thing just has to lead to another! I decided to try to work it in a circle in Trebles (Dc-USA). Ah! Now this wasn't quite as simple as I was hoping. 

Let me start by showing you how the Square Hot Pad works up in Trebles (Dc-USA).

Start with 27 chain stitches, Treble (Dc-USA) in 3rd chain from the hook, Treble in each stitch to the end, turn. [25Trebles, Ch2 does not count as stitch here and through out.]

Chain2, Treble in the back loop of the first treble and the remaining loop of the base chain stitch simultaneously,

and repeat in each pair of treble/chain stitches to the end, turn. [25BLTr] 

 
Chain2, Treble in the back loops of the first upper-row treble and the first lower-row treble simultaneously,
and repeat in each pair of upper/lower trebles to the end, turn. [25BLTr]
Repeat last row to desired height.

 
For final row: Chain1, Double crochet (Sc-USA) through both loops of first upper row stitch and back-loop of first lower-row stitch simultaneously. Repeat in each pair of upper/lower row stitches to end. Fasten off. [25Dc]                                   

This version made with Scheepjes Bloom, 100% cotton yarn, turned into a useful wash cloth.

As you have seen, we are overlapping our rounds and creating a double layered fabric. To make a circular design we have to place the stitches simultaneously into two rounds with two different stitch counts. So let me demonstrate how this works in practice.

I'm starting with a double magic ring. Having finally mastered this, (which let's face it wasn't that hard after all) I think it gives greater stability to the centre of our mat. I demonstrated the technique in last months blog post. Round One starts with a starting-chain and is simply 8 double crochet stitches (Sc-USA) into that ring. 

At the end of each round we need to slip stitch to the first stitch and then turn. Yes, I said turn! It's not something we are use to doing when making a flat circle, is it?

For Round Two we make 2 back loop trebles (Dc-USA) into each stitch. However instead of beginning the round with starting chain stitches we simply pull up a tall loop and go straight into making the first treble. The loop creates the 'head' of the first treble stitch. I've chosen to do this in order to disguise the join.
Once again we join the round with a slip stitch, this time placing the slip stitch into the 'Starting Loop'. The Starting Loop is also going to be the last stitch in the round, it is easy to miss so I am going to ask you to place a stitch marker in it. And turn.

Round Three is the most complicated round in the whole pattern. After this the rest will feel like plain sailing. Looking at your mat so far, you will see that Round1 has 8 back-loops left open and Round2 has 16 stitches. We are going to be placing the stitches into the two rounds simultaneously. At the end of this round we need to have added extra 8 stitches. (16+8=24). This means we have to fit 24 stitches into the 8 stitches of Round1. This is why the instructions look a little crazy.

Let's start simply, after pulling up a Starting Loop, we make the first Treble by placing the hook in the back loops of the first stitch of round2 and round1 together. I'm calling this a Special-Back-Loop Treble.
Now we need to put 2 more stitches into that round1 back loop that we've already used. So we make 2 Special-Back-Loop Trebles, placing the hook through the next round2 stitch but the first round1 stitch.
That's it, those three stitches are the repeat. Finish the round by slip stitching to the start, placing the stitch marker in the Staring Loop and turn.

Round Four. Looking at your mat now, you will see that Round2 has 16 back-loops left open and Round3 has 24 stitches. (In the pattern I give you a stitch count for both rows.)

The round begins by pulling up a Starting Loop and making a Special-Back-Loop Treble in the first stitches of round3 and round2 at the same time. The next Special-Back-Loop Treble goes into the next round3 stitch but the same round2 stitch that already contains a stitch. Now we make 2 Special-Back-Loop Trebles into the next stitch of round3 and the next stitch of round2.
So this time those four stitches create our repeat sequence. And at the end of the round the stitch count is 32 and 24.
In the pattern I have given you the full written instructions for the first five rounds, but then I've given the instructions in a table format. I think you will find this easier to follow. I've also included a little chart for each round. This gives you a thumbnail sketch of each pattern repeat.

For the final Double Crochet (Sc-USA) round I've given two sets of instructions in the pattern. I'm enabling you to make a coaster sized mat and a plate sized mat. 

Did you spot my claim that I make colourful customisable crochet? I almost never follow a pattern verbatim. There is just something in my nature that won't allow me to! So I never expect you to either. This means I expect you to make your mats in whatever yarn and to whatever size you feel like. You rebel! I have therefore given you further guidance on how to make that final round. Should you wish to go larger than my instructions allow, I think you will quickly see there is a pattern emerging in the numbers. You won't have to do any maths I promise! Should you run into any problems then email me! I will not take offence and I will reply.😇

I loved the yarn that Kathleen used for her Hot Pad. I chose the Rico Essentials version. The colour made me think of birds' eggs, hence the pattern's name. I wanted to use more than one colour but I realised that a long colour changing yarn might emphasis the end of each round, so this yarn seemed like an ideal fit. However the flecks also help to disguise the stitches. So if you would like to work your mats in a similar yarn, please practice the first four rounds in a plain colour yarn first.

Here is the downloadable PDF pattern link! Go create! 

Fastening off...