Search This Blog

Wednesday 15 December 2021

Long Hook Crochet Techniques: What is Tunisian crochet?

I've said it before (and I'll say it again, no doubt) the most important thing I learnt at art college was to ask questions. This month I have been asking myself; 'What's with all these long crochet hook techniques? Are they all the same technique with different names?' There's only one way to find out. So over the next few months I am going to investigate Tunisian crochet, Crochenit, Knooking and CroTat. Let's start with Tunisian Crochet. I am far from being an expert but it is the technique I know most about.

Tunisian crochet creates an extra thick and warm fabric which is particularly suited to blankets, but it is also very versatile. It produces a one-sided fabric which can be worked in the round or in short rows. Many of the techniques available to us in normal crochet can be used as well. The best way to explain is to show you.

Let's start with the basics. The hook is usually one or two sizes larger than usual. Today I'm using up some oddments of Scheepjes StoneWashed which recommends a hook size of 3-3.5mm. So the Tunisian hook that I am using is a 5mm. The hook is held with a knife grip instead of a pen grip. Personally I find the really long hooks very hard to use, so I prefer a shorter hook which is attached to a cable. Each row consists of a Forward Pass where the stitches are formed and placed onto the long hook; and the Return Pass where the stitches are worked off again.

Tunisian Simple Stitch.

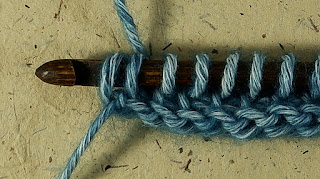
Start by chaining the exact number of of stitches as you require. There are no extra stitches required for turning. Pull up a loop in the second chain from the hook and each chain stitch to the end, just as you would normally, except leave all the loops on the hook. This is the foundation row Forward Pass.
Now we work all the stitches back off the hook in the Return Pass. It always begins with a Chain 1. To do this Yarn Over (YO) the hook and pull through the first loop on the hook.
Now YO the hook and pull through the next two loops at the same time.
YO and pull through each pair of loops to the end. The foundation row is complete.
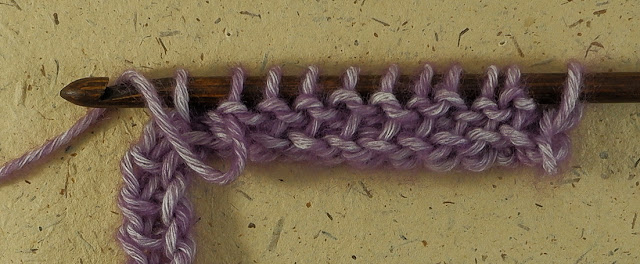
The loop on the hook will be the first stitch of your next row, so ignore the very first stitch and place the hook behind the next vertical bar.
YO the hook and pull through the vertical bar. Leave this loop on the hook.
 
Pull up a loop for each vertical bar to the very end. At the end place the hook into the Chain1 so that there are two bars of the chain stitch on the needle.
YO and pull up a loop.
 
You are now ready to work the Return Pass.

So Chain1, Yo and pull through each pair of stitches to the end.

Changing colour in Tunisian crochet can result in some interesting effects depending on when you change colour. Here I am changing the colour on the very last pull through of the Return Pass, so that my new row will be in a different colour.

Here, I have instead, changed colour on the Chain1 of the Return Pass so the row will be both blue and pink.
When you are ready to finish your fabric you will notice that the last row you made looks loose and gappy. The neatest way to finish it off is with a row of slip stitches. Place the hook under the vertical loop as normal but this time when you yarn over pull the yarn through both the loops on the hook to for a slip stitch.


Tunisian Knit Stitch.

We make the foundation row exactly as we did for Simple Stitch. Just as before, the loop on the hook counts as our first stitch.

To create the knit stitch we insert the hook between the Front vertical bar and the back vertical bar, right through the fabric, under the chain stitches. YO the hook and pull a loop through to the front.
Pull up a loop between each pair of vertical loops to the end. Working the Return Pass as we did before for Simple Stitch. Finish the fabric by working a row of slip stitches.


Tunisian Purl Stitch.

I found this stitch really hard at first. There is a bit of a knack to it, so if at first you struggle with it, please persevere! We start with the foundation row as before. And the first loop on the hook counts as our first stitch.
Bring the working yarn to the front before placing the hook under the front vertical loop. You will notice that in this photo my hook is upside down on purpose!
Yarn over the hook and pull the yarn through the loop. It is important not to twist the yarn or the loop as you pull through. This is the knack I spoke of! You of course may get it on the first go in which case I give you permission to be very smug!
The return pass is the same as before.

These are the three main stitches used in Tunisian crochet, and you would be forgiven for thinking this was all there was. But it also uses the more standard crochet stitches, clusters and techniques you have learnt in crochet. I shall leave you with a glimpse of a Tunisian lace stitch in the hope of wetting your appetite!


                     Fastening off for 2021! Seasons Greetings...

Peace, 和平, Paz, Paix, Мир, سلام,


Monday 15 November 2021

How to Crochet Circles , Bowls and Spheres.

 Call me slow, but something very strange has finally occurred to me. The formula for crocheting flat circles and round spheres is exactly the same?! "How can this be?" I ask myself. This I have to investigate!
Maths, sadly, is not my strong point. I do have a certificate that insists I have a certain level of understanding, but the minute the examiner said; "Pens down!" all knowledge instantly fled. So fear not we will keep it simple.
Let's start with a flat circle.
No matter what size of stitch you are working with the formula is exactly the same. The only difference is how many stitches you begin with.
 

UK

USA

Starting Stitch Count

Dc

Sc

6 stitches

Htr

Hdc

8 Stitches

Tr

Dc

12 Stitches

Dtr

Tr

15 Stitches

 
Round One of your circle begins with the starting number of stitches made into a magic ring. By following the formula below you will find that your circle increases by the same number of stitches, as the stitch count, on each round.
 

Standard Flat Circle Formula

Round 1

The starting number of stitches

Round 2

2 stitches in every stitch

Round 3

2 stitches in every 2nd stitch (1st, inc)

Round 4

2 stitches in every 3rd stitch (2sts, inc)

Round 5

2 stitches in every 4th stitch (3sts, inc)

Round 6

2 stitches in every 5th stitch (4sts, inc)

Round 7

2 stitches in every 6th stitch (5sts, inc)

And so on!

 
This formula is used most often because it is so easy to understand and remember. It has a flaw however. The increases start to stack up on top of each other and in the case of a Double crochet circle (Sc-USA) it starts to turn into a Hexagon. If I was awfully good at maths I would now give you a formula involving 𝛑. As I'm not here is the next best thing.
 
For this formula to work you need to know that 'Y' is the starting number of stitches minus one. So if you are working with Dc (Sc-USA) Y is 5. (6-1=5)
 

Adjusted Flat Circle Formula

Round 1

The starting number of stitches

Round 2

2 stitches in every stitch

Round 3

2 stitches in every 2nd stitch

Round 4

1st, inc, (2, inc) x Y, 1st

Round 5

2 stitches in every 4th stitch

Round 6

2sts, inc, (4sts, inc) x Y, 2sts

Round 7

2 stitches in every 6th stitch

Round 8

3sts, inc, (6sts, inc) x Y, 3sts

Round 9

2 stitches in every 8th stitch

Round10

4sts, inc, (8sts, inc) x Y, 4sts

And so on!

 
 Let's move onto Bowls
If you want to produce a flat bottomed bowl all you do is to make a flat circle to the required diameter. The next round is made into the back loop only and is worked with an even number of stitches without increase. It makes no difference if you work in a spiral as I have or in rounds joined with a slip stitch. From then on you work without increase to form the sides of your bowl.
 
 
Cones and round bottomed Bowls.
The reason this whole problem forced its way into my brain in the first place was that I was thinking about round bottomed bowls. I was wondering why so many Amigurumi patterns seem to begin with 6Dc (Sc-US). I decided to find out what happens if we begin with a different number of stitches. The cones above begin with 3Dc and 4Dc respectively.
Now I wonder what they would look like if I added a few even rounds without increases. The cones each have 8 rounds worked in a spiral and 3 even rounds.
Now I have added bowls beginning with 5Dc and 6Dc, each with 4 rounds worked even. If 6Dc makes a flat circle what happens if I use too many stitches to start?
(Yes, I am that small child constantly asking, "Why?")
I produced another bowl starting with 8Dc and working 6 rounds even. The more even rounds I added, the more the sides seem to straighten and the more the rippling circle I had begun with started to flatten out. If this was an Amigurumi shapes which I was going to stuff the rippling would disappear altogether.


Spheres
Before I ask myself any more stupid questions lets rush on and ask about spheres! First of all what is the standard formula for a crochet sphere? There seems to be some argument on this point but what I tried seems to work out OK.
Work a flat circle to achieve your desired diameter. Work the same number of rounds again even, without increase. Decrease by the same number of rounds. The Sphere on the right has 6 rounds of increase, 6 rounds worked even and 6 rounds worked in decrease.
 
I have mentioned Ms Premise-Conclusion before. She has very kindly worked out a mathematical solution for all us non mathematically literate people. So the Sphere on the left is made using her Ideal Sphere pattern.
Any perfectly sensible person would have stopped at this point. But I felt the burning desire to know if what held true for a Dc Sphere (Sc-US) held true for other stitch heights. So while a Half-treble (Hdc-Us) circle begins with 8 sts I found that a Htr sphere begins with 7 sts. Otherwise it follows the same formula. So for the sphere here I worked 5 increase rounds, 5 rounds even and 5 decrease rounds.
Following that theory I worked a Treble (Dc-US) sphere starting with 10 stitches instead of 12. This ball is 4 rounds of increase, 4 rounds even and 4 of decrease.
I can only conclude that the reason any of this works is due to the stretchy qualities of crochet and that skilled stuffing is largely to responsible for well shaped spheres!

Fastening off...