

All the designs I am going to show you are worked in continuous rounds. If you've never worked a Slip-stitch fabric before you'll find all the information you need to get going in this post, How to Crochet Slip-stitch. Shall we get started?
Shepherd's Knitting
Or Back-Loop Only Slip-st is a fairly stable stitch with little stretch. The fabric pattern is created by the unused front loops.
Set up your foundation by working a row of Chain, any number. Do not join the chain row into a loop, instead Slip-st into the Back-Bump of the very first chain to form a loop. This is your first stitch so don't tighten it as you would normally. Slip-st into the Back-Bump of each chain to the end. You are now ready to begin the pattern.

Slip-stitch into the Back-Loop Only of each stitch working in continuous rounds.
Flat Stitch

It's very similar to the version (right) which is worked in rows except that it creates a more uniform diagonal design and just like that stitch it really wants to roll itself up vertically. This makes it useful for rolled cuffs and hems or hat brims.

After making a foundation of any number of stitches, Slip-st into the Front-Loop Only working in continuous rounds.
Horizontal Stripes
By working alternate rounds of Back-Loop Only and Front-Loop Only Slip-st you can create stripes. I've varied the number of rounds in each stripe to give you an idea of what can be achieved.

Begin with a foundation of any number of stitches. Work in continuous rounds. In my sample I have begun with 4 rounds Back-Loop Only, 4 rounds Front-Loop Only.
Diagonal Stripes
The Problem with one directional crochet is that as the stitches sit on top of each other obliquely, so if you attempt to work vertical stripes this is what you end up with. The pattern naturally leans to the right, unless you are a left-handed crocheter and then you will have a left-handed lean!

In this sample my stripes each have 5 stitches so the number of stitches in my foundation was divisible by 10. I simply repeated (5 Back-Loop Only, 5 Front-Loop Only) continuously around.
One Colour Bosnian Braid
This design and the next are based on the ones in Therese De Dillmont's Encyclopedia of Needlework.
Due to that right leaning nature of one way crochet, if you try to create a flat strip of braid working in rows in one direction only, the ends will end up diagonal rather than square. So should you want to make a braid for a strap or belt then I suggest that you work in a continuous loop and cut the braid open at one end when it is finished. You will need to seam or seal the ends in some way. Of course you can also use the pattern on a garment worked in the round.

For this example I set up my foundation using a multiple of 6 stitches.
Round 1&2: Slip-st in back-loop only.
Round 3&4: Slip-st in front-loop only.
Round 5&6: Back-loop only.
Round 7 to 14: (Back-loop only in next 3 stitches, Front-loop only in next 3 stitches) repeat around. Begin each new round one stitch later so that the strips lean to the left. (Or to the right if you are a leftie!)
Round 15&16: Back-loop only.
Round 17&18: Front-loop only.
Round 19: Back-loop only around and fasten off.
Two Colour Bosnian Braid
By using colour-work techniques to create a design and with the unused threads carried behind the work we can create a very stable, hard-wearing and thick design as is done in Korsnas sweaters. This design is also based on one in De Dillmont's Encyclopedia. You will notice how some of the design leans to the right and some to the left. To get the design to lean to the left those rounds are started one stitch to the left. I have achieved this by adding in an extra stitch at the start of those rounds. The design is worked entirely in Back-Loop Only Slip-st. Here's what I did:

Create a foundation using a multiple of 18. [As
I was trying to replicate De Dillmont's design I made life difficult for
myself. The two parts of the pattern have a different stitch repeat. I could of course have changed the pattern on rounds 3,4&5 to be multiples of 6. As it is written here, on the last repeat on Round 3,4&5 adjust the number of ColA stitches to make up for the odd stitch count.]
Round 1&2: with ColA Back-Loop Only around.
Round 3,4&5: (with ColA 3 sts, with ColB 2 sts) repeat around.
Round 6,7&8: with ColA Back-Loop Only around.
Round 9,10&11: with ColB Back-Loop Only around.
Round 12: (ColB 3sts, ColA 3sts, ColB 3sts, ColA 9sts) repeat around.
Round 13&14: (ColB 4sts, ColA 3sts, ColB 3sts, ColA 9sts) once only, (ColB 3sts, ColA 3sts, ColB 3sts, ColA 9sts) repeat around.
Round 15,16&17: (ColB 4sts, ColA 3sts) once only, (ColB 3sts, ColA 3sts) repeat around.
Round 18,19&20: (ColB 4sts, ColA 3sts, ColB 3sts, ColA 9sts) once only, (ColB 3sts, ColA 3sts, ColB 3sts, ColA 9sts) repeat around.
Round 21,22&23: with ColB Back-Loop Only around.
De Dillmont's design now finishes with a repeat of Rounds 1to 8 but I'd had quite enough of colour-work by this point!
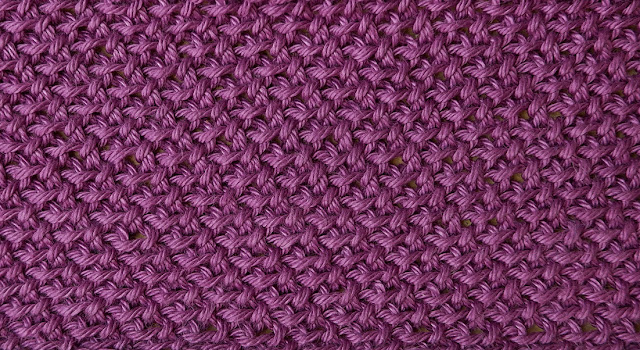
Diagonal Weave
The lovely faux woven texture in this sample is simply made by alternating blocks of Diagonal Stripe. In this example blocks are 4 rounds high by 4 stitches wide but you can make the pattern any width or height. In this sample I began with a foundation using a multiple of 8 stitches.

Round 1 to 5: (Front-Loop Only x 4sts, Back-Loop Only x 4sts) repeat around.
Round 6 to 9: (Back-Loop Only x 4sts, Front-Loop Only x 4sts) repeat around.
Round 10 to 13: (Front-Loop Only x 4sts, Back-Loop Only x 4sts) repeat around.
Repeat rows 6 to 13 to desired length.
Stairway to Heaven
I was clearly feeling creative when I named this. It is simply a one stitch wide diagonal stripe but I think it is my favourite pattern in these examples. To make it begin with a foundation of even numbered stitches.

(Front-Loop only in the next stitch, Back-Loop only in the next stitch) repeat around continuously.
Twill Weave
I thought I had finished this post when an obvious variant to 'Stairway to Heaven' popped into my head and I just had to try it. It's exactly the same but made over an odd number of stitches. This makes the diagonal stripe lean in the other direction. The fabric lies a little flatter without the diagonal ribbing effect of the stairway pattern.

Begin with an odd numbered foundation.
(Front-Loop only in the next stitch, Back-Loop only in the next stitch) repeat around.
Continue working continuously to the desired length.
Under the Board Walk
I have had a few attempts at creating patterns using inverse Slip-stitches unsuccessfully. I tried to recreate Garter stitch in the round, instead, this is what I ended up with. It actually looks like Inverse Garter stitch on the reverse side, but I like the pattern that I have achieved. The fabric lies very flat.
There was also much discussion about what to name this stitch. My crochet-confident was adamant the name should express the churning waves. Should you know different then please put us both out of our misery!

Start with a foundation using any number of stitches.
Round 1: inverse Back-Loop Only in each stitch around.
Round2: Front-Loop Only in each stitch around.
Continue alternating these two rounds to the desired length.
I am absolutely sure that there are plenty of other stitch combinations and patterns for me still to discover.
Fastening off... 
