This is what the inside of my head looks like!
But just lately I've been getting organised. It's most certainly Not something that comes naturally to me. It's all Nick's fault, he told me all about 5s Methodology and got me all inspired. Mr Untidy himself, went out to his wood turning shed and turned it into a workshop to be proud of. If you've heard of 5s Lean Manufacturing you might be wondering what on earth it's doing in a crochet Blog. If you haven't... well either way stay tuned and I'll do my best to inspire you to.
5s is part of the Japanese Manufacturing philosophy, it goes along with 'just in time ordering' and all that. It doesn't sound very creative but funnily enough I've just read a LookatwhatImade Blog post where Dedri talks about 'eating your frog' and 'touching it once'. This is a lot less scary and much more easily achieved than any of that. It doesn't matter whether you have a craft room, a corner of the living room or just a pile of stuff under the coffee table, this will help.
The 5s are:
- Seiri -Sort
- Seiton-Set in order
- Seiso-Shine
- Seiketsu-Standardise
- Shitsuke-Sustain
Sort
Basically, as far as you and I are concerned, this means throwing out the stuff you've been hanging on to but will never use. You have to be honest with yourself. How long have you had it? Will you ever really take up patchwork, bead weaving, arm knitting or whatever it is? You never liked that antique work-basket that Great Aunt Ethel gave you but she left it to you in her will. Throw it out, take it to the charity shop, give it to your sister, just get rid of it! (Blame it on me if it helps!) What you're trying to achieve is more usable space and less clutter. This was the bit that I found hardest, I hated it but everything after this is fun - promise!
Set in Order

The Overlocker is next to it's manual.

 |
| The printer is next to the ink. |
 |
| Close to hand! |
Shine is just about cleaning. If you were running machinery it would mean cleaning it so you could see if it is in good working order. In Nick's case he painted his work shop white to bring in more light.
 |
| Standardise and Label! |
In my mind this starts with 'set in order'. What a great opportunity to persuade the other half that you absolutely must have that craft storage cabinet! For the rest of us however there are a huge range of drawer units, stacking boxes and storage solutions. The word to keep in mind is standardise. Hopefully you've already thrown out the old cigar boxes and biscuit tins that you were using before. From now on we are going to keep it clean and tidy. Everything in it's place and a place for everything.
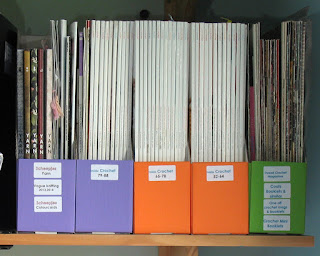
Now you are going to label. You should be able to see at a glance what is where. Never again let me hear those dreaded words, 'now where did I put that?' You can use visual clues like colour coding, different fonts, or symbols on your labels. Different coloured lids or containers help. Imagine I am going into your space to find something, how easily will I find it?
 |
| Use colour to identify. |
This is the really hard bit! Now that my workspace is clean I can't wait to get in there and start work. Now I have to develop the good habits that leave my work space exactly the same as it looks right now. Nick says he is never going to leave his shed in a mess at the end of a project. He is always going to tidy up before putting it to bed at night. For me there will be no 'in-tray'. An in-tray is an excuse for me to leave things to deal with later. I have given myself a 'WIP (work in progress) / next project' basket, this is because I get easily distracted and absent minded. I am never going to say 'what was I going to make with this?' again! Of course you can also use Ravelry for this purpose. If you go into your 'Notebook' you can put items in your 'Queue'. If you've added the yarn to your 'Stash', it even lines up the yarn for you. Or alternatively you can write it up in your 'Projects' and mark it as a WIP.
 |
| My magazines are going to stay upright and in order! |
OK so I've given you some images of what we've done. (Nick is wondering why I've not included 'before' images. Because it was shocking!) I hope we've inspired you. No matter what I do the inside of my head will remain a creative confusion where bizarre ideas bump up against each other. But now I stand half a chance of creating some of them!


