Search This Blog

Friday 15 December 2023

In Search of Advanced Crochet Techniques

It seems to have become a tradition that I write a somewhat off-the-wall post in December. It’s because I am in the throes of full-on panic at the time! Hey, why break with tradition?!

,
Ladybird book Series 634 1975

 I have been asked where I get my information, ideas and inspiration from. Perhaps you too are frustrated with the endless ‘How to crochet’ books and Amigurumi titles on sale. And yet there doesn’t seem to be any books which get you from being a beginer to being an expert. I don’t honestly remember why I started this blog; but whatever that reason was, it has evolved into being a repository for all the crochet knowledge that I can vacuum up.

So where do I get my information? Books! (sorry, I’m having a little giggle) Old books! You’re right it’s not quite that simple. Sometimes it starts with a book, a hint in a paragraph or a pattern, a weird tool or something I fall over on the internet, or in conversation. Sometimes it starts with a question I ask myself or a search that seemingly leads nowhere. At this point I say to myself; I need to write about this. Sometimes all the hints and the research make a post but sometimes I have to do the experimenting myself.

Let me break it down for you and show you what you may have been missing!

Hidden in a book you already own are all sorts of really interesting things. When I get a new book, I read it from cover to cover. You know those boring bits at the beginning and end that you rush past to get to the patterns, you need to read those bits!

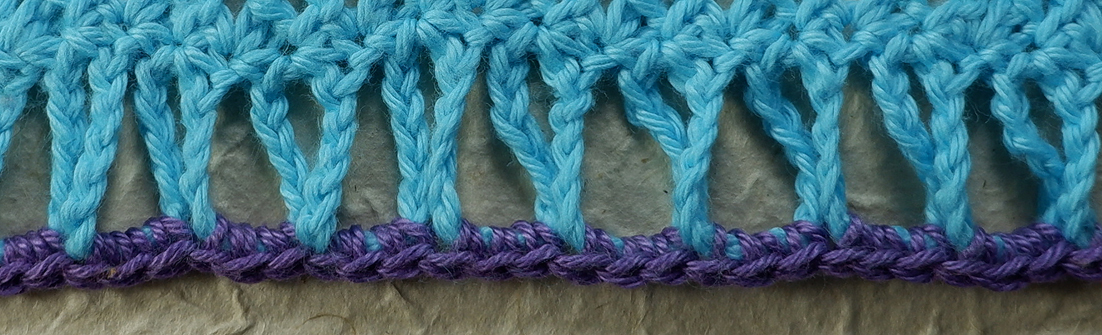
There are some other hidden bits in the patterns themselves. Do you remember that post I wrote about crochet ribbing? The whole post began with this…

Doris Chan's Convertible Crochet
 
Even stitch dictionaries have hidden information. All of my posts about slip-stitch crochet, in fact my whole slip stitch adventure began with this little paragraph in Robyn Chachula’s Stitch Dictionary.
Some books require more effort than others.
From The Batsford Book of Crochet by Ann Stearns

The Batsford book of crochet is an absolute gem. You may have flicked through it in a second-hand book shop and left it behind. At first glance the instructions are impenetrable and the pictures opaque. It requires that you take time and patience. You have to sit down with hook and yarn in hand to try and decode the information.

 
If you want something even more challenging, Therese de Dillmont’s book, Encyclopedia of Needlework, is written in an archaic style that requires you learn a new language. Here are her instructions for Double crochet! (Sc-US)
"Plain or close stitch- Put the needle in, as shewn, from the right side to the wrong, under the two horizontal loops of a preceding row, take the thread with the needle, draw it under the two threads, throw the thread over the needle and draw it through two loops."  
Almost(!) all the information you need is there. Sometimes I have to write my own instructions and draw my own charts. Do you remember this?
I made it for a post on slip stitch crochet in the round, it was inspired by this...
It was presented without any instructions. To make it worse, the illustrator was clearly making it up as they went along. If you try counting the stitches or indeed just try to follow the rows, something very odd is happening!!
 
James Walters' Crochet Workshop

 
 Another great book is James Walters Crochet Masterclass. There is so much information in there that even if you read it cover to cover you may come out none the wiser. It’s the sort of publication you dip into, as a reference book, when you need help with a specific problem. Thankfully it has a great index! Most recently, it came in handy when I was writing my Hairpin Doily post.
 

Unbelievably, foreign language books must not be overlooked! My Danish friends have bequeathed me some fabulous books over the years. Unfortunately, they have a wicked sense of humour and have started sending me Danish language books. It’s actually not that hard to translate an Amigurumi pattern from a foreign language, because the patterns are so formulaic. Fortunately for you, Sarah's book is now available in English! 

Nihon Vogue, Continuous Crochet
Japanese books are just magic. The whole written language is based on symbols so they are the masters of expressing a pattern in terms of symbols and charts. What little actually writing there is, is easily translated just with a mobile phone.
Pam Dawson
Among the books I've been given are two 1970’s obscure publications for textile handicrafts. They include information that I have not found elsewhere. They gave rise to the whole Surface Crochet series. Personally, I would have overlooked these books as I do not knit or embroider. Our mothers and grandmothers knew value for money when they saw it!
Haberdashery! Next time you’re shopping for yarn check out the haberdashery section, waste some time in a flea market. Don’t forget to look in the Sale items section of your favourite online yarn shop. This is how my ‘Long hook Crochet’ series began. I found an out-of-print publication for Double ended crochet and a Tatting crochet hook.
To find out about Crochet Tatting I found a reference in another online shop that led me to this Harper’s Bazar article. I had to blow it up and print it out in sections to try to see what it said. Even when I knew what it said I had to combine the information with several other sources to decode and write my post.

The internet is almost too big now. To be honest I’m surprised you found me. It’s nice to see you by the way! The articles that wash up to the top of any search are not always the best ones. The problem is always how to describe what you're looking for. Too many words, may mean you miss the perfect source but too few words and you are overwhelmed by links that are not what you are looking for. Don’t you wish the world at large understood the difference between crochet and knitting. This is where having a friend with an inquisitive mind is invaluable!

The problem with crochet, I always think, is that it’s basically a self-directed study. Once you have learnt the basics, from your Nan, from a book or from a video, you’re on your own. What you learn next is entirely up to chance. I’m not suggesting it should be otherwise. I am a jack of all trades and master of non, it’s just what floats my boat. But wouldn’t it be nice to know what all the things are. I've made a start!

Can I finish on a gripe? I picked up a pattern recently that used the notation Fsc. No explanation, just Fsc. I know what that means, but I also know that I have written more posts about Foundation stitches than any other. Like I said, we don’t all learn the same things and certainly not in the same order! To be honest I need to remember this myself. So if you catch me making assumptions about what you know… well you can quote me now!
Time for me to sign off and wish you traditional seasonal greetings…

Peace and goodwill to all…

Fastening off…


Three books I would not be without:

The Batsford Book of Crochet by Ann Stearns

(Because our mothers knew best!)

The Crochet Answers Book by Edie Eckman

(In fact, you can’t go wrong with any book by Edie Eckman)

The Handbook of Crochet Stitches by Betty Barnden

(Not for the stitches but for all the invaluable information at the start!)

Crochet Stitches Visual Encyclopedia by Robin Chachula

(Because of the diverse stitch patterns, she opened my knowledge of crochet techniques and got me hooked on Slip stitch crochet.)

Wednesday 15 November 2023

Stealing Ideas from Mrs Micawber!

When Mrs Micawber said; " I've wanted to experiment with Hairpin Lace using chained stitches instead of yarn loops", my response was "Uh?"
Let's face it, I am not an innovator. I am good at some things, like asking, "why?" and "what if?", I also have the patience to research and experiment. Sue Perez, aka Mrs Micawber, most certainly is an innovator. So after spending some time not being able to solve the problem, Sue, was kind enough to send me a simple set of instructions. Eureka! The 'what if?' side of my brain set fire to itself! The important thing to note is that, this is hairpin lace without a frame!

Here's what Sue told me... "chain three...
* chain [the desired number for the loop size]...
turn, skip the loop chains and Dc (Sc-US) in each of the first three stitches...
Repeat from  *
I used 12 chains for the loop. Just as with Hairpin Lace the length of the loop depends on what you intend to do with the braid. But I'm getting ahead of myself!
The result feels a little dull so I start to think about ways to make it more interesting. [I aught to point out that I've made these examples in a relatively thick and unyieldy cotton yarn. Made in a lace weight or cotton thread the result would be quite different.]
What if we work alternately in back loop and then front loop only?
I set up this sample with 3+12 chains and worked the 3Dc (SC-US). On the even numbered rows I worked Back-Loop Dc stitches and Front-Loops Dc on the odd rows.

What if we use Half-Trebles (Hdc-US) and work in the third loop?
This begins in the same way with 3+12 chain and 3Half-treble (Hdc-US). On the even rows I worked into the third loops and on the odd rows the Front-Loops.

What if we work front and back post Trebles (Dc-US)?
It begins with 3+12 chains and 3Trebles (Dc-US). The even rows are Front-Post Trebles and the odd rows are Back-Post Trebles.
Making it this way it has a front and a back, which is which depends on what you are going for!

Alternatively I suppose you could make it with just Front Post stitches.
Now it looks the same on both sides.
 
Shells?
This was an accident, I was trying for crossed Trebles but it wasn't successful! This was my alternative, I suppose technically these are spike stitches. You'll need proper instructions for this.
Set up; 3+6 chains. Turn.
Row1; Skip the 6chain +another 2chain, 2Treble (Dc-US) in the last chain, Chain1, 2Treble in the first of the skipped 2chain and make around the first treble pair. 6chain. Turn.
Row2; Skip (6chain,2 treble,1chain) and make 2Treble in the next treble, Chain1, make 2Treble in the second of the skipped trebles. Chain6. Turn.
Repeat row2 to desired length.
 
Fans?
This begins 1+6Chains, I skipped the 6chains and made a fan of (2Treble,1Chain,2Treble) in the last chain.
For each of the following rows I made the fan into the central chain1 of the previous fan.

How about a shallower version?
Doesn't this look a lot like standard Hairpin lace? It begins 1+12Chains, followed by (1Double-crochet,1Chain,1Double-crochet) in the last chain. Just like before, this mini fan is made into the central chain1 of the previous row.
 
We've got to try Puff stitches, surely? 
I began with 1+6Chain as before and made a 4Half-Treble Puff (Hdc-US) into the last chain. For each of the following rows I made the puff into the top of the previous one.
 
Mrs Micawber said; "Then join the strips as you would for regular Hairpin Crochet."  Oh crikey!

Woven?
I made this exactly as if it was standard hairpin lace. I wove the loops by pulling the left hand loop through the right hand loop, and the right through the left.

Zig-zag?
This is another common join, making a Double-crochet (Sc-US) into one loop followed by one or more chain stitches and a Dc into the opposing loop. The loops can be kept straight or twisted.
Here I've gathered three loops together and added extra chains.

And double Zig-zag?
In this example the first strip is edged and then the strips joined as the second strip is edged. I have also gathered the loops together, joining two loops with a single Double-crochet.

We can edge the strips before joining them.
 
I can alter the shape of the chain loops by making more than one stitch in each loop.
I made 3Double-crochet into each of these loops.

Because the loops are made of chain stitches I can choose to work into the actual chains rather than into the loops themselves.
I've gathered three loops together by putting the hook through the back bump of a single chain from each of three loops and then made 3Double-crochet. This keeps the gathered stitches quite flat.

 Our options are endless, there are so many more possible variations for stitches and joins. Different yarns will create different results and how shall we use the result? As a fabric, as a braid, as a section or border within standard crochet. I'm seeing sweater borders, an inset yoke, a throw, a mandala... so before my brain explodes I'm off for a lie down!


fastening off (and lying down)...


Sunday 15 October 2023

Hair Pin Lace 6 - Working in Rounds

Did you know that you could make doilies using Hairpin crochet? This was a revelation to me!

I have found a set of vague instructions, so of course I had to take up the challenge and see if I could design my own. I am given to understand that each successive round should contain double the number of loops from the previous round. I have absolutely no idea how to join the beginning and end of each round except that a slip-stitch is involved. So, with this scarcity of facts to hand, I invite you to come with me now as I puzzle out the solution!
 Let's be honest! I could write this post so that you would believe that I am awfully clever and magically produced the perfect design, but that's not what happened. It has taken some experimentation, some trial and error and some problem solving. I hit the first problem immediately. Standard crochet involves a simple formula for increases depending on the height of the stitches used. I know of no such formula for hairpin lace. The centre of my doily would not lie flat unless I; a. left a hole in the centre or b. reduced the width of the braid.

So here's what I did.
First round:
  • I'm using Scheepjes Cotton8, a 4ply yarn. I begin using a 3mm hook, a 2.5cm (1") wide frame. I make a braid with 20 loops on each side. As the centre of this doily will be quite compact I keep things simple and make a single Dc (Sc-US) on either side of the spine.
  • I am instructed to run a thread through all the loops on one side of the braid and gather to form the centre of the doily. You can use either sewing thread or yarn. My best solution was to thread a needle and run it through the untwisted loops, twice, while they were still on the Hairpin frame. Do not pull the centre too tightly closed, knot to secure.
  • While the braid is still on the frame, run a long contrast colour thread through the loops on the opposite side. Keep the working loop on the hook before carefully removing the frame.
  • Join the two ends of the braid at the spine by either making a slip stitch into the start of the spine, in the middle; or by sewing the equivalent of a needle join. I have not found a way to make this join completely invisible. You can hide your yarn-ends in the centre. Flatten the round into a disk.
  • Leave the contrast yarn in the work until you have either edged or joined this round with the next. This yarn helps to keep the loops in order and all facing a uniform direction. It makes joining and edging much easier.
Second Round:
  • Following the only formula that I've been given, I use double the number of loops, so this time I am making a 2.5cm (1") wide braid with 40 loops. This time, I'm using 2Dc (Sc-US) in the Front Left Loop on either side of the spine.
  • Once it is made I run a contrast thread through the loops, one on each side before removing it from the frame. At this length the lace has a tendency to twist so keep it flat before carefully joining it as before. This time you will need to carefully weave the yarn-ends into the spine on the reverse side.
Third Round:
  • To add a little variety, but still keeping things fairly straightforward, I am making a braid with 80 loops a side and working a Dc (Sc-US) into the Front Left Loop, plus another into the Back Left Loop. (Here's something to consider. The more stitches that are used to make the braid, the further apart the loops become and the longer the braid would be.)
  • Add the contrast threads and carefully remove from the frame on a flat surface, before joining at the spine as before. 
Joining the Rounds:
Rounds One and Two
  • Lie the disc inside Round2. 
  • At this point I have to decide whether to keep the loops straight or to twist them. Because the disc has half the number of loops compared to Round2, I have to join one loop from the disc to two loops from Round2.
  • I start on the disc, picking up one loop so that it is twisted and begin with either a Slip-stitch or a standing Dc (Sc-US),Chain1.
  • *Now I place the hook through 2 loops from the inner edge of Round2, I've kept mine straight and untwisted, and make a Dc,Chain1.
  • Dc,Chain1 into the next single loop of the disc.
  • Continue from* until I reach the starting point and needle join. The ends are easily woven in on the reverse. The doily looks a little scary at this point as it is not laying flat.
  • The first two contrasting yarns can now be removed.
Rounds Two and Three
  • I joined these rounds in exactly the same way.
Edging
Although I don't do fru-fru I decided I'd like the border to be a little frilly! I worked a simple border in three rounds.

Round One
  • Beginning anywhere on the border, I worked into twisted loops and started with a standing Dc.
  •  *Dc, Chain1. Repeat from* working a Dc into each twisted loop around and Slip-stitch to that starting Dc.
Round Two
  • *Dc in the next Chain1-space, Chain2. Repeat from* around and Slip-stitch to the starting Dc.
Round Three
  • *Dc in the next Chain2-space, Chain3. Repeat from* around and needle join to the start.
  • The last contrasting thread is now removed.
  • At this point my whole doily looks a little scary, so I say a prayer to the Crochet gods and after blocking it all turns out just like I'd hoped!!
Some time ago I bought some DMC Natura Linen yarn to try out but have never found a suitable project. The natural fibre in the yarn makes it a little different. It has some stiffness with a tendency to split and there is some variation in the thickness of the yarn. So I decided to try a more monotone doily using the same pattern. It used less than 10grams/30metres of each yarn. I was quite surprised. I'd only ever seen pictures of these doilies before and they looked flimsy and insubstantial. The Linen doily particularly keeps it's shape well and although light weight, neither could be described as flimsy.
If you would like to follow my instructions yourself you might find these links to the previous posts helpful:
Perhaps you've already made a Hairpin Doily or you'd like to experiment with some of the more complex braids, in case I'd love to hear about what you did and how you got on.

That's almost the last post in our Hairpin Lace series. So if you ever see anyone presenting just a set of basic instructions for Hairpin Crochet, as if that's all there is, I hope you will tell them to be very ashamed!! 
Oh gosh! Did I say almost? There is yet one more work in progress, it's a bit out of the box and off the wall, so we'll see how far I get with it before I promise anything!
 
Fastening off...