

It immediately strikes me that despite this being a necessary topic, it makes for a dull Blog post. But hang on until the end, I've attempted to jazz it up for you!
Decreasing
Let's start with decreasing because that's dead simple! Decreasing with slip stitches is no different from any other type of crochet, you place the hook in two stitches, the difference here is, of course, that you don't pull up a loop in the stitches. I'm using a second colour to make it easier for you to see what I am up to.
Here I am working in Back-loop-only stitches. Once the hook is in both stitches, yarn over the hook...

...and pull through all three loops on the hook.

As the first example was in Back-loop-only, here I am showing you the same thing in Front-loop-only.


You could skip a stitch in between the two stitches if you want a bigger decrease...

...or you could put the hook into three adjacent stitches.


Increasing
Increasing is just a bit different to the standard method and leads to a number of solutions.
Method1:
This is done by adding a Chain1 where ever an increase is required.


Method2:
This time we make two Slip-stitches into the same stitch, the second slip stitch is anchored by the succeeding stitch.


Method3:
This is the more traditional method and is done over two stitches, the instructions look a little mad. At first glance it looks as if we are removing stitches.
make a Slip-stitch in the first stitch...

...make a decrease using that same stitch, which already contains a stitch, and the next one

...make another Slip-stitch in the second stitch which already contains the decrease.

So two stitches become three.
Method4:
If you need more than one increase, try this.
make a Slip-stitch in the first stitch...
...make a decrease using that same, first stitch and the next one
...make another Slip-stitch in the second stitch which already contains the decrease.
...make a decrease using that second stitch and the next one
...make another Slip-stitch in the third stitch which already contains the decrease.

So three stitches become five.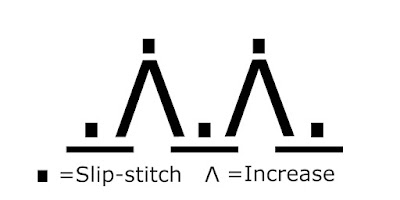

Zigzag Rib
Now that we know how to increase and decrease it must be easy to work up a Chevron or Zigzag. You may remember that I talked about how to make Zigzags back in 2021. All you need to do, I told you, was to increase and decrease by the same number of stitches. Oh how my words came back to haunt me! With taller crochet stitches you can put as many stitches as you like into a previous row stitch. But it is not so easy with Slip-stitches. I nearly drove myself crazy trying to work it out!
Here is a solution that I found for Zigzag Rib:
All the stitches are made into the Back-loop only. I have used Method4 to increase.
I worked over a repeat of 13 stitches, plus 3 for the end and turning chain. So begin with a multiple of 13+3 chain.

Row1.
Decrease over first 2sts,
*Slip-st x5,
(Decrease over last and next st, Slip-st in last)x2,
Slip-st x4,
Decrease over next 2sts,
repeat from* to end of starting chain, chain1 and turn.

Row2.
Decrease over first 2sts,
*Slip-stx5,
(Decrease over last and next st, Slip-st in last)x2,
Slip-stx4,
Decrease over next 3sts skipping the central st,
repeat from* to last two sts, at which point decrease over last two sts only, chain1 and turn.
Repeat row2 to desired length.

Here's a little chart to help, the funny little upside down V's represent the decreases. They indicate which stitches the hook goes into.

This was actually my second solution to this problem so I am certain that you will discover something more elegant.
Fastening off...
