
I can't honestly believe that I am sitting down to write yet another post about Foundation Crochet stitches but this one is a doozy! I've seen other crocheters making these chains before, but have only just learnt it myself, to leave it out and not share the secret with you would be criminal!

Before we get started let me remind you of some of the variations I've already shared with you. There was the Foundation Stitches post, that you will find here and Foundation Treble, here. That was followed by Foundation Double-chain, here and then I found a Foundation that was perfect for lace crochet. At that point I could not imagine that there could possibly be any other solutions; and yet here we are!
But why? I hear you asking! Why do we need all, or even, any of these solutions? Perhaps you love to make chain stitches, personally I hate to. My stitches are either too loose or too tight. This type of chain is very stable and it's easy to make the stitches evenly. But best of all the finish is very crisp and tidy
Let me show you. It's so easy you won't believe me until you try!
It's best to start with a Reverse Slip Knot. I've shown you this before but here it is again. All you have to do is to hold your yarn the opposite way round to the usual method. Hold the yarn tail in your left hand and the working yarn in your right.

By making the knot this way you can control the size of that first loop. By pulling on the tail end you can close up the loop. This can be very helpful after the next stitch is made or even after the next row is made.

Should you make your initial loop too tight you can open it up by holding the working yarn and pulling against it.

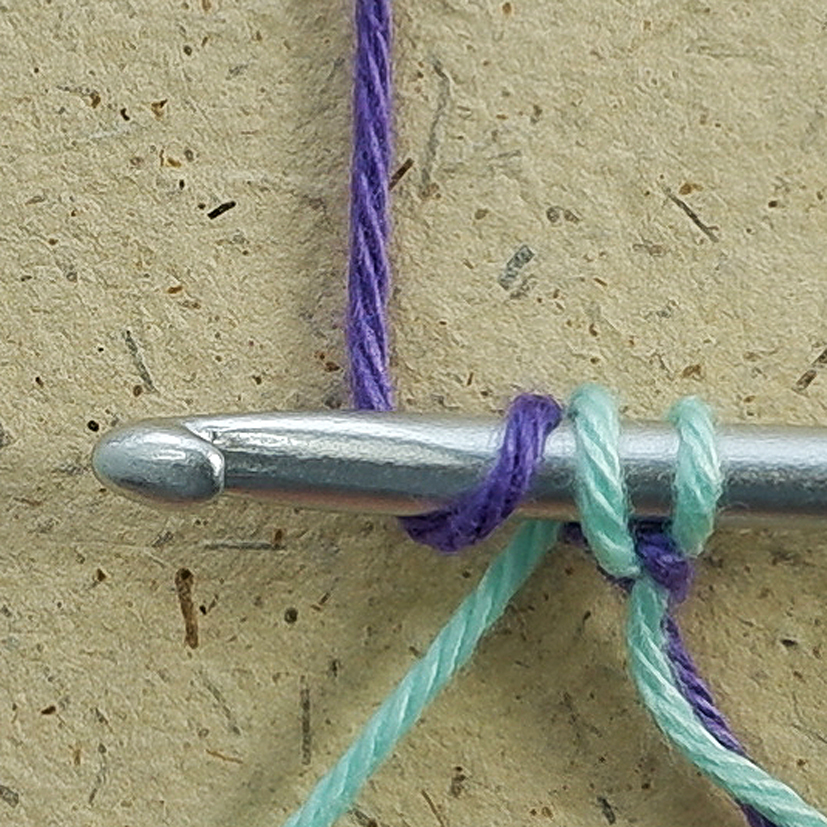
Now we can get started making the chain. In order for you to understand exactly how these stitches are being formed I am using two colours of yarn. In this illustration the pale thread represents the yarn tail. So, although you can clearly see two yarn tails in the next image, I need you to pretend that they are not there!
Step One: take the yarn tail over the hook from front to back.

Step Two: take the working yarn over the hook from back to front and pull through the two loops on the hook.
That's it! Repeat steps One and Two for each chain stitch required.
The hardest thing is wrangling the yarn. It feels very strange to begin with but if you hold your working yarn as you would normally you can then use your thumb and another finger to work the tail from front to back.

Now pass the working yarn from back to front as you normally would, leaving the thumb to control the yarn tail.

Here's the finished chain from the front... ... and from the back.


To join it into a loop or work back along it with your first row of stitches, treat it as if it is a normal length of chain stitches. I chose to beginning with a starting chain, and work double crochet (Single crochet-US) stitches into my chain for this example.

than foundation double crochet.
There's just one last thing you need to know. I had to ask myself this, the first time I sat down to make these stitches...
How long should you make your tail? Fortunately the maths are easy. The tail needs to be three times the length of your finished length of chain plus 4"/10cms for sewing in at the end!
I really hope you'll give it a try, I know that it is a very handy technique to have in your crochet toolbox.
Fastening off...
