I've said it before (and I'll say it again, no doubt) the most important thing I learnt at art college was to ask questions. This month I have been asking myself; 'What's with all these long crochet hook techniques? Are they all the same technique with different names?' There's only one way to find out. So over the next few months I am going to investigate Tunisian crochet, Crochenit, Knooking and CroTat. Let's start with Tunisian Crochet. I am far from being an expert but it is the technique I know most about.Tunisian crochet creates an extra thick and warm fabric which is particularly suited to blankets, but it is also very versatile. It produces a one-sided fabric which can be worked in the round or in short rows. Many of the techniques available to us in normal crochet can be used as well. The best way to explain is to show you.
Let's start with the basics. The hook is usually one or two sizes larger than usual. Today I'm using up some oddments of Scheepjes StoneWashed which recommends a hook size of 3-3.5mm. So the Tunisian hook that I am using is a 5mm. The hook is held with a knife grip instead of a pen grip. Personally I find the really long hooks very hard to use, so I prefer a shorter hook which is attached to a cable. Each row consists of a Forward Pass where the stitches are formed and placed onto the long hook; and the Return Pass where the stitches are worked off again.Tunisian Simple Stitch.
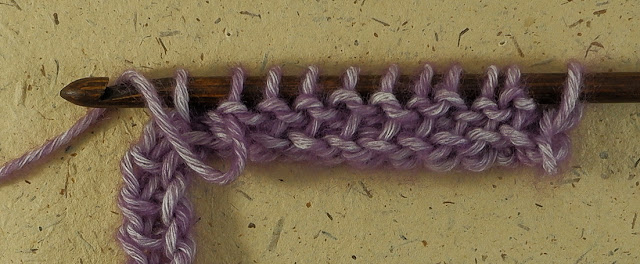
Start by chaining the exact number of of stitches as you require. There are no extra stitches required for turning. Pull up a loop in the second chain from the hook and each chain stitch to the end, just as you would normally, except leave all the loops on the hook. This is the foundation row Forward Pass.
Now we work all the stitches back off the hook in the Return Pass. It always begins with a Chain 1. To do this Yarn Over (YO) the hook and pull through the first loop on the hook.Now YO the hook and pull through the next two loops at the same time.YO and pull through each pair of loops to the end. The foundation row is complete.
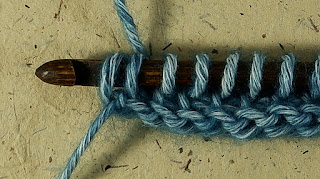
The loop on the hook will be the first stitch of your next row, so ignore the very first stitch and place the hook behind the next vertical bar.YO the hook and pull through the vertical bar. Leave this loop on the hook.Pull up a loop for each vertical bar to the very end. At the end place the hook into the Chain1 so that there are two bars of the chain stitch on the needle.
YO and pull up a loop.
You are now ready to work the Return Pass.
So Chain1, Yo and pull through each pair of stitches to the end.
Changing colour in Tunisian crochet can result in some interesting effects depending on when you change colour. Here I am changing the colour on the very last pull through of the Return Pass, so that my new row will be in a different colour.
Here, I have instead, changed colour on the Chain1 of the Return Pass so the row will be both blue and pink.When you are ready to finish your fabric you will notice that the last row you made looks loose and gappy. The neatest way to finish it off is with a row of slip stitches. Place the hook under the vertical loop as normal but this time when you yarn over pull the yarn through both the loops on the hook to for a slip stitch. Tunisian Knit Stitch.
We make the foundation row exactly as we did for Simple Stitch. Just as before, the loop on the hook counts as our first stitch.
To create the knit stitch we insert the hook between the Front vertical bar and the back vertical bar, right through the fabric, under the chain stitches. YO the hook and pull a loop through to the front.Pull up a loop between each pair of vertical loops to the end. Working the Return Pass as we did before for Simple Stitch. Finish the fabric by working a row of slip stitches.
Tunisian Purl Stitch.
I found this stitch really hard at first. There is a bit of a knack to it, so if at first you struggle with it, please persevere! We start with the foundation row as before. And the first loop on the hook counts as our first stitch.
Bring the working yarn to the front before placing the hook under the front vertical loop. You will notice that in this photo my hook is upside down on purpose! Yarn over the hook and pull the yarn through the loop. It is important not to twist the yarn or the loop as you pull through. This is the knack I spoke of! You of course may get it on the first go in which case I give you permission to be very smug!The return pass is the same as before.These are the three main stitches used in Tunisian crochet, and you would be forgiven for thinking this was all there was. But it also uses the more standard crochet stitches, clusters and techniques you have learnt in crochet. I shall leave you with a glimpse of a Tunisian lace stitch in the hope of wetting your appetite!
Fastening off for 2021! Seasons Greetings...
Peace, 和平, Paz, Paix, Мир, سلام,