I've been doing a bit of blocking this week and it's thrown up a few questions, so I thought I'd experiment to find the answers.
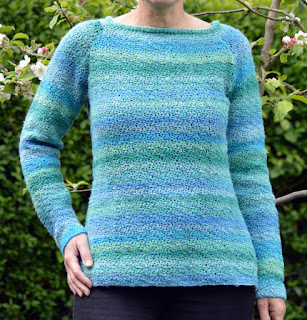
I've just finished making myself the 'Eleganza' sweater from Dora Ohrenstein's 'Custom Crochet Sweater Book'.
Blocking turned this garment from a bit Ugh! to a very flattering
A-line design. So my question here is will I need to block this garment
next time it's washed or will it keep this shape if I treat it with
respect and dry it flat?
(Yes I know you need sunglasses for this one!) This was my attempt at Jen Tyler's Equinox
in acrylic. It needed quite alot of blocking, in fact I blocked it to
18 inches, but when I took the pins out it popped itself down to 17
inches. So once again I want to know how washing will affect this. But
also I want to know if it's just acrylic that retains that amount of
spring? Or perhaps how controllable is the blocking process? What happens
when I wash it again?
My
experiments won't be exactly scientific because that would be boring!!
I've taken five yarns which each have different properties. And I'm
using three different blocking methods.
✸Man made fibres should be wet or cold blocked.
(Cold blocking means pinning and then spraying with water so that it's damp rather than soaking wet.)
✸Plant fibres should be wet blocked.
✸Animal fibres should be steam blocked.
(Pin out your work and then steam holding the iron no closer than 2.5cm/1".)
I'm using designs from Margaret Hubert's The granny Square Book. It's my experience that these designs work better after blocking. The cotton square uses the horizontal puff stitches we look at in a previous post.
Here's
my experiment then. After crocheting my squares I measured them. As you
can see from the image above they are twisting all over the place. They
definitely needed blocking.
I
blocked each one according to it's fibre content and measured it's size
while pinned out. When they were dry I unpinned them and measured
again.
a
no-rinse washing solution; squeezed but didn't wring them out, rolled
them in a clean towel to remove excess water and dried them flat.
Finally I washed them all using 'Soak'
Here are my results for you in a little table.
As you can see, after unpinning all of the samples instantly shrank and after the second wash they mostly returned to their original size.
So what's the point of blocking? Well...all of my samples are now a better more even shape, with sharp corners which they have retained even after the extra wash. If I had been joining together a number of blocks, or the back and front of a sweater it would have ensured that the overall finish was neat and even. I am confident that if I wash my Equinox square again it will retain the same shape it has now. As for my Eleganza sweater? That is still a mystery! But I do have this handy gauge swatch that I made before I started it, so I'm off to experiment with that!
See you in a fortnight for some more mad musings from the crochet obsessed!!


