

My last post led me to thinking about buttonholes so here is my mini guide. I've made some diagrams so I hope that most of my examples are self explanatory. So often in patterns I've seen buttons stuck through any old hole in the fabric, and yet button bands are so easy to do.
I'm assuming that most of the time you will be working a button band. The very easiest way is to make a band of Double Crochet stitches (SC-USA) so that the holes will stand vertically. To make the 'hole' you simply chain a few stitches skipping the same number of stitches in the previous row. In the next row you work into the chain stitches. Here's the diagram...

And here's what it looks like...

It might be a good time to point out that due to the stretchy nature of the crochet fabric it's always a good idea to make the holes smaller than you think they need to be! Heavy buttons can distort the fabric so they're best avoided.
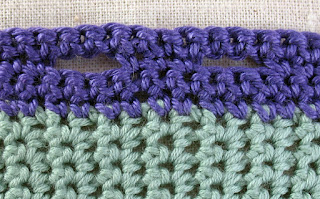
The next example is made a little bit more interesting by using Half Treble Stitches (HDC-USA).

Here's what it looks like...


Remember my Janelle cardigan using Linked Stitches? I added a button band to it using Double Crochet worked into the back bump of the previous rows. (You have to work the stitches from the right side of the fabric only, so don't turn!)
Here's the diagram...
Here's the diagram...


Let's get a bit fancier. I used this when making a ribbed button band. Please be aware that because you are using taller stitches the button hole will be bigger. (Yes - you know I made my button holes too big!)


Here's the swatch...


Perhaps you want something a bit more exciting. This one looks a bit fancier.
 Here's the swatch...

The next one is more of a button loop than a hole!

Here it is...
 My last example is going to require some explanation. Perhaps you want your button hole to lie horizontally in a band? Or you would like to make a vertical hole in the fabric and not add an additional band at all?


The explanation is a bit like a dot-to-dot picture. When you are at the point where you would like the button hole to be, you work the fabric on one side of the hole, ie follow arrows 2,3 and 4. At the top of the hole, slip stitch down the edge of the rows you have just made, arrow 5. Now you can make the fabric to the other side of the button hole, ie follow arrows 6,7,and 8. (I used chain stitches at the start of each row but left them out of the diagram as it would have been way too confusing!)
 Once you've made all the buttonholes you go back along the top, Row9.


I hope these examples have given you a starting point and have inspired you to create some really stunning button holes!
No comments:
Post a Comment