Search This Blog

Showing posts with label Hairpin Lace Crochet. Show all posts

Sunday, 15 October 2023

Hair Pin Lace 6 - Working in Rounds

Did you know that you could make doilies using Hairpin crochet? This was a revelation to me!

I have found a set of vague instructions, so of course I had to take up the challenge and see if I could design my own. I am given to understand that each successive round should contain double the number of loops from the previous round. I have absolutely no idea how to join the beginning and end of each round except that a slip-stitch is involved. So, with this scarcity of facts to hand, I invite you to come with me now as I puzzle out the solution!
 Let's be honest! I could write this post so that you would believe that I am awfully clever and magically produced the perfect design, but that's not what happened. It has taken some experimentation, some trial and error and some problem solving. I hit the first problem immediately. Standard crochet involves a simple formula for increases depending on the height of the stitches used. I know of no such formula for hairpin lace. The centre of my doily would not lie flat unless I; a. left a hole in the centre or b. reduced the width of the braid.

So here's what I did.
First round:
  • I'm using Scheepjes Cotton8, a 4ply yarn. I begin using a 3mm hook, a 2.5cm (1") wide frame. I make a braid with 20 loops on each side. As the centre of this doily will be quite compact I keep things simple and make a single Dc (Sc-US) on either side of the spine.
  • I am instructed to run a thread through all the loops on one side of the braid and gather to form the centre of the doily. You can use either sewing thread or yarn. My best solution was to thread a needle and run it through the untwisted loops, twice, while they were still on the Hairpin frame. Do not pull the centre too tightly closed, knot to secure.
  • While the braid is still on the frame, run a long contrast colour thread through the loops on the opposite side. Keep the working loop on the hook before carefully removing the frame.
  • Join the two ends of the braid at the spine by either making a slip stitch into the start of the spine, in the middle; or by sewing the equivalent of a needle join. I have not found a way to make this join completely invisible. You can hide your yarn-ends in the centre. Flatten the round into a disk.
  • Leave the contrast yarn in the work until you have either edged or joined this round with the next. This yarn helps to keep the loops in order and all facing a uniform direction. It makes joining and edging much easier.
Second Round:
  • Following the only formula that I've been given, I use double the number of loops, so this time I am making a 2.5cm (1") wide braid with 40 loops. This time, I'm using 2Dc (Sc-US) in the Front Left Loop on either side of the spine.
  • Once it is made I run a contrast thread through the loops, one on each side before removing it from the frame. At this length the lace has a tendency to twist so keep it flat before carefully joining it as before. This time you will need to carefully weave the yarn-ends into the spine on the reverse side.
Third Round:
  • To add a little variety, but still keeping things fairly straightforward, I am making a braid with 80 loops a side and working a Dc (Sc-US) into the Front Left Loop, plus another into the Back Left Loop. (Here's something to consider. The more stitches that are used to make the braid, the further apart the loops become and the longer the braid would be.)
  • Add the contrast threads and carefully remove from the frame on a flat surface, before joining at the spine as before. 
Joining the Rounds:
Rounds One and Two
  • Lie the disc inside Round2. 
  • At this point I have to decide whether to keep the loops straight or to twist them. Because the disc has half the number of loops compared to Round2, I have to join one loop from the disc to two loops from Round2.
  • I start on the disc, picking up one loop so that it is twisted and begin with either a Slip-stitch or a standing Dc (Sc-US),Chain1.
  • *Now I place the hook through 2 loops from the inner edge of Round2, I've kept mine straight and untwisted, and make a Dc,Chain1.
  • Dc,Chain1 into the next single loop of the disc.
  • Continue from* until I reach the starting point and needle join. The ends are easily woven in on the reverse. The doily looks a little scary at this point as it is not laying flat.
  • The first two contrasting yarns can now be removed.
Rounds Two and Three
  • I joined these rounds in exactly the same way.
Edging
Although I don't do fru-fru I decided I'd like the border to be a little frilly! I worked a simple border in three rounds.

Round One
  • Beginning anywhere on the border, I worked into twisted loops and started with a standing Dc.
  •  *Dc, Chain1. Repeat from* working a Dc into each twisted loop around and Slip-stitch to that starting Dc.
Round Two
  • *Dc in the next Chain1-space, Chain2. Repeat from* around and Slip-stitch to the starting Dc.
Round Three
  • *Dc in the next Chain2-space, Chain3. Repeat from* around and needle join to the start.
  • The last contrasting thread is now removed.
  • At this point my whole doily looks a little scary, so I say a prayer to the Crochet gods and after blocking it all turns out just like I'd hoped!!
Some time ago I bought some DMC Natura Linen yarn to try out but have never found a suitable project. The natural fibre in the yarn makes it a little different. It has some stiffness with a tendency to split and there is some variation in the thickness of the yarn. So I decided to try a more monotone doily using the same pattern. It used less than 10grams/30metres of each yarn. I was quite surprised. I'd only ever seen pictures of these doilies before and they looked flimsy and insubstantial. The Linen doily particularly keeps it's shape well and although light weight, neither could be described as flimsy.
If you would like to follow my instructions yourself you might find these links to the previous posts helpful:
Perhaps you've already made a Hairpin Doily or you'd like to experiment with some of the more complex braids, in case I'd love to hear about what you did and how you got on.

That's almost the last post in our Hairpin Lace series. So if you ever see anyone presenting just a set of basic instructions for Hairpin Crochet, as if that's all there is, I hope you will tell them to be very ashamed!! 
Oh gosh! Did I say almost? There is yet one more work in progress, it's a bit out of the box and off the wall, so we'll see how far I get with it before I promise anything!
 
Fastening off...


Friday, 15 September 2023

Hair Pin Lace 5 - Joining Techniques

I keep telling you that Hairpin Lace is very versatile. I have already demonstrated various techniques; created fringes, edgings and added beads. But this month I hope to really prove it to you by turning corners!
We will also look at the different ways we can use the braid, edge and join the strips to form a fabric.

First, I suppose, we must decide how we are using the braid.
It can be used exactly like Lace, as an edging, insert or appliqué.
It can be sewn, or slip-stitch crocheted onto fabric, crochet or knitting.
You can even use it straight off the Hairpin frame.

Alternatively it can be edged with any type of crochet stitch.
Let's begin with a simple Dc (Sc-US) edging. 
We have to decide whether to separate the loops by the addition of chain stitches...
...and whether to keep the loops straight or twist them.

We can even gather together the loops, or not...
twist them or not...
and both sides don't even have to be the same!

As promised, we can turn corners...
...or create Waves
 ... and Chevrons!
In this example I have gathered the loops with a Dc and placed a Treble (Dc-US) into the spine between the groups.

From this point we can add more rows of crochet for a more complex braid.

Using all these various techniques we can join the lace strips to create a fabric.

Woven Join.
Lay two strips of Lace side by side and alternatively interlace the loops. At the end of the row sew the final pair to secure in place.
It's possible to interlace a multiple number of loops, the more loops you weave together the longer they will need to be. This type of join can be quite bulky.

Slip-stitch Join.
Hold two lengths of lace back to back. Place the hook through a pair of loops, one from the top and one from the bottom strip simultaneously,and join with a slip-stitch. Work to the end of the strips in this manner.

Zigzag Join.
Lay two strips of lace parallel. *Place the hook through two loops (either twisted or straight) on the lower strip, make a Dc (Sc-US). Chain two and place the hook between two loops on the upper strip and make a Dc, Chain2. Repeat from* to end of lace.

Double Zigzag Join.
This join is made in two stages.
On the first braid, place the hook through two loops (either twisted or straight), Dc, Chain5. Repeat along the strip. (Shown here in purple)
On the second braid, place the hook through two loops and Dc as before, Chain2, slip-stitch into centre chain of the first edging, Chain2. Repeat along the strip. (Shown here in teal)

Pre-edged Join.
Add more interest by edging the strips before joining them.

Because of the endless possibilities I have kept the 'how to' to a minimum. Instead I recommend you experiment to your hearts content. I shall leave it to you to imagine all the additional levels of complexity that are possible.
I have one more topic still to cover before we wind up this Hairpin Lace series, so I hope you will join me again next month.

fastening off...


Tuesday, 15 August 2023

Hair Pin Lace 4 - Beaded Braid

Adding beads to Hairpin Lace is so transformative that I felt it deserved it's own special post. I'll begin by showing you how to add beads to any design and then give you step by step instructions to make this challenging but beautiful Berry Braid.
 
[Abbreviations used in this post:
Chain- Ch
Double Crochet- Dc (Sc-USA)
Right-Hand- RH 
Back Left-hand Loop- BLL]
 
Beaded Asymmetric Braid
Last month I showed you a way of making an Asymmetric Braid which is perfect for adding a fringed edging. By loading your working yarn with beads before you begin to make the lace, you can create a beaded fringe.
Simply pull up one bead as you turn the frame to form the long loops.
In this manner beading can be added to any of the braids we have made so far in this series.
 
Berry Braid
This doesn't immediately look like Hairpin Lace. I found it challenging to say the least. It introduces the idea that the Hairpin is simply a tool. We don't have to be restricted by the very basic Hairpin Lace instructions that we are normally offered.
This braid is best made on a closed quad frame. It's quite fiddly in the beginning and liable to fall off an open frame! 
 
Pre load your yarn with beads. You can use any number or size of bead, but you will need an odd number per loop. There are three loops per berry. I've used 7 beads per loop.
Begin with a Slip-knot on your hook and Slip-stitch around the RH pin, Ch3, keep the working yarn to the back.
*Pull up 7 beads, placing 3 to the back and 4 to the front,
Turn the frame, catching the working yarn between pins and Ch1.
(Turn the frame, Dc in the BLL...
...Pull up 7 beads as you did before and turn the frame, Dc in the BLL)...
...repeat all between the brackets once more.
Place the hook between the chain stitches and the 2 left Loops, work 3 Dc around the 2 loops.
Now place the hook down between the Front and Back loops...
...and work a final Dc around the 2 back loops only.
Turn the frame, catch the yarn between the pins and Ch3.
Repeat from * to the required length.

The braid has 3 loops between each pair of berries. To finish and add an edge, catch the 3 loops together into a single Dc and 5 chain stitches in between the 3-loop groups.

Next month we'll look at ways to edge, join and use Hairpin Lace Braid. I hope you'll join me.
fastening off...


Saturday, 15 July 2023

Hairpin Lace 3- Frills and Fringes

 I hope you are ready for a challenge this month as we will be making some wild, weird and wonderful hairpin braids! 
 
[Abbreviations used in this post:
Chain One- Ch1
Double Crochet- Dc (Sc-USA)
Left-Hand- LH
Right-Hand- RH 
Front Left-hand Loop- FLL]
 
Multiple length Braid
Let's start as we mean to go on with a three pin braid. The instructions I have for this braid tell me to hold two hairpins of different widths together at the same time, aligning the left hand pins. Besides the fact that this sounds almost impossible, frustrating and fiddly, I don't have two hairpins of different widths!
But, I do have the Simplicity Boyle quad frame which allows for adjustable widths. So I added to it a 3.25mm knitting needle. For this technique we need the frame to be open at the top which makes it a little bit less secure than it usually is. So, Mr Pulledstitch suggested that I temporarily use a couple of tiny cable ties to lock the frame.
 
I'm making the stitches between the two darker coloured pins, with a long loop around the outer pin every other stitch.
 
I'm starting as we did for Basic Braid, with a slip-knot on the loom, around the left hand pin, catch the yarn under the work,
pull up a loop and Ch1above the work.
 Work the first Dc (Sc-US) in the Front Left-hand Loop. (FLL from here on)
 *Remove the hook. Turn the frame, as if turning a page, from right to left, and allowing the working yarn to wrap around the frame. Replace the hook.
Dc (Sc-US) in the FLL.
Bring the yarn down between the two Left-Hand (LH) pins, then turn the frame as before. Dc in the FLL.
Turn the frame, Dc in the FLL.
Turn the frame allowing the yarn to wrap around the outer pin, Dc in the FLL.
Repeat from * to the desired length.
You can choose the frequency of the long loops. Here I have worked one long and one short loop, but you could choose to work, say, two short and one long loop.
 
Multiple Loop Braid
This braid is thick, perhaps it would make a good frill or edging. For this technique you need an open ended frame, with the open end uppermost.

Start as previously with the slip-knot around the LH pin, Ch1 and Dc in FLL.
(without turning, wrap the yarn around the Right-hand (RH) pin from front to back and Dc in FLL) repeat once more.
[There are now 3Dc around the loop on the LH pin and 3 loops around the RH pin.]
 *Turn the frame, allowing the yarn to wrap around the frame, bring the hook up and under all 3FLLs at the same time and make 1DC
(without turning the frame wrap the yarn around RH pin and Dc under all FLLs together) repeat once more.
[There are now 3Dc around the 3 loops on the LH pin.]
Repeat from * to the required length.
 
Asymmetric Braid
While you could use this technique to create a fabric or insert, edging one side with slip stitches creates a perfect fringed edging.
Start as previously, with a Slip-Knot around the LH pin and the working yarn around the RH pin, but this time keep the knot close to the LH pin.
Ch1 and Dc in the FLL as close to the LH pin as possible.
*Turn the frame
Bring the hook up under the FLL, catch the yarn and pull up a loop,  [2 loops on hook]
Yarn over the hook (YO) [3 loops]
Place the hook under the FLL again, catch the yarn and pull up a loop, [4 loops]
YO the hook and pull through all 4 loops on hook.
Turn the frame and Dc in FLL as close to the pin as possible.
Repeat from * to the required length.
The braid can be used as it comes off the frame but adding a slip-stitch in each of the short loops it creates a very usable edging.
 
Fringed Braid
Simply adding cut lengths of yarn to the loops of the Asymmetric Braid creates a more joyous fringe!
Indeed you could do the same to any of the braids we've made so far. Personally I think keeping the loops short before adding the tassels looks better.
 

Victorian Lace
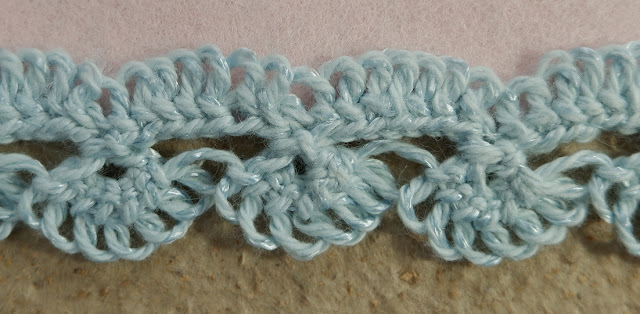
Now that I have introduced the idea that we can use the Hairpin frame in different ways, here's a method the Victorians used to create a quick yet delicate edging lace. Traditionally the lace was made using a delicate crochet thread, and the result can easily be mistaken for tatting. 
 
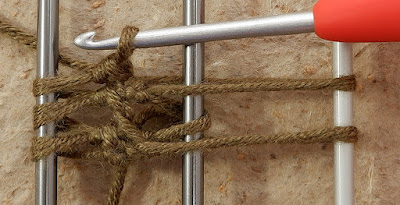
It requires a narrow open ended Hairpin held with the open end uppermost.
Start with a slip-knot loop dropped over both pins, with the knot at the back and central, catch the yarn under the loops, pull through and Ch1 above the loops.
Do not turn the frame.
*( Put the hook under the FLL,
using the left hand, wrap the working yarn around the outside of the LH pin, from front to back.
Catch the yarn from behind the pin, pull through the loop and work a Dc)
Repeat until there are 5Dc running up along the inside of the LH pin.
Ch2 between the pins.
Turn the frame from the left to right so that the yarn wraps around the empty pin from front to back. Remove the hook and reinsert from the front.
Put the hook under the FLL, catch the yarn from behind the pin, pull through a loop and make a Dc.
Repeat from * to the required length.

Endless possibilities are possible by altering the number of Dc per side and by adding, removing or linking the crossing chains.

This 2nd example is made as follows;
*make 7Dc on one side of the frame, do not add any crossing chains, make 7Dc on the other side of the frame, make a Slip-stitch over the last crossing and repeat from * to the required length.

Even if you never intend to pick up a Hairpin frame, I hope you are enjoying these examples of the versatility of crochet...

... fastening off