
... or, Beyond Shepherd's Knitting.
I've noticed that Shepherd's Knitting is becoming more mainstream lately, but there is so much more to Slip-Stitch crochet. So, I have curated a small collection of stitch patterns in an effort to open the door a crack wider. You will find all the information you need on 'How to Slip-Stitch Crochet' in last months post.

There is so much we could talk about here, and so many ways we could compare the stitches. Let's just start with Rib stitches.
Rib stitches
Slip-Stitch Rib is as basic as it gets. It makes a thick, warm fabric which stretches mainly vertically.

To
produce this sample start with a reduced height turning Chain and
placing the hook under both loops, slip-stitch in each stitch across.
The symbol for a slip-stitch is very dull so the chart for this pattern would simply be something like this:
Back-Loop Rib is the most commonly used rib stitch. It makes a thinner and very elastic rib which stretches mainly vertically.

To produce this pattern slip-stitch under the back-loop only of each stitch across.
I have decided to break with convention here, in the chart I am showing the back-loop stitch simply as an upside down U. My chart looks like this:


Inverse Front-Loop Rib is remarkably similar to Back-Loop Rib. It takes some practise to create an even looking fabric. My sample is a little flatter and very stretchy but less elastic than the back-loop version. To produce this sample inverse slip-stitch under the front loop only.

We can think of a Back-loop stitch as similar to an inverse Front-loop stitch. Equally a Front-loop stitch is very similar to an inverse Back-loop stitch.
I am not aware of a symbol for an inverse stitch so I am identifying it as a U with a i to represent the 'i' of inverse. My chart looks like this:

Slip-Stitch Ridges is made using twisted stitches. It isn't really elastic and takes practise and patience. I can't imagine when I would ever use this stitch but I would be remiss if I left it out. I demonstrated how to make twisted stitches in the last post.

The chart might look like this:

Ric Rac Rib is incredibly stretchy and elastic vertically, it wants to spring back into place. It has some stretch width wise as well. This is where Slip-stitch crochet starts to get really interesting. Notice as you work this stitch that when you make a Front-loop stitch you create a little vertical bar on the surface of your fabric. When you make a Back-loop stitch you create a little horizontal bar. 

To produce this sample work over an even number of stitches repeating the following two rows.
Row1; Front-loop slip-stitch in the first stitch, Back-loop slip-stitch in the next stitch, repeated across the row.
Row2; Back-loop slip-stitch in the first stitch, Front-loop slip-stitch in the next, repeated across the row.
I've charted it like this:

Flying Birds might not be a rib stitch at all. It makes a textural low-relief rib that stretches more vertically than horizontally. I've chosen to include it at this point because it is made from exactly the same stitches as Ric Rac Rib.

To produce this sample work over an even number of stitches, but this time repeat only one row; Front-loop slip-stitch in the first stitch, Back-loop slip stitch in the next, repeated across the row.
The chart quickly shows how, despite being made from the same stitches, these two samples differ:

Stacking Boxes. So far I have been giving you little bites of information about slip-stitches. I like to think of this as Slip-stitch physics. I hope, now that I hit you with all the same information again in one big wallop, it will be easier to swallow! If an inverse Front-loop stitch is the same as a Back-loop stitch, and an inverse Back-loop stitch is the same as a Front-loop stitch, then this sample should be the same as Ric Rac Rib. It is certainly very similar.

To produce this sample work over an even number
of stitches repeating the following two rows.
Row1; inverse Front-loop,
inverse Back-loop slip-stitch repeated across the row.
Row2; inverse Back-loop,
inverse Front-loop slip-stitch repeated across the row.  To produce this sample slip stitch into the front-loop only of each stitch.
I've charted it like this:


Fusilli. My partner named this because it reminded him of the spiralling pasta! It is the sister stitch to Stacking boxes as it uses the same stitches. Which makes it the inverse version of Flying birds, similar to- but not quite the same! To produce this sample work over an even number of
stitches, but this time repeat only one row; inverse Front-loop slip-stitch in
the first stitch, inverse Back-loop slip stitch in the next, repeated across the
row.
To produce this sample work over an even number of
stitches, but this time repeat only one row; inverse Front-loop slip-stitch in
the first stitch, inverse Back-loop slip stitch in the next, repeated across the
row.

You can compare the charts:


Cable Stitches
What is the difference between a cable and a rib? In my mind a cable is merely a vertical rib!
Furrow stitch. The photo really doesn't do justice to the wonderful texture which instantly reminded me of a ploughed field. Unlike all the other stitch combinations so far this one stretches in all the directions! I would suggest you make the foundation row with a hook one size smaller than for the rest of the fabric. I've used a 4mm followed by a 5mm hook.

To produce this sample work over an even number
of stitches repeating the following two rows.
Row1; inverse Front-loop, Back-loop slip-stitch repeated across the row. Row2; Back-loop,
inverse Front-loop slip-stitch repeated across the row.
I've charted it like this:

Stacking wedges. Looking at Furrow St, I wondered if I could make the furrows wider. This low relief stretchy fabric is the result.

To produce this sample work over a multiple of 4 stitches plus an additional 2. The extra two stitches work like a border and allow you to repeat only the one row;
inverse Front-loop slip-stitch in each of first two stitches, Back-loop slip-stitch in each of next two stitches, repeated across the row finishing inverse Front-loop slip-stitch in last two stitches.
The chart makes this easier to understand:

Trellis Stitch has amazing vertical stretch but lacks elasticity. It also has stretch on the horizontal and diagonal. How a fabric stretches affects how it might be used. A heavy weight sweater, for instance, would make this fabric longer and thinner. However if the pattern was turned horizontally it might have good drape and flexibility.

To produce this sample work over an even number of
stitches, repeating only one row; Front-loop slip-stitch in
the first stitch, inverse Back-loop slip stitch in the next, repeated across the
row.
The chart looks like this:

Criss Cross Cable. Trellis stitch is my favourite discovery so far, but as we've discussed there are limitations in how it might be used. I decided to copy what I had done with Stacking Wedges and double up the stitches. This dense deeply-ridged undulating fabric is the result. The fabric has all round stretch and is much more elastic than Trellis stitch. 

To produce this sample work over a multiple of 4 stitches repeating only one row. Front-loop slip-stitch in each of first two stitches, inverse Back-loop slip-stitch in each of next two stitches,
repeated across the row.
The chart makes this easier to visualise:

Garter Stitch
In most slip-stitch dictionaries this would have appeared near the beginning along with Purl stitch and other basics. I've found some friends for it to play with so it gets it's very own sub heading!
Garter Stitch looks like a flat rib and like rib stitch it stretches vertically but not horizontally.

You don't really need a chart for this but I made one anyway!

Inverse Garter Stitch has a crisp finish and a little more elasticity making this well worthy of the inclusion. 

To produce this sample inverse Back-loop slip stitch in each stitch across.

Twisted Garter Stitch is included here for novelty value only! As you can see from my very untidy swatch I think it's of limited use. Like Slip-stitch Ridges it uses Twisted stitches but this time in the Front-loop only. 

To
produce this sample make the foundation with a normal size of hook but
make the Front-loop twisted slip-stitches with a much larger hook. I used
a 4mm hook for the base rows and a 7mm hook thereafter.
The chart might look like this:

Flat Stitches
Purl Stitch. So far all the stitches we have looked at have been reversible. They look the same on both sides. This is a single sided pattern that has a tendency to curl inwards from the top and bottom. The reverse looks a lot like Garter stitch. It also stretches like Garter stitch. 

To produce this sample work over any number of stitches repeating the following two rows.
Row1; Front-loop slip-stitch across.
Row2; Back-loop slip-stitch across.

Flat Stitch must be ironically named as it naturally tries to curl up. This makes it useful for rolled hems. It is also a single sided pattern. The reverse looks like Garter stitch. 

To produce this sample work over any number of stitches repeating the following two rows.
Row1; Front-loop slip-stitch across.
Row2; inverse Back-loop slip-stitch across.

Mesh Stitch is a very flat, flat stitch! 

To produce this sample repeat the following row over an even number of stitches.
Front-loop slip-stitch in the first stitch, inverse Front-loop slip-stitch in the next, repeated across the row.


Waffle Weave is a textured version of Mesh Stitch.
To produce this sample repeat the following row over an even number of stitches. 

Back-loop slip-stitch in the first stitch, inverse Back-loop slip-stitch in the next, repeated across the row.

Moss Stitch has multi directional stretch and makes an interesting light weight fabric.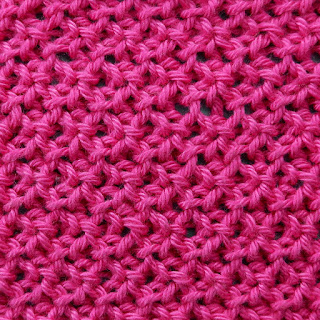

To produce this sample work over an even number
of stitches repeating the following two rows.
Row1; Front-loop, inverse Back-loop slip-stitch repeated across the row. Row2; inverse Back-loop,
Front-loop slip-stitch repeated across the row.

Corded Slip Stitch
is made using Twisted slip-stitch. Unlike the other versions using
twisted stitches this is fun and easy to make giving a very even
pattern. I imagine it would be great for making shopping bags.  To
produce this sample make a Twisted slip-stitch,
placing the hook under both loops slip-stitch in each stitch across.
To
produce this sample make a Twisted slip-stitch,
placing the hook under both loops slip-stitch in each stitch across.


You will have noticed that all these stitches have very simple repeats, so I have left you plenty to experiment with! There are more slip-stitch posts planned for you over the next few months.
Fastening off...


