Search This Blog

Friday, 15 April 2022

Long Hook Crochet Techniques: How to Crochet Tatting.

    
This month, armed with a copy of
Harper's Bazar from February 1868, I have been teaching myself to Cro-Tat. Previously I'd thought that Cro-Tat was one of those new-fangled inventions that should have a 'Trade Mark' after the name. How wrong can you be! So, if I start writing like a Jane Austen novel and declaiming 'herewith' and 'hereto' you will understand why!   
   This will be the last of my Long Hook posts, but I've saved the best until last. The beauty of this technique is that it can be combined with other crochet stitches. Traditional Tatting is normally done with a little pointed shuttle, although I've seen it being done it's still a complete mystery to me. Fortunately, Crochet Tatting uses techniques that will already be familiar to you. In fact I have already written a post about making a Tatted Picot. All you need is a special hook and to learn some new language.    
    The hook needs to be extra long and of even width. Prym make hooks in 1, 1.5 and 2mm widths. If you want to use a thicker yarn you might consider using the Clover double ended hooks I was using in an earlier post, a short Tunisian hook or a straight shafted Bamboo hook. It is helpful if the head is 'inline' and slightly smaller than usual. 
   The thing that I have found hardest is matching the right yarn to the right hook size. The yarn needs to be tightly spun so cotton crochet thread is ideal as it is unlikely to split. While learning the techniques I have been using the 2mm Prym hook and have found that the size of yarn for that hook is something like Schachenmayr Cantania which is a mercerized cotton yarn with a recommended hook size of 2.5-3.5mm. The 1.5mm hook worked well for me with a No6 Anchor Freccia crochet thread. With the 1mm hook a No10 thread can be used.

   There is some new language that we need to learn. It begins with the Double Stitch (DS) or Double Knot (DK). This is made by picking up two loops on the hook. The first is a Plain loop, the second a Purl loop.
    To make the plain loop, take the working yarn over the forefinger to form a loop. Insert the hook from left to right under the back of the loop and up into the centre. Let the loop fall onto the hook.
Follow this up with the purl loop. Wrap the working yarn over the forefinger again, to form a loop. This time insert the hook from right to left under the back of the loop and up into the centre. Let the loop fall onto the hook.
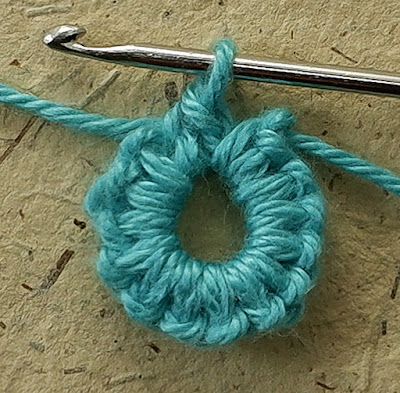
As you can see from this illustration, I began with a slip knot on my hook and then made a group of closely spaced double-stitches. We are now ready to form these stitches into a loop or ring. There are two methods that I have been using. They both begin in the same way.
    Take the working yarn under the little finger to form a long loop. Catch the thread with the hook and carefully pull through the first double-stitch.
I find it helpful to keep the long loop on the finger for the first stitch only and then release it. I am also careful to pull through one double-stitch at a time. If you make a mistake it is easy to pull the working yarn out by it's tail and start again.
In order to ease the loop through the stitches, hold each stitch at the base with the hook facing down and slightly forward.
    Now we are ready to create a Double Stitch Ring. This first method is the simplest. Place your hook through the end of the long loop of working yarn. Then grasp the back of the right-hand loop and pull up. This closes the left-hand loop around the hook.
Now simply pull the working yarn to close the right-hand loop.
To form this crescent into a closed ring merely pull the left-hand stitch through the right hand.
For ease of clarity I am referring to this as a Double Stitch Ring. The method of joining given in the 1868 instructions is a little more complicated.
   The Double Stitch Circle is the second method. This time when you pull the on the right-hand loop, allow the left-hand loop to just disappear into the end of the double stitches. Now you can continue to pull the working yarn and close the right-hand loop.
To form the circle, yarn over the hook...
and pull through the stitch on the hook.
Place the hook under the bar at the end of the crescent...
...Yarn over, and pull through both stitches on the hook. 
I find this method unnecessarily complicated but there is a reason you might want just one loop on your hook after forming the double-stitches into a crescent.
    Here I have made six crescents
(each of 6 double-stitches) leaving that right-hand loop on the hook each time. I joined all of these as follows: yarn over the hook and pull through first stitch only, *yarn over the hook and pull through the next two stitches together, repeat from*. When there was just one stitch left I joined to the beginning.
    Now that we have learnt how to make the little 'motifs' we need to be able to join them together.
Motifs can of course be linked with standard crochet stitches. All the stitches can be made with the Tatting hook, however I've found it much easier to swap to a standard hook for those parts of the design.
    The simplest way to join two rings together is to pull up a loop in the adjoining ring
as the next ring is being made. To do this place the hook between two double-stitches, yarn over and pull through. Leave this loop on the hook and work it off as the new ring is formed.
    Alternatively
this can be done by using Picots. The picots also have a decorative function. This is sometimes written simply as P in a pattern. Sometimes it is indicated with - .
    Picots are formed by leaving a gap between double-stitches.
Now we can form this into a ring in the normal way.
When the adjacent ring is made, instead of making the first picot, pull up a loop in the neighbouring picot.
These two motifs are now sharing that picot between them. The size of the picots is changed by altering the size of gap.
    
    It is sometimes necessary to add a picot to chain stitches that precede a motif. This is done by creating a 1chain-picot.
For each picot; Chain1, enlarge the loop on the hook to the size of the picot. Remove the hook, skip the preceding chain and replace the hook into the next chain stitch.
Continue to make chain stitches, this traps the picot underneath.

 
     There is one last thing to tell you about. I am referring to them as Purl Rings. (in Harper's Bazar they're called 'figures'.)
Make a number of purl loops on the hook. These sit a little closer than double stitches.
To form them into a ring, make a long loop exactly as we did for the double-stitch rings, pull through all the purl stitches and join.
    If you work through the Harper's Bazar article you will also need to know that a Long Treble is a UK Treble-treble or US Double Treble. It's used in this design. You will also find additional information and ideas on this web site.
You'll also find designs in all the usual crochet pattern places. Have fun discovering.
Post Script: Next months blog will be two days late, up on the 17th May.

Fastening off...


Tuesday, 15 March 2022

Long Hook Crochet Techniques: How to Tunisian Crochet in Joined Rounds.

 
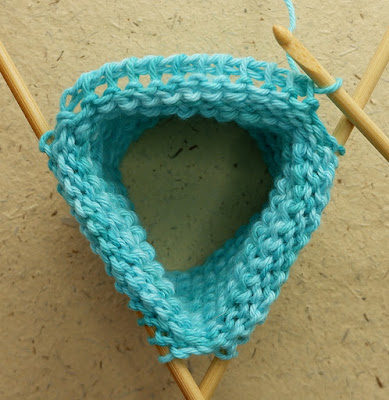
If you have been following my series on Long Hook Crochet Techniques you will be beginning to see why I've been feeling so confused! You may also be thinking that you have already read this post. You haven't! This is all about making joined rounds of Tunisian crochet. You will have seen socks being knitted on a number of small knitting needles. This is what we are going to do but with Tunisian crochet.
It requires multiple double ended crochet hooks and just one ball of yarn.
 
I am going to assume that you can already work Tunisian Crochet. You begin with a joined ring of chain stitches and pull up a loop in each stitch. To keep things simple, my swatch uses 36 stitches which is easily divisible by 3, so I place 12 stitches on each of my three double ended hooks.
Now turn and start working off the stitches; Yarn over and pull through one stitch on the hook.
Yarn over and pull through 2 stitches on the hook, continue until you have worked all the stitches off the first hook.
Slide the remaining loop on to the next hook and continue working off the stitches.
When you are left with just one stitch on the last hook you are ready to join the round. How you join the round depends on the type of stitch you are using.

Knit stitch join:
Drop the last loop off the hook, insert the hook through the first stitch in the round to make a new knit stitch,
replace the dropped loop on the hook, yarn over and pull through all the loops on the hook.
The resulting loop on the hook is the first stitch of the new round.

Alternate Purl stitch join:
The information that I have uses a different purl stitch to the one I am used to. It is a Knit stitch made backwards.
To work this purl stitch: 
Bring the yarn to the front of the work.
Place the hook from back to front, between the vertical loops and under the horizontal chain stitches.
Yarn over from front to back and pull through a loop.

To make the join:
Leave the last loop on the hook, work a purl stitch as above and when you pull the loop through the stitch pull it through the remaining loop on the hook as well.
The resulting loop on the hook is the first stitch of the new round.
 
Standard Purl stitch join:
This is my solution to a standard purl stitch join. 
After the last "pull through 2 loops", hold the yarn to the back of the hook as you turn. (The yarn has come round the back end of the hook to the front.)
Place the hook under the vertical bar from right to left, yarn over the hook from front to back and pull through all the loops on the hook.
The resulting loop on the hook is the first stitch of the new round.

Simple stitch join:
I can find no instructions for this stitch so this is what I came up with. You may come up with a better solution!
Drop the last loop off the hook, insert the hook under the
vertical bar from right to left, insert the hook into the horizontal chain stitch,  replace the dropped loop on the hook, yarn over and pull through all the loops on the hook.
The resulting loop on the hook is the first stitch of the new round.
 
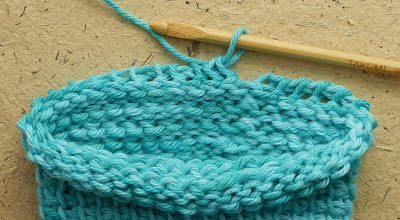
I hummed and hawed about including this post in our Long Hook series. I have not found this information anywhere else online. I am not particularly enamoured by the technique. Probably in most cases working in a continuous spiral will be less complicated and give a better result. However if you are using a particularly tall stitch you might like to give it a try. Now that you have the information you can make up your own mind!

Fastening off...