Crochet is by and large a very lonely occupation, but isn't it wonderful how universal our community is? I never forget that I only get to do this because of all the hook-wielders before me!
Back in June when I was writing about picots, I came across a reference to Tatted Picot in an old crochet book. Frustratingly I could not make head nor tail of the instructions. So when I read a recent blog post by Vashti Braha about Limpet Stitches a light bulb went off in my head. She in turn refers us to some video instructions by Sue Perez / Mrs Micawber. TaDah! all becomes clear to me.
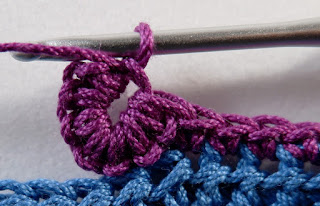
So what is a Tatted Picot? It's a sort of crocodile stitch formed from half-hitches. It may come to us directly from Tatting or through Irish Crochet.
Here's how it's made.
2. Then we create an even number of half hitch pairs. This is where we needed Mrs Micawber. This is what a single pair of half hitches looks like.
3. To make the right-hand loop;
5. To make the left-hand loop;
Place the yarn over your forefinger from back to front.
6. Place the hook through the loop from the back, letting it fall onto the hook.
13. On your next row place a stitch into the chain at the centre of the picot. And another stitch into the left hand side of the picot.
Until Vashti illuminated these instructions for me I had never seen any other reference to these type of stitches. I was wondering when I would ever find the need for such a strange picot, but then 'The guy with the hook', published his stylish Ottomania pattern.
While Mark has cleverly used a sort of inside out bobble, I can now imagine tatted picots used in a similar.
If you would like to try the swatch sample I have produced, these are my instructions (UK terminology).
The pattern needs to be worked over multiples of 4 stitches, plus an extra stitch at each end. I started with 30 stitches.
Row1. Make 30 Foundation Double Crochet (Sc-USA). Turn.
Row2. Chain2 (doesn't count as stitch), Treble Crochet (Dc-USA) in each stitch across. Turn.
Row3. Chain1 (doesn't count as stitch), Dc in each of next 5 stitches, *Dc in next stitch, 1 Tatted picot as described above [No.3to11], skip2 stitches, Dc in next stitch. Dc in next 4 stitches**. Repeat from *to** finishing with a Dc in last stitch. Turn.
Row4. Chain2, *Tr in next 6 dc, Tr in chain-space of picot, Tr in left hand side of picot. Repeat from* across row. Turn.
Row5. Chain1, Dc in first st,
*Dc in next stitch, 1 Tatted picot, skip2 stitches, Dc in next stitch. Dc in next 4 stitches**.
*Dc in next stitch, 1 Tatted picot, skip2 stitches, Dc in next stitch. Dc in next 4 stitches**.
Repeat from *to**
finishing with Dc
in next stitch, 1 Tatted picot, skip2
stitches, Dc in next stitch and a Dc in last stitch. Turn.
Row6. Chain2, Tr in next 2 dc, *Tr in chain-space of picot,
Tr in left hand side of picot, Tr in next 6 dc. Repeat from* across row.Turn.
By altering the number of half hitch pairs in the picot, the number of stitches skipped and how tightly they are closed I think that there is plenty here to experiment with!
It only seems fitting at this time of year, the winter equinox here in the UK, that we should celebrate all our fellow hook wielders who help to shine a light on our craft! Seasons Greetings to one and all.
P.S. This year I have been blogging every fourth Tuesday, and while that makes sense for me, I've finally realised it makes no sense for you at all. So from now on I will be blogging every 15th of the month. That way you'll know when there is new content. Of course you can always sign up for the email notification!


No comments:
Post a Comment