Search This Blog

Thursday, 15 June 2023

Hair Pin Lace 2- Beyond Basic Braid

Have I got some gems for you today! 
Last month I talked about how to make Basic Hairpin Lace. I have some more advanced braids today which I hope will inspire you. I am using a 2"/5cm loom and Schachenmayr Catania 4ply cotton throughout. Varying the width of the frame and the weight of the yarn can have a big impact on how the finished braid looks. You can go as delicate or chunky as you like.   
 Two Double Crochet 
The Braid we made last time used just a simple Double Crochet (Sc-US) on either side. Let's start by looking at two Dc (Sc-US) per side.
START as you would normally:
Make a slip-knot loop and place it over the frame with the knot in the centre and the working yarn to the back of the frame;
Place the hook under both loops, catch the working loop and pull it back to the front;
And now working over both loops, catch the working yarn again and pull through the loop on hook to create a Chain1.
Place the hook under the Front Left-hand Loop (abbreviated to FLL from now on)
and work two Dc (Sc-US).
*Remove the hook from the loop. Turn the frame, as if turning a page from right to left, and allowing the yarn to wrap around the frame. Replace the hook in the loop.
Catch the working yarn above the work and Ch1.
Make 2Dc in the FLL.
Repeat from * to the desired length.
 
Double Crochet Front and Back Left-hand Loop
Now lets try something that sounds the same but gives us a surprising result.
Start as instructions above.
*Place the hook under FLL and work a Dc.
Place the hook, from above, under Back Left-hand Loop (BLL), 
and work a Dc.
Turn the frame as before, catching the yarn above the work and Chain1.
Repeat from * to required length.

Three Treble Crochet
We aren't restricted in the height of stitch that we use or even the number of stitches we use.
Start as before.
Place the hook under the FLL and make three Treble (Dc-US).
*Turn as before, catching the yarn in the centre of the frame, above the work, Ch1.
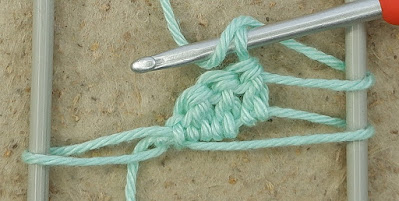
Work 3Tr in FLL.
Repeat from * to the required length.

Three Chain, One Double Crochet
In contrast this braid has a much more lacy feel.
Start as before.
Dc in FLL.
*Turn the frame, catching the yarn in the centre and Chain3.
Make a Dc in FLL.
Repeat from * to required length.

Treble, three Chain, Treble
The addition of treble stitches makes this braid more lacy still.
Start as before.
*Place the hook under the FLL and make Tr, 3Ch, Tr.
Turn as before, catching the yarn in the centre with a Ch1 and repeat from * to the desired length.

Chain2 Loop
This was a puzzle to me in the beginning so be careful it doesn't catch you out!
Start as before with a Chain1
Now Chain2 and Dc under FLL.
*Turn the frame, catch the yarn above the work, Ch1 and Dcx2 under the first ch2-loop. Do Not Turn!
Ch2 and Dc into FLL.
Repeat from * to required length.
 
Bullion Stitch
I would have told you that Bullion stitch was my nemesis but somewhere along the way I seem to have finally picked up the required skills to make this sample. If you also struggle you might want to look at the post I wrote about Crochet Tatting for some handy hints. If this doesn't prove you can use any stitch you like to make hairpin braid, I don't know what will!
Start as before.
 *Put the hook under the FLL, pull up a loop [2 loops on hook]
(YO the hook, put hook under FLL, pull thru a loop) x2 [6 loops on hook]
YO the hook and pull thru all loops on hook. [bullion st made]
If you have trouble making the stitch, try keeping the tension of the working yarn light, pull the yarn thru the loops on the hook two at a time, and try holding them at the base with fingers of the left hand while pulling down on them as you pull the hook thru.
 
Turn the frame, catching the yarn above the work with a Ch1. Repeat from * to required length.

Next month I'll have some more unusual examples for you, which I hope will convince you that Hairpin lace is good for more than just making shawls!

fastening off...


Sunday, 14 May 2023

How to Make Hairpin Lace Crochet- Basic Braid


Hold onto your hats I think it's going to be a mini-series! 
I've been selfishly hogging on to some Hairpin Lace information for a while now but I think it's about time to share it with you. When I say Hairpin Lace, what do you think of? It's is one of those crochet disciplines I thought I'd never want to use. We tend to see it used in a very bold manner to make loud shawls and throws. But wait! It can also be subtle and adaptable, I think I can surprise you. So let's dip our collective toes in the water and see where it takes us!
 
The Tools 
Depending on where you are in the world you might find the hairpin frames hard to source. The more traditional hairpin shaped frames are hard to find here in the UK, so look for second hand, this particular one may be from the 1980s. They come in fixed sizes but on the up side, are light weight and easy to use.
This style of loom is called a quad frame. This particular one is by Simplicity Boyle and adjusts in half inch increments up to four inches. It's a bit clunky and heavy. It is possible to make your own or have a look for craftsman-made frames. 
I had to show you this, the Empire. Dating from pre war, perhaps? It's not strictly speaking a quad frame for crochet, but the principal is the same. Mine has two sizes of adjustment and is surprisingly good for making hairpin crochet, although it's a little heavy.

Getting Started
 
The braid is usually made in pairs of loops. To make it easier to keep track of where you are it's helpful if you mark one side of the frame. Tie on a piece of yarn, daub a dot of nail varnish or wrap with a length tape.
You will of course need a crochet hook. Despite the fact that the Boyle frame is inexplicably supplied with a 5.5mm hook, the size of hook you need is reliant on what yarn you use!
Now you need to decide how to hold the frame. As a rule the open end should be held facing down. This allows you to make lace strips of any length. On the other hand, holding the open end upwards makes the frame easier to hold and the strips easier to work!

Basic Braid

While I love that crochet has very few rules it does get frustrating when I need to show you how to do something! So, there are two basic ways to get started.

Option One
Make a slip knot and place it around both prongs of the frame. Align the knot to the centre of the frame.
Take the working yarn to the back of the frame. Hook the yarn from underneath the starting loops.
Yarn over the hook from above the starting loops...
...and chain one.
For your first stitch place the hook between the two loops on the left. (Of course if you are left handed you would reverse these instructions.)
Pull up a loop...
...Yarn over the hook, and pull through both loops on the hook to form a Double Crochet (UK, Sc US). 
Now turn the frame by bringing the right hand edge of the frame forward and allowing the yarn to wrap around the frame. The hook will end up on the back. So, at the same time you need to bring the hook back to the front. You can do this either by slipping the hook through the frame or by removing the hook before turning and re-inserting it in the stitch afterwards.
As I mentioned earlier, your stitches are made in pairs. They are also only made on the left hand side of the frame. This is why we needed to mark one side of our frame. 
For the second stitch make another Double Crochet (Sc-US). That's the first pair of stitches made.
Turn the frame again, allowing the yarn to wrap around the frame as you do, and bring the hook back to the front.
On the left you now have another unworked loop formed by turning the loom. Place the hook between the two strands of this loop and form a Double Crochet (Sc-US) as we did before. 
Turn the frame again and remember to make an even number of loops.
When you need to remove the loops from the frame run a thread through the loops first to keep them in order.
 
Option Two
You may come across other ways to get started.
This version begins by making a slip knot but this time you place it around one prong only.
Allow the slip knot to sit in the centre of the frame with the working yarn at the back of the loom.
Turn the frame as before, bringing the right edge forwards and allowing the yarn to wrap around the edge.
Place the hook between the two loops, pull through a loop of yarn, yarn over the hook and pull through the loop to form a Chain one.
Work a Double Crochet (UK, Sc-US) exactly as before. Continue turning the frame, moving the hook and forming Double Crochet stitches in the newly formed loops always on the left.
That's normally where the instructions for Hairpin Lace end, but there is so much more that I am excited to show you. We can replace those Double Crochets with almost any crochet stitch that you can imagine. Then comes how to join the strips, they can become a whole fabric, an insert, a fringe or a doily. We can form them into shapes or add beads. I can't wait to give you more ideas. 
 
Fastening off...