Search This Blog

Thursday, 15 September 2022

Crochet Slip-stitch in the round.

Continuing my mini Slip-stitch series this month I've been looking at Slip-stitch designs worked in the round. This is the sort of work which is more usually known as Shepherd's knitting or Bosnian crochet. 
All the designs I am going to show you are worked in continuous rounds. If you've never worked a Slip-stitch fabric before you'll find all the information you need to get going in this post, How to Crochet Slip-stitch. Shall we get started?
 
Shepherd's Knitting
Or Back-Loop Only Slip-st is a fairly stable stitch with little stretch. The fabric pattern is created by the unused front loops.
Set up your foundation by working a row of Chain, any number. Do not join the chain row into a loop, instead Slip-st into the Back-Bump of the very first chain to form a loop. This is your first stitch so don't tighten it as you would normally. Slip-st into the Back-Bump of each chain to the end. You are now ready to begin the pattern.
Slip-stitch into the Back-Loop Only of each stitch working in continuous rounds.

 
Flat Stitch
Or Front-Loop Only Slip-st. 
 
It's very similar to the version (right) which is worked in rows except that it creates a more uniform diagonal design and just like that stitch it really wants to roll itself up vertically. This makes it useful for rolled cuffs and hems or hat brims.
After making a foundation of any number of stitches, Slip-st into the Front-Loop Only working in continuous rounds.

Horizontal Stripes
By working alternate rounds of Back-Loop Only and Front-Loop Only Slip-st you can create stripes. I've varied the number of rounds in each stripe to give you an idea of what can be achieved.
Begin with a foundation of any number of stitches. Work in continuous rounds. In my sample I have begun with 4 rounds Back-Loop Only, 4 rounds Front-Loop Only.

Diagonal Stripes
The Problem with one directional crochet is that as the stitches sit on top of each other obliquely, so if you attempt to work vertical stripes this is what you end up with. The pattern naturally leans to the right, unless you are a left-handed crocheter and then you will have a left-handed lean!
In this sample my stripes each have 5 stitches so the number of stitches in my foundation was divisible by 10. I simply repeated (5 Back-Loop Only, 5 Front-Loop Only) continuously around.

One Colour Bosnian Braid
This design and the next are based on the ones in Therese De Dillmont's Encyclopedia of Needlework. 
Due to that right leaning nature of one way crochet, if you try to create a flat strip of braid working in rows in one direction only, the ends will end up diagonal rather than square. So should you want to make a braid for a strap or belt then I suggest that you work in a continuous loop and cut the braid open at one end when it is finished. You will need to seam or seal the ends in some way. Of course you can also use the pattern on a garment worked in the round.
For this example I set up my foundation using a multiple of 6 stitches.
    Round 1&2: Slip-st in back-loop only.
    Round 3&4: Slip-st in front-loop only.
    Round 5&6: Back-loop only.
    Round 7 to 14: (Back-loop only in next 3 stitches, Front-loop only in next 3 stitches) repeat around. Begin each new round one stitch later so that the strips lean to the left. (Or to the right if you are a leftie!)
    Round 15&16: Back-loop only.
    Round 17&18: Front-loop only.
    Round 19: Back-loop only around and fasten off.
 
Two Colour Bosnian Braid
By using colour-work techniques to create a design and with the unused threads carried behind the work we can create a very stable, hard-wearing and thick design as is done in Korsnas sweaters. This design is also based on one in De Dillmont's Encyclopedia. You will notice how some of the design leans to the right and some to the left. To get the design to lean to the left those rounds are started one stitch to the left. I have achieved this by adding in an extra stitch at the start of those rounds.
The design is worked entirely in Back-Loop Only Slip-st. Here's what I did:
Create a foundation using a multiple of 18. [As I was trying to replicate De Dillmont's design I made life difficult for myself. The two parts of the pattern have a different stitch repeat. I could of course have changed the pattern on rounds 3,4&5 to be multiples of 6. As it is written here, on the last repeat on Round 3,4&5 adjust the number of ColA stitches to make up for the odd stitch count.]
    Round 1&2: with ColA Back-Loop Only around.
    Round 3,4&5: (with ColA 3 sts, with ColB 2 sts) repeat around.
    Round 6,7&8: with ColA Back-Loop Only around.
    Round 9,10&11: with ColB Back-Loop Only around.
    Round 12: (ColB 3sts, ColA 3sts, ColB 3sts, ColA 9sts) repeat around.
    Round 13&14: (ColB 4sts, ColA 3sts, ColB 3sts, ColA 9sts) once only, (ColB 3sts, ColA 3sts, ColB 3sts, ColA 9sts) repeat around.
    Round 15,16&17: (ColB 4sts, ColA 3sts) once only, (ColB 3sts, ColA 3sts) repeat around.
    Round 18,19&20: (ColB 4sts, ColA 3sts, ColB 3sts, ColA 9sts) once only, (ColB 3sts, ColA 3sts, ColB 3sts, ColA 9sts) repeat around.
    Round 21,22&23: with ColB Back-Loop Only around.
De Dillmont's design now finishes with a repeat of Rounds 1to 8 but I'd had quite enough of colour-work by this point!

Diagonal Weave
The lovely faux woven texture in this sample is simply made by alternating blocks of Diagonal Stripe. In this example blocks are 4 rounds high by 4 stitches wide but you can make the pattern any width or height.
In this sample I began with a foundation using a multiple of 8 stitches.
    Round 1 to 5: (Front-Loop Only x 4sts, Back-Loop Only x 4sts) repeat around.
    Round 6 to 9: (Back-Loop Only x 4sts, Front-Loop Only x 4sts) repeat around.
    Round 10 to 13: (Front-Loop Only x 4sts, Back-Loop Only x 4sts) repeat around.
Repeat rows 6 to 13 to desired length.
 
Stairway to Heaven
I was clearly feeling creative when I named this. It is simply a one stitch wide diagonal stripe but I think it is my favourite pattern in these examples.
To make it begin with a foundation of even numbered stitches.
(Front-Loop only in the next stitch, Back-Loop only in the next stitch) repeat around continuously.

Twill Weave
I thought I had finished this post when an obvious variant to 'Stairway to Heaven' popped into my head and I just had to try it. It's exactly the same but made over an odd number of stitches. This makes the diagonal stripe lean in the other direction. The fabric lies a little flatter without the diagonal ribbing effect of the stairway pattern.
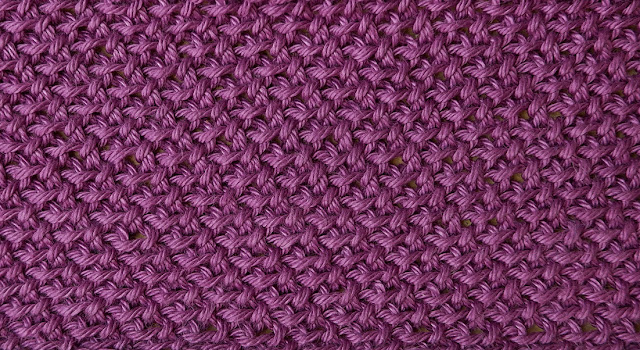
Begin with an odd numbered foundation.
(Front-Loop only in the next stitch, Back-Loop only in the next stitch) repeat around.
Continue working continuously to the desired length.

Under the Board Walk
I have had a few attempts at creating patterns using inverse Slip-stitches unsuccessfully. I tried to recreate Garter stitch in the round, instead, this is what I ended up with. It actually looks like Inverse Garter stitch on the reverse side, but I like the pattern that I have achieved. The fabric lies very flat.
There was also much discussion about what to name this stitch. My crochet-confident was adamant the name should express the churning waves. Should you know different then please put us both out of our misery!
Start with a foundation using any number of stitches.
    Round 1: inverse Back-Loop Only in each stitch around.
    Round2:  Front-Loop Only in each stitch around.
Continue alternating these two rounds to the desired length. 
 
I am absolutely sure that there are plenty of other stitch combinations and patterns for me still to discover.
 
Fastening off...


Monday, 15 August 2022

The Olive Leaf Rug

 
Having two large dogs means that easy to clean features high on my agenda especially when it comes to flooring. I have been on a voyage of discovery and think that I have finally found the solution in a machine washable crochet rug.
    It was by no means easy. I needed to find a material that is heavy enough to make a substantial rug but light enough not to break the washing machine and flexible to fit inside the drum. The yarn has to be too big to get caught in dogs claws and strong to withstand a little rough and tumble. Finally I found Woolyknit's Chunky rug yarn.
It comes in an enormous single skein weighing around 2kgs. The weight is important because there is a limit on the weight you can put in your washing machine. While my machine claims to take up to 6kgs in one load it can only handle 2kgs of wool.
The yarn has a lightly felted construction and is about 5mm thick. While this absolutely will not get caught in a dog claw it poses new problems. It is not going to create long graceful crochet stitches without first breaking my arm. So where do I go from here?
Rather than waste any of my precious yarn I grabbed the thickest yarn I had and started trying out stitch patterns. I quickly came to realise that slip stitches are perfect for this extra thick yarn.
Eventually I was ready to make a swatch with the Rug yarn. But what hook size is right? Too large a hook and the work is loose flat and stretchy. Too small a hook and the work is tight, slow and hard on the hands. After a false start I went with the 15mm hook. By weighing the swatch and weighing the yarn I could work out the approximate number of stitches and rows I could make altogether. By measuring the swatch I was also able to decide on the ideal size for my rug. But before I started there was on more thing to do, wash the swatch. This yarn blooms slightly when washed. The yarn relaxes and puffs up, it also evens out the stitches.
So no more excuses, it's time to begin. The plan is to work 51 stitches alternating Front loop, Back Loop slip stitch in each row. To make things simple I began and ended ever row with a front loop stitch. This way I could instantly tell if I had made a mistake and I didn't have to keep track of whether I was on a front or back row.
I used a chain1 turning-chain at the start of each row. There was another false start when I realised the starting chains were too loose, making the first few rows wider than the rest of the rows. The turning chains were also too tall making the edges of the rug ripple. I came down to the 12mm hook for the starting row only and made sure to pull those turning chain tight. From there on it was plain sailing, once I'd realised that it was easier to work with a knife hold on the chunky 15mm hook. I finished the rug with a row of slip stitches so that both ends of the rug matched.
When I had finished I washed the rug (and didn't break the washing machine). I laid it out on a couple of old towels. It required some stretching and manipulating before stoking it into shape from the centre outwards, but it dried quickly with nice even stitches.
Shadow gave it his full seal of approval the minute I laid it down! In the past when I've tried something and it's gone wrong, I've given up thinking it was a failure. Now I see difficulties as problems requiring a solution. I hope I've given you some encouragement to solve something you're having difficulties with.

fastening off...


Friday, 15 July 2022

Compendium of Crochet Slip Stitches

 ... or, Beyond Shepherd's Knitting.

I've noticed that Shepherd's Knitting is becoming more mainstream lately, but there is so much more to Slip-Stitch crochet. So, I have curated a small collection of stitch patterns in an effort to open the door a crack wider. You will find all the information you need on 'How to Slip-Stitch Crochet' in last months post.
All of the stitches that I am showing you today are worked in rows, so, to and fro or back and forth. I have mainly used a hook which is 2mm larger than the size recommended by the yarn band. I am using a reduced height turning chain at the start of each row. Where I have known the name of a stitch I have used it, but for the stitches that I have discovered myself I have named them myself. I am not good at naming things! 
There is so much we could talk about here, and so many ways we could compare the stitches. Let's just start with Rib stitches. 
Rib stitches
Slip-Stitch Rib is as basic as it gets. It makes a thick, warm fabric which stretches mainly vertically.
To produce this sample start with a reduced height turning Chain and placing the hook under both loops, slip-stitch in each stitch across.
The symbol for a slip-stitch is very dull so the chart for this pattern would simply be something like this:

Back-Loop Rib is the most commonly used rib stitch. It makes a thinner and very elastic rib which stretches mainly vertically.
To produce this pattern slip-stitch under the back-loop only of each stitch across.
I have decided to break with convention here, in the chart I am showing the back-loop stitch simply as an upside down U. My chart looks like this:

Inverse Front-Loop Rib is remarkably similar to Back-Loop Rib. It takes some practise to create an even looking fabric. My sample is a little flatter and very stretchy but less elastic than the back-loop version.
To produce this sample inverse  slip-stitch under the front loop only.
We can think of a Back-loop stitch as similar to an inverse Front-loop stitch. Equally a Front-loop stitch is very similar to an inverse Back-loop stitch.
I am not aware of a symbol for an inverse stitch so I am identifying it as a U with a i to represent the 'i' of inverse. My chart looks like this:

Slip-Stitch Ridges is made using twisted stitches. It isn't really elastic and takes practise and patience. I can't imagine when I would ever use this stitch but I would be remiss if I left it out. I demonstrated how to make twisted stitches in the last post. 
To produce this sample make the foundation with a normal size of hook but make the Back-loop twisted slip-stitches with a much larger hook. I used a 4mm hook for the base rows and a 7mm hook thereafter. 
The chart might look like this:

Ric Rac Rib is incredibly stretchy and elastic vertically, it wants to spring back into place. It has some stretch width wise as well. This is where Slip-stitch crochet starts to get really interesting. Notice as you work this stitch that when you make a Front-loop stitch you create a little vertical bar on the surface of your fabric. When you make a Back-loop stitch you create a little horizontal bar. 
To produce this sample work over an even number of stitches repeating the following two rows. 
Row1; Front-loop slip-stitch in the first stitch, Back-loop slip-stitch in the next stitch, repeated across the row. 
Row2; Back-loop slip-stitch in the first stitch, Front-loop slip-stitch in the next, repeated across the row.
I've charted it like this:
  
Flying Birds might not be a rib stitch at all. It makes a textural low-relief rib that stretches more vertically than horizontally. I've chosen to include it at this point because it is made from exactly the same stitches as Ric Rac Rib.
To produce this sample work over an even number of stitches, but this time repeat only one row; Front-loop slip-stitch in the first stitch, Back-loop slip stitch in the next, repeated across the row.
The chart quickly shows how, despite being made from the same stitches, these two samples differ:

Stacking Boxes. So far I have been giving you little bites of information about slip-stitches. I like to think of this as Slip-stitch physics. I hope, now that I hit you with all the same information again in one big wallop, it will be easier to swallow! If an inverse Front-loop stitch is the same as a Back-loop stitch, and an inverse Back-loop stitch is the same as a Front-loop stitch, then this sample should be the same as Ric Rac Rib. It is certainly very similar.
To produce this sample work over an even number of stitches repeating the following two rows. 
Row1; inverse Front-loop, inverse Back-loop slip-stitch repeated across the row. 
Row2; inverse Back-loop, inverse Front-loop slip-stitch repeated across the row.
I've charted it like this:

Fusilli. My partner named this because it reminded him of the spiralling pasta! It is the sister stitch to Stacking boxes as it uses the same stitches. Which makes it the inverse version of Flying birds, similar to- but not quite the same!
To produce this sample work over an even number of stitches, but this time repeat only one row; inverse Front-loop slip-stitch in the first stitch, inverse Back-loop slip stitch in the next, repeated across the row.
You can compare the charts:

Cable Stitches
What is the difference between a cable and a rib? In my mind a cable is merely a vertical rib!
 
Furrow stitch. The photo really doesn't do justice to the wonderful texture which instantly reminded me of a ploughed field. Unlike all the other stitch combinations so far this one stretches in all the directions!  I would suggest you make the foundation row with a hook one size smaller than for the rest of the fabric. I've used a 4mm followed by a 5mm hook.
To produce this sample work over an even number of stitches repeating the following two rows. 
Row1; inverse Front-loop, Back-loop slip-stitch repeated across the row. Row2; Back-loop, inverse Front-loop slip-stitch repeated across the row.
I've charted it like this:
 
Stacking wedges. Looking at Furrow St, I wondered if I could make the furrows wider. This low relief stretchy fabric is the result.
To produce this sample work over a multiple of 4 stitches plus an additional 2.  The extra two stitches work like a border and allow you to repeat only the one row;
inverse Front-loop slip-stitch in each of first two stitches, Back-loop slip-stitch in each of next two stitches, repeated across the row finishing inverse Front-loop slip-stitch in last two stitches. 
The chart makes this easier to understand:
 
Trellis Stitch has amazing vertical stretch but lacks elasticity. It also has stretch on the horizontal and diagonal. How a fabric stretches affects how it might be used. A heavy weight sweater, for instance, would make this fabric longer and thinner. However if the pattern was turned horizontally it might have good drape and flexibility.
To produce this sample work over an even number of stitches, repeating only one row; Front-loop slip-stitch in the first stitch, inverse Back-loop slip stitch in the next, repeated across the row.
The chart looks like this:

Criss Cross Cable. Trellis stitch is my favourite discovery so far, but as we've discussed there are limitations in how it might be used. I decided to copy what I had done with Stacking Wedges and double up the stitches. This dense deeply-ridged undulating fabric is the result. The fabric has all round stretch and is much more elastic than Trellis stitch. 
To produce this sample work over a multiple of 4 stitches repeating only one row. Front-loop slip-stitch in each of first two stitches, inverse Back-loop slip-stitch in each of next two stitches, repeated across the row.
The chart makes this easier to visualise:

Garter Stitch
In most slip-stitch dictionaries this would have appeared near the beginning along with Purl stitch and other basics. I've found some friends for it to play with so it gets it's very own sub heading!
 
Garter Stitch looks like a flat rib and like rib stitch it stretches vertically but not horizontally. 
To produce this sample slip stitch into the front-loop only of each stitch.
You don't really need a chart for this but I made one anyway!

Inverse Garter Stitch has a crisp finish and a little more elasticity making this well worthy of the inclusion. 
To produce this sample inverse Back-loop slip stitch in each stitch across.

Twisted Garter Stitch is included here for novelty value only! As you can see from my very untidy swatch I think it's of limited use. Like Slip-stitch Ridges it uses Twisted stitches but this time in the Front-loop only. 
To produce this sample make the foundation with a normal size of hook but make the Front-loop twisted slip-stitches with a much larger hook. I used a 4mm hook for the base rows and a 7mm hook thereafter. 
The chart might look like this:

Flat Stitches
Purl Stitch. So far all the stitches we have looked at have been reversible. They look the same on both sides. This is a single sided pattern that has a tendency to curl inwards from the top and bottom. The reverse looks a lot like Garter stitch. It also stretches like Garter stitch. 
To produce this sample work over any number of stitches repeating the following two rows. 
Row1; Front-loop slip-stitch  across. 
Row2; Back-loop slip-stitch across.

Flat Stitch must be ironically named as it naturally tries to curl up. This makes it useful for rolled hems. It is also a single sided pattern. The reverse looks like Garter stitch.  
To produce this sample work over any number of stitches repeating the following two rows. 
Row1; Front-loop slip-stitch  across. 
Row2; inverse Back-loop slip-stitch across.

 Mesh Stitch is a very flat, flat stitch! 
To produce this sample repeat the following row over an even number of stitches.
Front-loop slip-stitch in the first stitch, inverse Front-loop slip-stitch in the next, repeated across the row.
 
Waffle Weave is a textured version of Mesh Stitch.
To produce this sample repeat the following row over an even number of stitches. 
Back-loop slip-stitch in the first stitch, inverse Back-loop slip-stitch in the next, repeated across the row.
 
Moss Stitch has multi directional stretch and makes an interesting light weight fabric.
To produce this sample work over an even number of stitches repeating the following two rows. 
Row1; Front-loop, inverse Back-loop slip-stitch repeated across the row. Row2; inverse Back-loop, Front-loop slip-stitch repeated across the row.

Corded Slip Stitch is made using Twisted slip-stitch. Unlike the other versions using twisted stitches this is fun and easy to make giving a very even pattern. I imagine it would be great for making shopping bags. 
To produce this sample make a Twisted slip-stitch, placing the hook under both loops slip-stitch in each stitch across.

 You will have noticed that all these stitches have very simple repeats, so I have left you plenty to experiment with! There are more slip-stitch posts planned for you over the next few months.

Fastening off...