Search This Blog

Showing posts with label slip-stitch increases. Show all posts

Wednesday, 15 March 2023

How to Increase and Decrease in Slip-stitch Crochet.

    
To round off my season of Slip-stitch crochet there are a couple of things we haven't talked about yet. I've spent the last month making a number of short-row crochet projects and my learning curve has taken a steep climb. Suddenly I have more information to share with you. So, let's look at how to increase and decrease in Slip-stitch crochet.
    It immediately strikes me that despite this being a necessary topic, it makes for a dull Blog post. But hang on until the end, I've attempted to jazz it up for you!

Decreasing
    Let's start with decreasing because that's dead simple! Decreasing with slip stitches is no different from any other type of crochet, you place the hook in two stitches, the difference here is, of course, that you don't pull up a loop in the stitches. I'm using a second colour to make it easier for you to see what I am up to.
 
Here I am working in Back-loop-only stitches. Once the hook is in both stitches, yarn over the hook...
 ...and pull through all three loops on the hook.
 
As the first example was in Back-loop-only, here I am showing you the same thing in Front-loop-only.

 
You could skip a stitch in between the two stitches if you want a bigger decrease...
 
...or you could put the hook into three adjacent stitches.

 
Increasing
    Increasing is just a bit different to the standard method and leads to a number of solutions. 
 
Method1:
This is done by adding a Chain1 where ever an increase is required.

 
Method2:
This time we make two Slip-stitches into the same stitch, the second slip stitch is anchored by the succeeding stitch.

 
Method3:
This is the more traditional method and is done over two stitches, the instructions look a little mad. At first glance it looks as if we are removing stitches.
    make a Slip-stitch in the first stitch...

...make a decrease using that same stitch, which already contains a stitch, and the next one

...make another Slip-stitch in the second stitch which already contains the decrease.
So two stitches become three.

Method4:
If you need more than one increase, try this.
    make a Slip-stitch in the first stitch...
 ...make a decrease using that same, first stitch and the next one
...make another Slip-stitch in the second stitch which already contains the decrease.
 ...make a decrease using that second stitch and the next one
...make another Slip-stitch in the third stitch which already contains the decrease.
So three stitches become five.
Zigzag Rib
    Now that we know how to increase and decrease it must be easy to work up a Chevron or Zigzag. You may remember that I talked about how to make Zigzags back in 2021. All you need to do, I told you, was to increase and decrease by the same number of stitches. Oh how my words came back to haunt me! With taller crochet stitches you can put as many stitches as you like into a previous row stitch. But it is not so easy with Slip-stitches. I nearly drove myself crazy trying to work it out!

Here is a solution that I found for Zigzag Rib: 

All the stitches are made into the Back-loop only. I have used Method4 to increase.
I worked over a repeat of 13 stitches, plus 3 for the end and turning chain. So begin with a multiple of 13+3 chain.
 
Row1. 
Decrease over first 2sts,
*Slip-st x5,
(Decrease over last and next st, Slip-st in last)x2, 
Slip-st x4,
Decrease over next 2sts,
repeat from* to end of starting chain, chain1 and turn.
 
Row2.
Decrease over first 2sts,
*Slip-stx5,
(Decrease over last and next st, Slip-st in last)x2, 
Slip-stx4,
Decrease over next 3sts skipping the central st,
repeat from* to last two sts, at which point decrease over last two sts only, chain1 and turn. 

Repeat row2 to desired length.

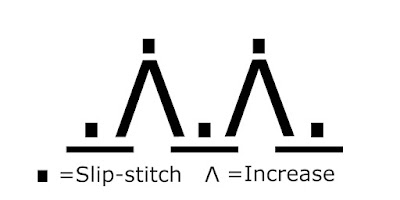
Here's a little chart to help, the funny little upside down V's represent the decreases. They indicate which stitches the hook goes into.
 

This was actually my second solution to this problem so I am certain that you will discover something more elegant.

Fastening off...


Saturday, 15 October 2022

Double Helix Mat


    If you've been reading my recent blog posts you will know that I have been on a mission to make some machine-washable rugs. Now I do like a circular rug, don't you? But here's the problem, how do you make a circular shape using only slip-stitches? How many increases do you use? How do you increase using slip-stitches? These are the kind of questions that used to keep me awake at night, but not any more! Let me tell you how I found the solutions.  
    Although slip-stitch crochet is sometimes referred to as Shepherd's knitting or Bosnian crochet it is one of the oldest types of crochet and appears all over the world. So, I was surprised to find very little information to solve my problems. Faced with this wasteland of knowledge there is only one thing to do and that is to get out the hooks and yarn and start crocheting.

        Let's cut through lots and lots of swatching and tell you what I did! I started with a 'reverse slip-knot'. Just in case you haven't met this useful trick before, you simply hold the yarn the opposite way round when forming the knot. So hold the tail end in the hand which normally holds the working yarn and make the knot. By doing this you can tighten your first stitch by pulling on the tail.
    Next I made six chains. Six, it turns out, is the number of increases we need per round and working in a continuous spiral turned out to be the easiest way to go. So, I don't join the stitches into a ring.

   Back Loop Slip-stitch is the easiest type of slip stitch to use, so let's go with that! Making two slip stitches in the same stitch is how I made the increases. It feels odd but it is the secret behind the swirl. So, for round two I made two Slip-stitches into the back loop of each chain. Now I can tighten the tail of that slip-knot to reduce the size of the first chain. It helps to form the start of the spiral and close up the centre of the rug.
 
    As you know if I place my increases as per the standard formula I will end up with a hexagon. I showed you another solution back in November last year. It's better but after a while it gives you a Dodecagon, a 12 sided polygon. I am not great with maths and I cannot even begin to work out this conundrum. My brain simply refuses to work in such an abstract way. I need to physically see the problem and then I have a brain wave. I start thinking about Spirograph. I could imagine that instead of allowing the increases to stack up on top of each other I merely needed to move them one increment, one notch, one stitch to the right. It may not be THE perfect solution but what it gave me was quite unexpected. 

It helps to use a stitch-marker at the start of each round so that you know when you have reached the end of that round. I've added a chart of the first few rounds to the pattern, so that you can see what it is you are doing. Slip-stitches are usually written as dots in crochet charts. It makes Slip-stitch patterns very difficult to read, so I have drawn them as 'l' and 'V' for increases.
    You can follow the pattern for as many rounds as you wish. When you are two rounds away from your chosen size you need to do something different. Those increases leave a little bump on the final round which we need to smooth out. So, on the penultimate round I recommend that you work an even round of slip-stitches without any increases.
I like to work an edging row to properly finish off my rugs and mats. For the final round I find that 'inverse Back Loop' stitches work really well. I am finally beginning to understand how these intriguing slip-stitches work so I think I need to explain the physics to you as they are quite different to normal crochet stitches.

    A standard crochet stitch has a vertical stem and the top of the stitch sits horizontally on the top, just like the little symbol we use to identify it. But the slip stitch has no stem so the top of the stitch falls to the front of the work. It also means that the last round you've made sits bunched up on the previous round until the a new round is made. It means that the work begins to curl. The solution is the inverse stitch where the top of the stitch falls to the back of the work. Here's how to work the inverse back loop stitch...  
Bring the working yarn to the front of the work...
Insert the hook through the back loop, from back to front...
Yarn under the hook and pull through both the stitch and the loop on the hook.

    All difficulties are now solved. Using the same Super chunky rug yarn from Woolyknit that I used in my last rugs but this time with a smaller 12mm hook I was able to make 43 rounds with increases, followed by the even round and finished on the 45th round with inverse back loop stitches. It all sounds terribly easy doesn't it? But, even as I needle joined my last stitch I still had my heart in my mouth. It wasn't entirely flat. After washing I laid out every single blocking mat I had and relying on my new found belief in the physics of slip-stitches I blocked the rug. I realised that I had to increase the diameter of the rug to match it's circumference. I stretched the rug out from the centre to open up those bunched up rounds, until the rug lay flat and round.

    I am sharing the pattern with you so that you can play with the design. It doesn't have to be a rug, it could be anything from a coaster to a cushion cover. It does need to be made in a block-able fabric and you will have to work out what hook size works best for your yarn. I have given you over 50 rounds, I am confident that you will see how to add even more rounds if you wish. Don't forget to make the final two rounds without increases.

    Here's the link to the PDF pattern.

Fastening off...