Search This Blog

Tuesday, 8 May 2018

Crochet Tips: Buttonholes

My last post led me to thinking about buttonholes so here is my mini guide. I've made some diagrams so I hope that most of my examples are self explanatory. So often in patterns I've seen buttons stuck through any old hole in the fabric, and yet button bands are so easy to do.
 I'm assuming that most of the time you will be working a button band. The very easiest way is to make a band of Double Crochet stitches (SC-USA) so that the holes will stand vertically. To make the 'hole' you simply chain a few stitches skipping the same number of stitches in the previous row. In the next row you work into the chain stitches. Here's the diagram...
 And here's what it looks like...
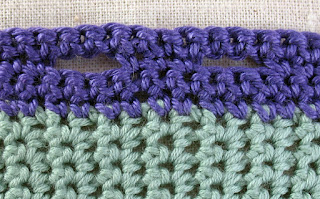
It might be a good time to point out that due to the stretchy nature of the crochet fabric it's always a good idea to make the holes smaller than you think they need to be! Heavy buttons can distort the fabric so they're best avoided.
The next example is made a little bit more interesting by using Half Treble Stitches (HDC-USA).
Here's what it looks like...
Remember my Janelle cardigan using Linked Stitches? I added a button band to it using Double Crochet worked into the back bump of the previous rows. (You have to work the stitches from the right side of the fabric only, so don't turn!)
   Here's the diagram...
And here's what it looks like as a swatch...
Let's get a bit fancier. I used this when making a ribbed button band. Please be aware that because you are using taller stitches the button hole will be bigger. (Yes - you know I made my button holes too big!)
 Here's the swatch...
Perhaps you want something a bit more exciting. This one looks a bit fancier.
Here's the swatch...
The next one is more of a button loop than a hole!
Here it is...
My last example is going to require some explanation. Perhaps you want your button hole to lie horizontally in a band? Or you would like to make a vertical hole in the fabric and not add an additional band at all?
The explanation is a bit like a dot-to-dot picture. When you are at the point where you would like the button hole to be, you work the fabric on one side of the hole, ie follow arrows 2,3 and 4. At the top of the hole, slip stitch down the edge of the rows you have just made, arrow 5. Now you can make the fabric to the other side of the button hole, ie follow arrows 6,7,and 8. (I used chain stitches at the start of each row but left them out of the diagram as it would have been way too confusing!)
Once you've made all the buttonholes you go back along the top, Row9.


I hope these examples have given you a starting point and have inspired you to create some really stunning button holes!

Tuesday, 24 April 2018

Crochet Tips: Cords, Drawstrings, Handles and Buttonholes.

Every now and again you're going to want to crochet some sort of cord. I know nothing about this subject so I thought I'd go on a voyage of discovery. This is what I've found out so far!
 Up to now I've only ever used chain stitches or french knitting. I learnt french knitting as a child, when wooden cotton reels were still an everyday item. Now I use the fancy Prym french knitting mill. It definitely speeds up the process, but it does have it's limitations. The mill prefers a smooth 4 ply yarn. What it produces is basically a hollow stretchy tube. 
None of the modern books on my shelf mention any kind of crochet cord. Instead I've had to go time travelling back to the 70's and 80's. Let's start with the most simple forms. I'm saving the best till last!
This sweetie is just a length of chain stitches with slip stitches made into the 'back bump'.
This one has slip stitches made into the top loop only. The finish is a little looser.
Here I've simply woven a number of threads through the chain stitches. You could also use ribbon or even a length of metal chain.
In this example I've actually made the chain stitches around the extra threads. You have to pass the threads between the hook and the working yarn. It took a few attempts to get it right. I definitely prefer this to the woven version.
 Next, for your consideration I've got Irish Crochet cord. I'm not sure if you can really call it cord, but it would certainly be good for button loops. All it is is a number of threads of yarn which you Double crochet (Sc) around twice. Like this:
Have you heard of a Lucet? I think they're also called knitting forks. Having dipped into this on the Internet I've discovered that this is an art form all on it's own. If you'd like to find out more you could start by visiting the video made by It's all in a Nutshell here.
If you'd like to try it out before having to rush out and spend money have a go at this.
Tape together two crochet hooks of the same size. Luckily I just happen to have two! Start with a slip knot on the left hook and the yarn end hanging down in front.
Wrap the yarn around the hooks as I've done. Some instructions tell you to turn the 'Lucet' but it doesn't matter as long as you always work in the same order.
Use another crochet hook to pick up the left hand loop and lift it over the yarn wrap into the centre.
Now pick up the right hand loop, lift it over the yarn wrap and into the centre. Keep repeating these three actions, wrap the yarn, lift the left hand loop into the centre, lift the right hand loop into the centre. 
Here are a couple I made earlier! (Don't forget to wash the sticky tape off your hooks before you use them next time!!)
 Now we get to the really fun bit. This is where I'm feeling a bit smug. I found a few versions of the instructions for Basic Crochet Cord or Caterpillar Braid. It took me a few attempts to work out what to do but I love the result.
Start with a larger hook than usual and I'd also suggest a non splitty yarn, try to keep things loose, at least to start with.
 Chain 2,
Double Crochet (Sc) into the 2nd chain from the hook,
Turn the work and look for the two vertical bars on the left,
Double crochet (Sc) into those two bars,
*Turn the work and Double Crochet (Sc) into the two bars on the left.
Repeat from * to the required length.
Once you've got the hang of the basic cord you can try these variations. This one I'm calling 'Topsy Turvy Braid'. It looks different on the front and back.
To make this one follow the instruction above turning it twice to the right to establish the braid. Then turn it alternately to the left and then the right. When you turn it to the left insert you hook underneath the working yarn, not over the top of it. You'll see what I mean when you get there!
This one is much easier! I'm calling it 'Half Treble (Hdc) Caterpillar braid'. Instead of making Double Crochets into those parallel stitches try Half Trebles.
Or try using Trebles (Dc), like this example.
Why not go wild and make a three Treble (Dc) cluster into those parallel bars! Well really you could get carried away, but I thought that I'd better stop there.
What ever you do, have fun!


Tuesday, 10 April 2018

Crochet Tips: The Humble Dc Part 2

If you thought that we'd tortured the poor Double Crochet enough already, well that's nothing compared to what it will suffer this week! It could be argued that these offerings are not Double Crochet at all. That's why I decided to blog about them separately. (Just a reminder that we are talking about Single Crochet in USA terminology.)
Let's start with Extended Dc because it makes a good comparison with the others. The best way I can describe this is that it is a Dc standing on the shoulders of a chain st. The image above is from the front, worked from the front only.
The stitch is begun as for a normal Dc, when there are two loops on the hook the next Yarn Over is pulled through the first loop only creating the 'chain'. Now Yarn Over again and pull through both loops to form the Dc. 
What it does is to create a stitch about the same height as a Half Treble (Hdc) but without the bulk.
This is the same stitch on reverse.
Now compare this with Knotted Stitch. (This is where you might like to argue with me and say this is a Half Treble!) I would describe this as a Dc standing on the shoulders of a Slip stitch. 
Start by Yarn Over the hook, before you put the hook in the next st. Pull up a loop and pull it through the 'Yarn Over' only. That's the slip st. Now finish the stitch as if it were a Dc, that is Yarn over and pull through both loops on hook. Oh this stitch is made from the front only.
If you work the same stitch 'to and fro' then suddenly it is called Counterpane Stitch. (I'm wondering if that translates into American, my dictionary tells me it was traditionally a quilted bed covering. Americans might say Afghan.)

If you've already got a hook out and you're trying out these stitches then you're as weird as I am! It's these teeny tiny differences between stitches that fascinate me. If on the other hand your head is swimming well I can only apologise. For those of you who are even more pedantic than me, I did think that I should have included Crab stitch and Loop stitch too!

(Please can someone tell me if Americans have counterpanes even if you're reading this in a year's time. You're still only be the third person to visit!)