Search This Blog

Wednesday, 15 March 2023

How to Increase and Decrease in Slip-stitch Crochet.

    
To round off my season of Slip-stitch crochet there are a couple of things we haven't talked about yet. I've spent the last month making a number of short-row crochet projects and my learning curve has taken a steep climb. Suddenly I have more information to share with you. So, let's look at how to increase and decrease in Slip-stitch crochet.
    It immediately strikes me that despite this being a necessary topic, it makes for a dull Blog post. But hang on until the end, I've attempted to jazz it up for you!

Decreasing
    Let's start with decreasing because that's dead simple! Decreasing with slip stitches is no different from any other type of crochet, you place the hook in two stitches, the difference here is, of course, that you don't pull up a loop in the stitches. I'm using a second colour to make it easier for you to see what I am up to.
 
Here I am working in Back-loop-only stitches. Once the hook is in both stitches, yarn over the hook...
 ...and pull through all three loops on the hook.
 
As the first example was in Back-loop-only, here I am showing you the same thing in Front-loop-only.

 
You could skip a stitch in between the two stitches if you want a bigger decrease...
 
...or you could put the hook into three adjacent stitches.

 
Increasing
    Increasing is just a bit different to the standard method and leads to a number of solutions. 
 
Method1:
This is done by adding a Chain1 where ever an increase is required.

 
Method2:
This time we make two Slip-stitches into the same stitch, the second slip stitch is anchored by the succeeding stitch.

 
Method3:
This is the more traditional method and is done over two stitches, the instructions look a little mad. At first glance it looks as if we are removing stitches.
    make a Slip-stitch in the first stitch...

...make a decrease using that same stitch, which already contains a stitch, and the next one

...make another Slip-stitch in the second stitch which already contains the decrease.
So two stitches become three.

Method4:
If you need more than one increase, try this.
    make a Slip-stitch in the first stitch...
 ...make a decrease using that same, first stitch and the next one
...make another Slip-stitch in the second stitch which already contains the decrease.
 ...make a decrease using that second stitch and the next one
...make another Slip-stitch in the third stitch which already contains the decrease.
So three stitches become five.
Zigzag Rib
    Now that we know how to increase and decrease it must be easy to work up a Chevron or Zigzag. You may remember that I talked about how to make Zigzags back in 2021. All you need to do, I told you, was to increase and decrease by the same number of stitches. Oh how my words came back to haunt me! With taller crochet stitches you can put as many stitches as you like into a previous row stitch. But it is not so easy with Slip-stitches. I nearly drove myself crazy trying to work it out!

Here is a solution that I found for Zigzag Rib: 

All the stitches are made into the Back-loop only. I have used Method4 to increase.
I worked over a repeat of 13 stitches, plus 3 for the end and turning chain. So begin with a multiple of 13+3 chain.
 
Row1. 
Decrease over first 2sts,
*Slip-st x5,
(Decrease over last and next st, Slip-st in last)x2, 
Slip-st x4,
Decrease over next 2sts,
repeat from* to end of starting chain, chain1 and turn.
 
Row2.
Decrease over first 2sts,
*Slip-stx5,
(Decrease over last and next st, Slip-st in last)x2, 
Slip-stx4,
Decrease over next 3sts skipping the central st,
repeat from* to last two sts, at which point decrease over last two sts only, chain1 and turn. 

Repeat row2 to desired length.

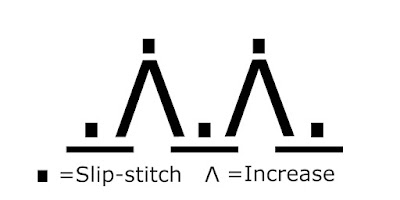
Here's a little chart to help, the funny little upside down V's represent the decreases. They indicate which stitches the hook goes into.
 

This was actually my second solution to this problem so I am certain that you will discover something more elegant.

Fastening off...


Wednesday, 15 February 2023

How to Join Slip-stitch Crochet Ribbing

    
Up until recently Slip-stitch crochet has felt, for me, rather like groping around in the dark. Finally it's all beginning to make sense! To round off my mini Slip-stitch series there are some things I missed out.
As a reminder I've talked about:
  • how to Slip-Stich crochet, here
  • a mini Slip-Stitch dictionary, here
  • how to Slip-stitch in the round, here, with more designs
  • a round Slip-stitch rug design, here
  • how to make crochet ribbing, here.
At last I can talk intelligently about how to join Slip-stitch crochet and ribbing panels. So let's start with the simplest method first. It just happens to be perfect for joining ribbing.
     
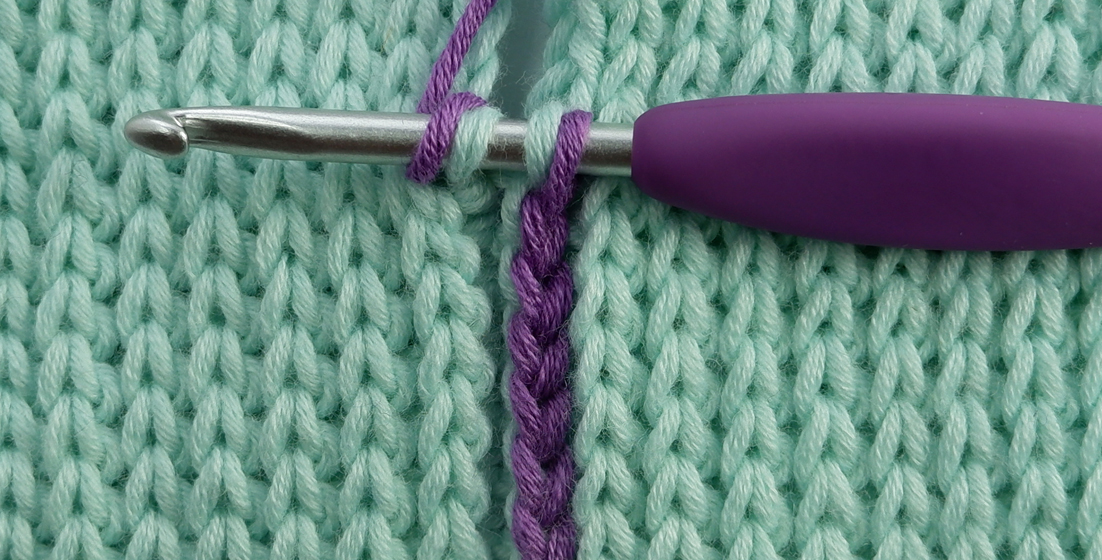
    What we are going to do is use surface crochet. It feels a bit weird and not intuitive. This is where we need to apply our Slip-stitch knowledge. What we have to remember is that if we work a back-loop-only stitch it leaves behind the front loop creating a little line. But, if we work a front-loop-only stitch you get a different result. This first method is equivalent to making a row of Back-loop stitches. Let's dive in and hopefully you will see what I mean!
    I need you to pretend that my two little swatches here are one whole piece of ribbing, like a cuff perhaps, which we are joining. At the end of the last row I have made one chain because we are about to make a new row. I have joined in a different colour so that you can see exactly what is happening.

As we are making surface crochet, I now need to keep my working yarn to the back and my hook to the front.
Now, here comes the non-intuitive bit! Take the hook to the right and put it under the Back-loop, from the right.
Immediately take the hook to the left and put it under the Front-loop, from the left.
Yarn over the hook and pull through all three loops on the hook. That's your first stitch made.
Repeat this for each stitch along the row.

Tah dah!
You now have a pseudo line of rib which joins your work and is invisible to all but you!

    The second method is done with a needle, like mattress stitch. It is the equivalent of making a row of Front-loop stitches.
Once again I have joined in a different colour and I am beginning with a chain stitch.
Once the chain stitch is made, cut the yarn about twice as long as the seam you are about to join and thread a darning needle.
To begin; push the needle through the end stitch, under the fabric and back out behind the back loop of the first stitch on the right hand side. What you have done is to take the yarn around under that stitch's post. Pull the yarn through.
Now on the left, take the needle down between the two loops of the first stitch and back up between the two loops of the next stitch. Pull the yarn through.
Take the needle back to the right, down where you came out last, around the stem of the next stitch and back out. 
Returning to the left, the needle goes back into the place it came out last, down between the two loops and up between the loops of the next stitch.
The thing to remember is that you go out of and into each stitch.
This creates a join which looks very much like working into Front-loops-only.
Here's a swatch I made using alternating rows of Front-loop and Back-loop Slip-stitch, so you can see how beautifully it mimics the stitches.
 
There must be more joining techniques possible, for more complex  Slip-stitch patterns, depending on where you insert the hook/needle. But for today that's all she wrote!
Fastening off...


Sunday, 15 January 2023

How to Make Tail-end Foundation Chain

I can't honestly believe that I am sitting down to write yet another post about Foundation Crochet stitches but this one is a doozy! I've seen other crocheters making these chains before, but have only just learnt it myself, to leave it out and not share the secret with you would be criminal!

Before we get started let me remind you of some of the variations I've already shared with you. There was the Foundation Stitches post, that you will find here and Foundation Treble, here. That was followed by Foundation Double-chain, here and then I found a Foundation that was perfect for lace crochet. At that point I could not imagine that there could possibly be any other solutions; and yet here we are!
 
But why? I hear you asking! Why do we need all, or even, any of these solutions? Perhaps you love to make chain stitches, personally I hate to. My stitches are either too loose or too tight. This type of chain is very stable and it's easy to make the stitches evenly. But best of all the finish is very crisp and tidy
 
Let me show you. It's so easy you won't believe me until you try! 
 
It's best to start with a Reverse Slip Knot. I've shown you this before but here it is again. All you have to do is to hold your yarn the opposite way round to the usual method. Hold the yarn tail in your left hand and the working yarn in your right.
 
By making the knot this way you can control the size of that first loop. By pulling on the tail end you can close up the loop. This can be very helpful after the next stitch is made or even after the next row is made.
 
Should you make your initial loop too tight you can open it up by holding the working yarn and pulling against it.
 
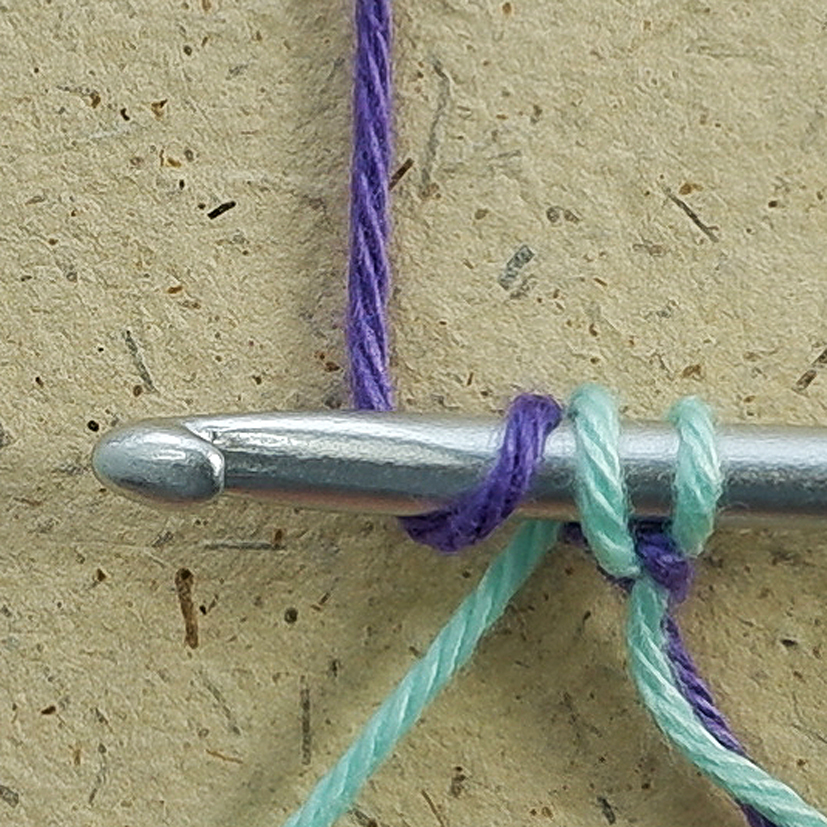
Now we can get started making the chain. In order for you to understand exactly how these stitches are being formed I am using two colours of yarn. In this illustration the pale thread represents the yarn tail. So, although you can clearly see two yarn tails in the next image, I need you to pretend that they are not there!
 
Step One: take the yarn tail over the hook from front to back.
 
Step Two: take the working yarn over the hook from back to front and pull through the two loops on the hook.
That's it! Repeat steps One and Two for each chain stitch required. 
 
The hardest thing is wrangling the yarn. It feels very strange to begin with but if you hold your working yarn as you would normally you can then use your thumb and another finger to work the tail from front to back.
 
Now pass the working yarn from back to front as you normally would, leaving the thumb to control the yarn tail.
 
Here's the finished chain from the front...
... and from the back.
 
To join it into a loop or work back along it with your first row of stitches, treat it as if it is a normal length of chain stitches.  I chose to beginning with a starting chain, and work double crochet (Single crochet-US) stitches into my chain for this example.
You can see how neat and tidy it looks compared to foundation double crochet and makes a very stable edging. It's also so much quicker to make 
than foundation double crochet.
 
There's just one last thing you need to know. I had to ask myself this, the first time I sat down to make these stitches...
How long should you make your tail? Fortunately the maths are easy. The tail needs to be three times the length of your finished length of chain plus 4"/10cms for sewing in at the end!
 
I really hope you'll give it a try, I know that it is a very handy technique to have in your crochet toolbox. 
 
Fastening off...