Search This Blog

Tuesday, 14 August 2018

StarFlower Overlay

As promised here is the sister pattern to the last post.
Sadly I lost my Mum last month so I'm naming this pattern for her. Here she is in better times looking like a real 50's chick.
My Mum was a real inspiration. She was amazingly creative and always curious about the world. Born in London before the second world war she had to live through the horror of the blitz. Like many of her generation she grew up without her father just when she was in her formative years and when he came back he must have seemed like a stranger. 
Here they are together on Alf's first leave.
One of the many things I inherited from my Mum was her love of nature.
Sadly gardening and crochet are unhappy bed fellows. That's why my hands don't often feature on my crochet blog. They end up dry and split after an hour or two at my other hobby!
 Here then is the PDF for Barbara's Borage! It's my favourite of the two patterns, but you will immediately see the similarities. I'm really hoping that someone out there will find a way of putting the two patterns together in something!
Incidentally the last two rounds (rounds7 and 8/8a) are interchangeable with those of Ruby's Rue. You can give your Borage rounded petals or the Rue pointy ones, if you want more options.
Among Barbara's inspirations were Dragonflies and Peacocks plus she had an unnatural penchant for Turquoise! All of these came down to me in my genes, so these are the colours that I'm using.
As with Ruby's Rue, here are the round by round images. Some of the front loop stitches are a little awkward to find. So I have included a few images in the pattern to help you.
Once again made with a DK yarn like Scheepjes Softfun, Softfun Denim and 4mm hook, they are a perfect size for a mug mat. (I like the way the petals wrap upwards to hug your mug!)
  
Made with a 4ply yarn like Scheepjes Cotton 8, Sunkissed and a 3mm hook, they are great for card toppers.
The one I made with Scheepjes Maxi, crochet thread and a 1.75mm hook makes a fabulous little broach. (If I do say so myself!) I think the pointy petals benefit from a light blocking. I soaked mine, squeezed out excess water, sprayed lightly with starch and blocked upside down. I pinned the petals out but didn't stretch them.

I was curious to know what it would look like made in a thicker yarn. So I tryed it in Wendy Supreme Chunky, 100% cotton and the recommended 6.5mm hook. This is the yarn I use for my tutorials because it photographs well but sadly I don't think this is still produced. The finished item comes out with a 20cm/ 8inch diameter. At this size it's big enough for a trivet.
 
The trouble with experimenting is that I never know when to stop! So here it is in a locally hand spun wool and silk mix and 6mm hook. Mum would have loved these colours! I made the central 16 sts around a rubber 'O' ring, and then made the next row through both loops. I think the dreamcatcher (?) might benefit from a few feathers and some beads.


Whatever you chose to do, have fun experimenting!

Tuesday, 31 July 2018

Mug Mat Maybe?

 No it's not a crossword clue it's a mini mandala overlay pattern!
I've had two mini overlay patterns hanging around for sometime, which I've been intending to do something with. I've finally admitted to myself that I'll never get round to it. So I thought that maybe you could do something with them! 
I'm absolutely rubbish at naming patterns, but just as I started writing this the Chinese Meadow Rue came into flower in my garden. (Thalictrum Delavayi) 
Here is the white one nestling in the shade of an Acer. I've made the flowers look massive but the blooms on this incredibly delicate looking plant are only about a centimetre in diameter. So I'm naming this also for Ruby, my rescued Lurcher who is now old and doddery.
Made out of 4ply they are the perfect size for card toppers.
Made out of a thicker (DK maybe) cotton they make excellent mug mats. 

For the Mug mat I've used Scheepjes Softfun and a 4mm hook. I've gone with Scheepjes Sunkissed and Scheepjes Cotton 8 with a 3mm hook for the card toppers. Or for a really cute lighter weight motif you could try a crochet thread like Scheepjes Maxi. This one uses a 1.75mm hook.
Click here to open the Pdf Pattern. I've added a couple of links on the pattern which take you to two of my previous Blogs. If you're unfamiliar with these terms you might find them helpful. Normally I would start a pattern like this with a magic ring but instead I'm using the 'Chain 2' technique I told you about in the last post.
 I've given you two options for the final round, mainly because I hate making decisions!
To save your printer's ink I'm putting the round by round images here.
 The pattern comes with a diagram/chart which will hopefully make stitch placement a breeze. It's the first circular chart I've drawn all by myself. Actually that's not quite true I still had to get some help from Nick, acting as my technical guru! Hopefully the sister pattern to this one won't take as long now I've had some practise. I'm planning to have it ready in a fortnight.
Hope you enjoy using up some of your odds and ends.

Tuesday, 17 July 2018

Magic Ring Alternative

This week I promised you a free pattern. You know what happens to best laid plans?!  But in the mean time here's a little morsel or an update on my previous post about Magic Rings.
Last week was a pretty awful week and it's messed up my plans a bit. As my Grandpa, a seaman used to say, "worse things happen at sea"! Although my pattern is nearly ready to go, my dyslexic brain means I always check, check, check and check again. So sorry chaps but you will definitely have that in a fortnight come hell or high water!

So I've been having a Jen Tyler marathon. I hope you've heard of Jen Tyler from Hooks 'n Tales. She is both barking mad, amazingly sweet and ridiculously talented. She is currently embarking on a "Karoo Vintage Mystery-A-Long".  
Any hoo- I was doing one of her patterns the other day and watching one of her videos when she mentioned a different way to do the magic ring. She claimed to have learnt it from Esther Dijkstra, It's all in a Nutshell. (I can't find it on her Blog.) I know some of us struggle with the Magic Ring. Some of the instructions I've seen also make it look much harder than it is and have you doing some weird thing wrapping the yarn round your fingers!! This struck me as so sensible that I've been using it ever since.

Without a slip knot on your hook Chain one! That's it!
If you are going to Double Crochet (Sc) into the ring, 'Chain One' (that counts as your first stitch)
and continue to make your Double Crochets into the first chain.
If you are going to Treble Crochet (Dc-USA) then Chain Three (that counts as your first stitch)
and continue to make your Trebles into the first chain.
When you've completed your stitches, pick up that loose tail and pull tight!

 It's exactly the same as the way I told you before, but it's a much simpler way of thinking about it, and that's what makes it easier!

So come back in a fortnight and I will DEFINITELY have a freebie for you. Consider it carved in stone!

Tuesday, 3 July 2018

Herringbone Stitches

I am aware that it's a bit odd to be obsessed with the minutiae of crochet! Herringbone Stitch is one that most definitely rings all my bells!
This post is the sister of the last post where I talked about Extended stitches. I described these as a stitch standing on the shoulders of a Chain or Slip stitch. The Herringbone stitch certainly fits into that family. It's the slip stitch at the base that makes it lean to one side.
As usual no one in the crochet world can agree, so there are several examples of Herringbone stitch. The English being eccentric also call it Knotted Stitch! This is my blog so I'm going to decide what seems sensible to me!

I'm calling this Herringbone Half Treble.

 This is what it looks like when worked to and fro.
  This is worked on the right side only.
 Here are the instructions:
Ch2 to start a new row.
Yarn over hook and insert hook in first st,
Yarn over, pull thru st and 1st loop on hook,
Yarn over, pull thru both loops on hook. 
 

Let's call this Herringbone Treble.

First worked to and fro.
Followed by from right side only.
Here are the instructions:
Ch3 to start a new row.
Yarn over hook and insert hook in first st,
Yarn over, pull thru st and 1st loop,
Yarn over, pull thru 1 loop on hook,
Yarn over, pull thru both loops on hook.

If you look back at my book review of Edie Eckman's Crochet Borders you'll see an example of how she has used Herringbone.
Just a short and sweet post this week, but I hope you can find a use for these fabulous stitches. 
 

Tuesday, 19 June 2018

Extended Crochet Stitches

For some reason I thought that we'd already looked at Extended stitches. (I've also found them called Alternative stitches and also Elmore stitches.) As I will be using them in the next post now seems like a good time!!
I keep thinking that I'm running out of things to talk about. I thought I would drag out the next post by breaking it in to two. But as I've been investigating in my stitch dictionaries I've got very excited about this simple stitch. (And I've also decided that I haven't got nearly enough stitch dictionaries!)
So what is an Extended stitch?
Quite simply it is any stitch sitting on the shoulders of a chain stitch. Well that's what the symbol looks like. Sometimes a slip stitch might be used instead of a chain stitch.
These symbols both mean Extended Double Crochet (Sc-USA)
 
Whereas this symbol means the Double Crochet is sitting on a slip stitch.
 Any of these symbols could be used to mean Extended Half Treble (Hdc-USA)

There are lots of reasons why you might want to use an Extended Stitch. Here are all the reasons I could find!
To create a slightly taller stitch than usual.
To create a lighter weight fabric with more drape.
To create a stretchy fabric.
To create texture within the fabric.
To throw stitches off at an angle.
For a height comparison, these samples are as follows; Trebles (Dc-USA), Extended Trebles (Ext Dc-USA), Double Trebles (Tr-USA).
 Here is how you make an Extended Treble (Dc):
Yarn over the hook as if you were making a normal Treble crochet, hook into the next stitch, and pull up a loop;
Yarn over hook and pull through one loop only, that's your chain stitch made;
Now complete your treble stitch as normal.
Following on the left is a block of 10sts x 10 rows of Double Crochet (Sc-USA). It's stiff without much drape. On the right the same sized block of Extended Dc.

Now look how stretchy it is.
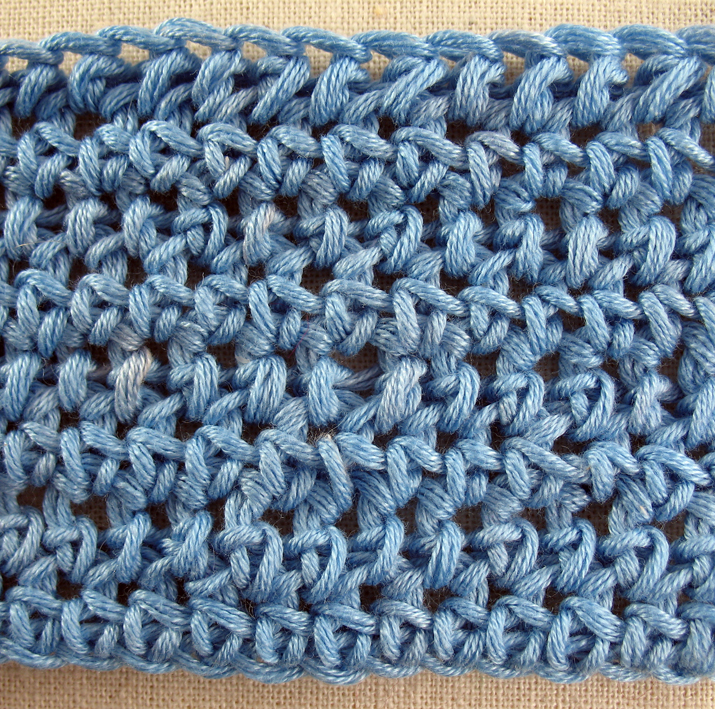
 Compare here Double Crochet Mesh with Extended Dc Mesh. I hope you can see that the Ext Dc Mesh is a much softer fabric with a more 3D texture.

These are both (Extended) Double Crochet cluster stitches using a slip stitch instead of a chain stitch.

 The symbol looks like this.
The second example is exactly the same but made in Front Loops Only. To be honest I didn't enjoy making the second example but if you'd like to give it a try you'll find it in 'The Ultimate Crochet Stitch Bible'! 
This final example uses Extra Extended Dc Stitches (Sc-USA) to create texture.
To make an Extra Extended Dc stitch you simply make two chain stitches before finishing with a Dc. Because the stitch is taller than those around it, it puffs up and also lies at a slight angle. The stitch pattern is: Row1. Dc,ExExtDc,Dc. Row2. Dc across.

Come back in a fortnight for my favourite stitch in this little stitch family! 
 

Tuesday, 5 June 2018

HalfTreble with a twist.

If you are feeling a bit bored and find yourself twiddling your thumbs then grab a hook and have a go at this one. 
Did I mention that I'm crochet obsessed?! I wasn't going to blog about this this week. In fact I had a plan for the next month. But I fell over it in my 1981 Batsford Book of Crochet, by Ann Stearns and got entirely distracted.
 You might remember that we looked at a variation of the Double Crochet (SC- USA), in the Humble Dc part 2. Well this HalfTreble (HDC-USA) is very similar in constructuion but the result is much more interesting. So lets play!
We'll start making it in the way the book suggests.   
Let's start with a length of Double Crochet (Sc), then turn and Chain2 to start the new row.
Here's the bit that makes all the difference. Take the yarn in front of the hook, yarn over from front to back. I find it helps to hold the yarn behind your hook with a spare finger.
Put the hook in the next stitch, yarn over normally and pull up a loop.
You now have three loops on the hook like a normal HalfTreble, the only difference being that you wrapped the yarn initialy from front to back.
Yarn over and pull thru all three loops on hook.
Continue to the end of the row.
Alternate rows of Dc and Slanting Htr. (I've just decided to call it that!) I think the front should be the nobbly side.

Here's what it looks like with just Slanting HTr (no Dc) worked to and fro.
 This one is slanting HTr worked from the front only.
Just for the hell of it I thought I'd have a go and see what happened if I did the same thing with a Treble st. (Double crochet-USA)
It's these idiosyncrasies that keep me hooked to crochet! I don't understand how wrapping the yarn the wrong way round the hook can make this much difference. I don't have a very good brain for physics so I don't understand, for instance, why the Earth doesn't fall into the Sun. I've had people wave bits of fruit at me but it's no clearer.😕So there's no chance that I'll ever understand this! Never-the-less I do hope you'll give it a go and get a chance to use it somewhere!!